


Deploy Your First Action1 Agent
To deploy your first Action1 agent and configure Endpoint Takeover Prevention, you need the Enterprise Admin role.
Important! Each Action1 organization should have at least two Enterprise Admins with Active Action1 Keys. Before deploying agents across your environment, create a second Enterprise Admin account and approve their Action1 Key. If the only administrator loses access to their Action1 Key, contact Action1 Support for recovery assistance. See Configure a Backup Administrator for details.
In the Action1 console, click +Install Agent to open the wizard that will help you:
- Create and protect your Action1 Key.
- Select the endpoint operating system of the target endpoint and download the required agent setup.
- Install the Action1 agent.
By default, your Action1 Key will be stored in the Cloud Storage in encrypted form and protected by the passphrase. To discover or change your current key storage mode, in the Action1 console, navigate to Security | My Account | Action1 Key Settings.
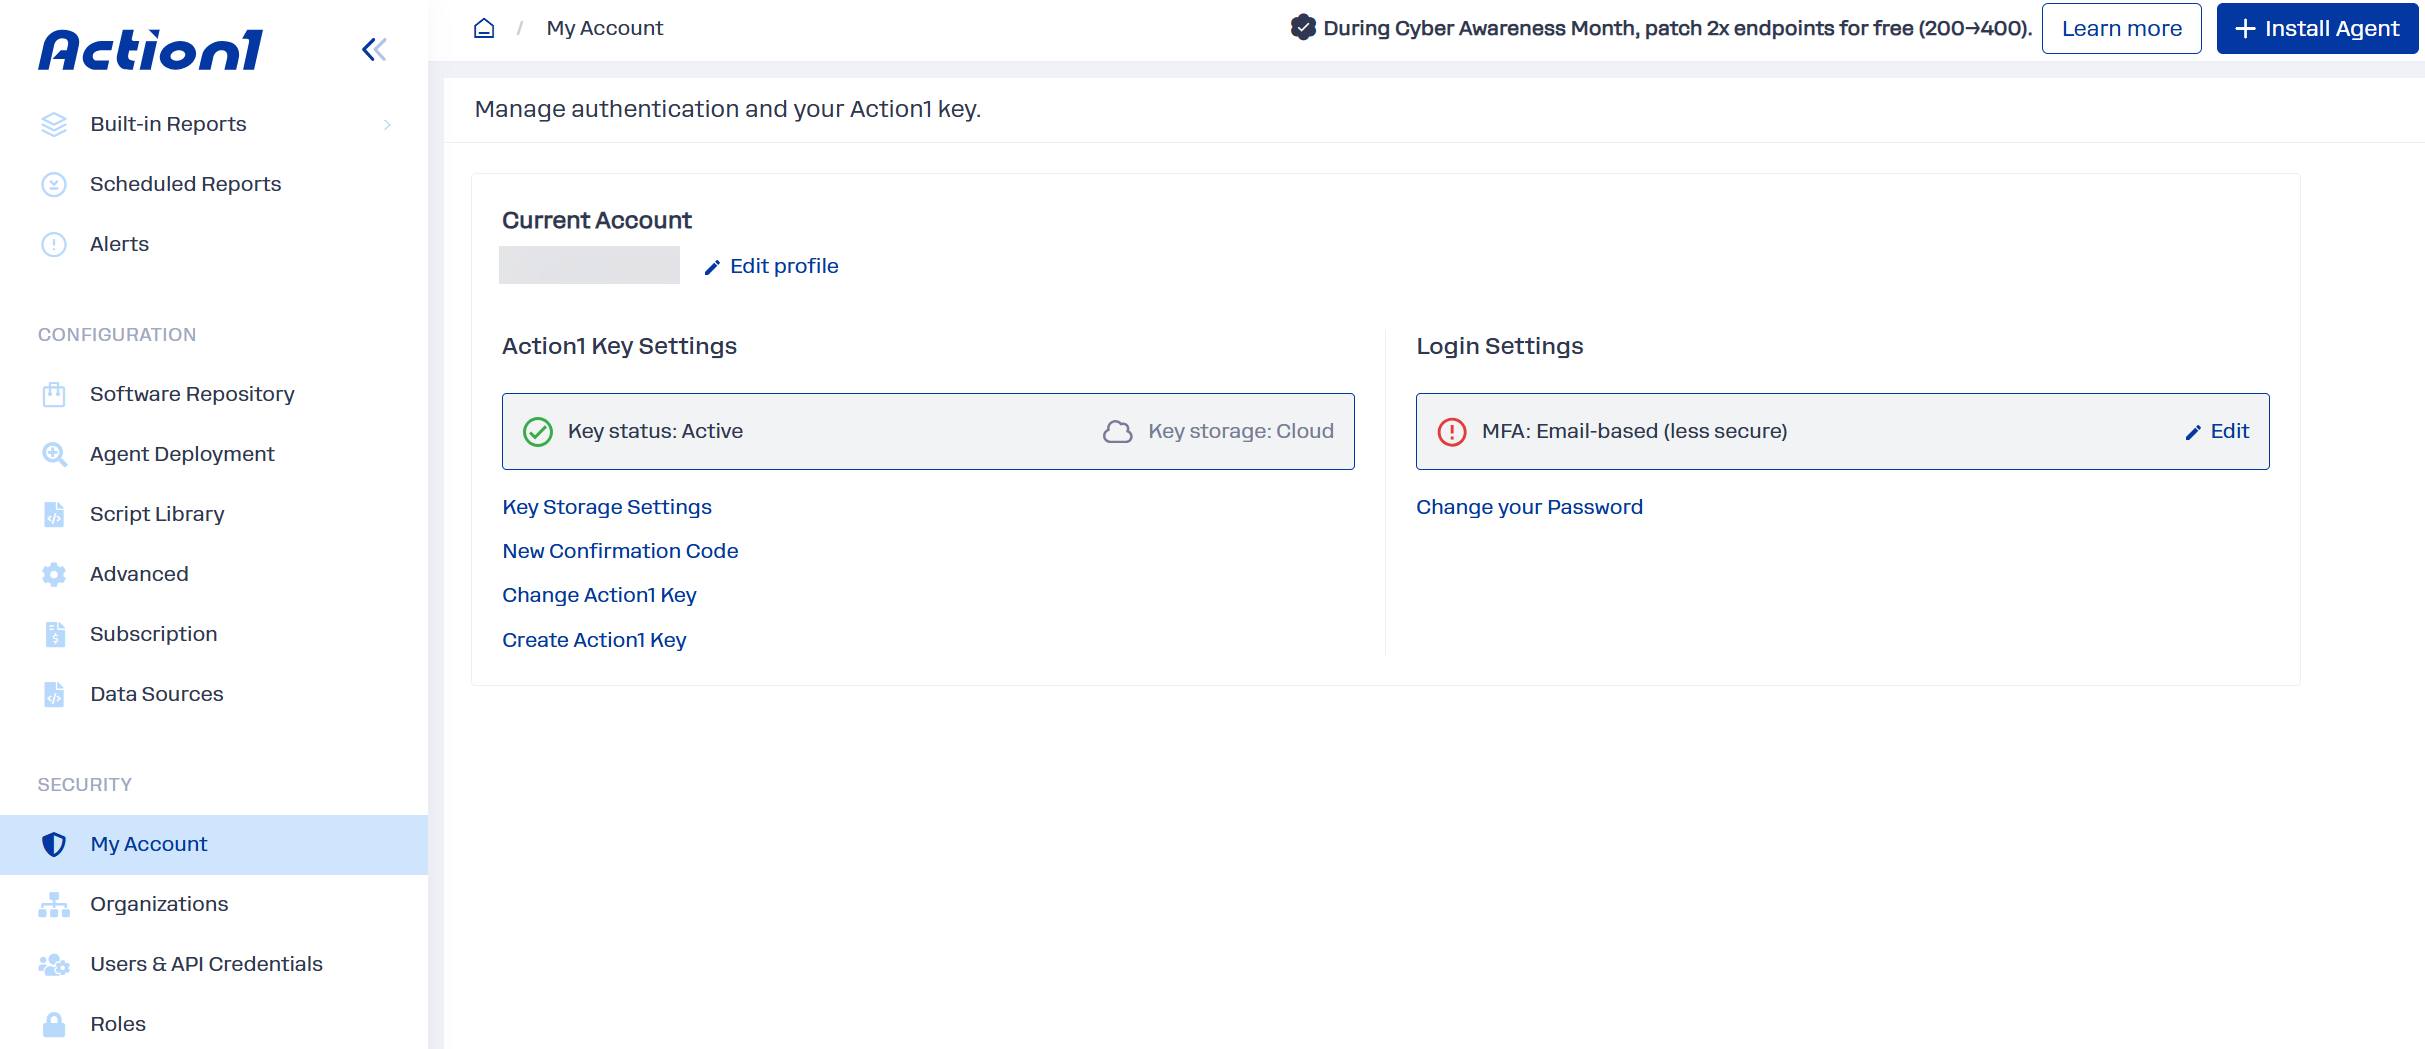
To get started with the first agent, use the default setting, that is, Cloud key storage mode.
How is Action1 Key protected in the Cloud Storage?
When your Action1 Key is stored encrypted in Action1 Vault using Cloud Storage, Action1 does not receive your Key passphrase or unencrypted Action1 Key. When you sign a protected action or configuration in the Action1 web console, your browser decrypts the key locally using your Key passphrase.
NOTE: To learn about Local key storage mode, refer to the Manage Keys section.
Step 1: Secure Your Environment
- Copy the generated Key passphrase and save it in a secure location. It will be used to protect your Action1 Key.
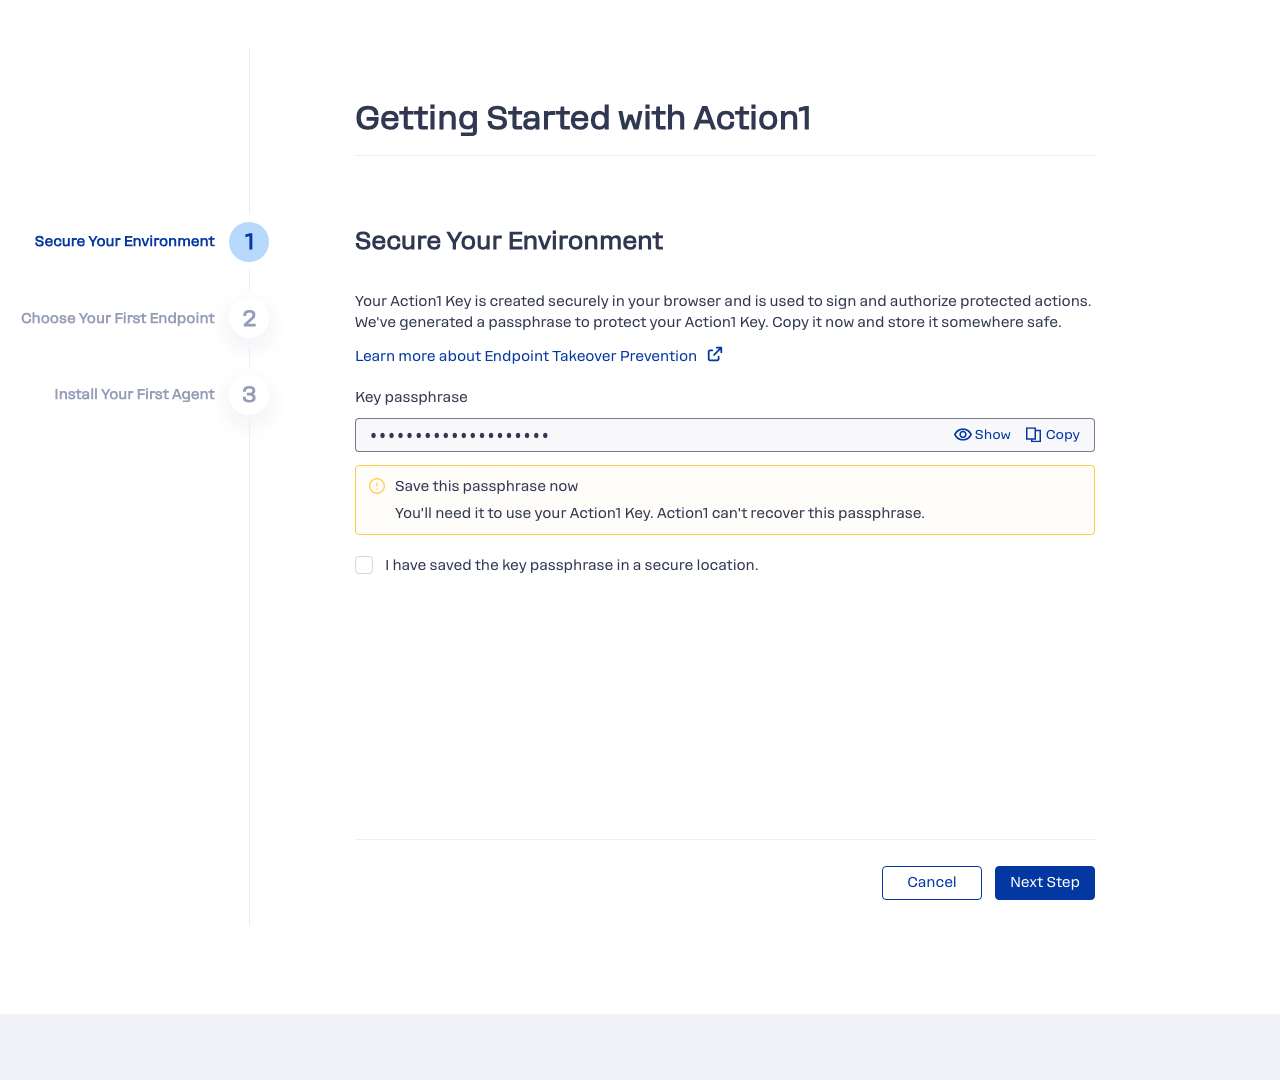
Important! Make sure you copy and store the Key passphrase properly. After you close the wizard, the Key passphrase will no longer be available for copying. If you lose access to your Key passphrase, Action1 will not be able to recover it.
- Select the checkbox to confirm that you saved the Key passphrase.
- Confirm the operation by providing the Key passphrase you have saved.
Step 2: Choose Your First Endpoint
Select the operating system of the endpoint where you want to install the agent.
Action1 provides the appropriate deployment packages:
- For Windows endpoints: MSI
- For macOS endpoints: SH or PKG
- For Linux endpoints: DEB or RPM
Step 3: Install Your First Agent
Do the following to get started:
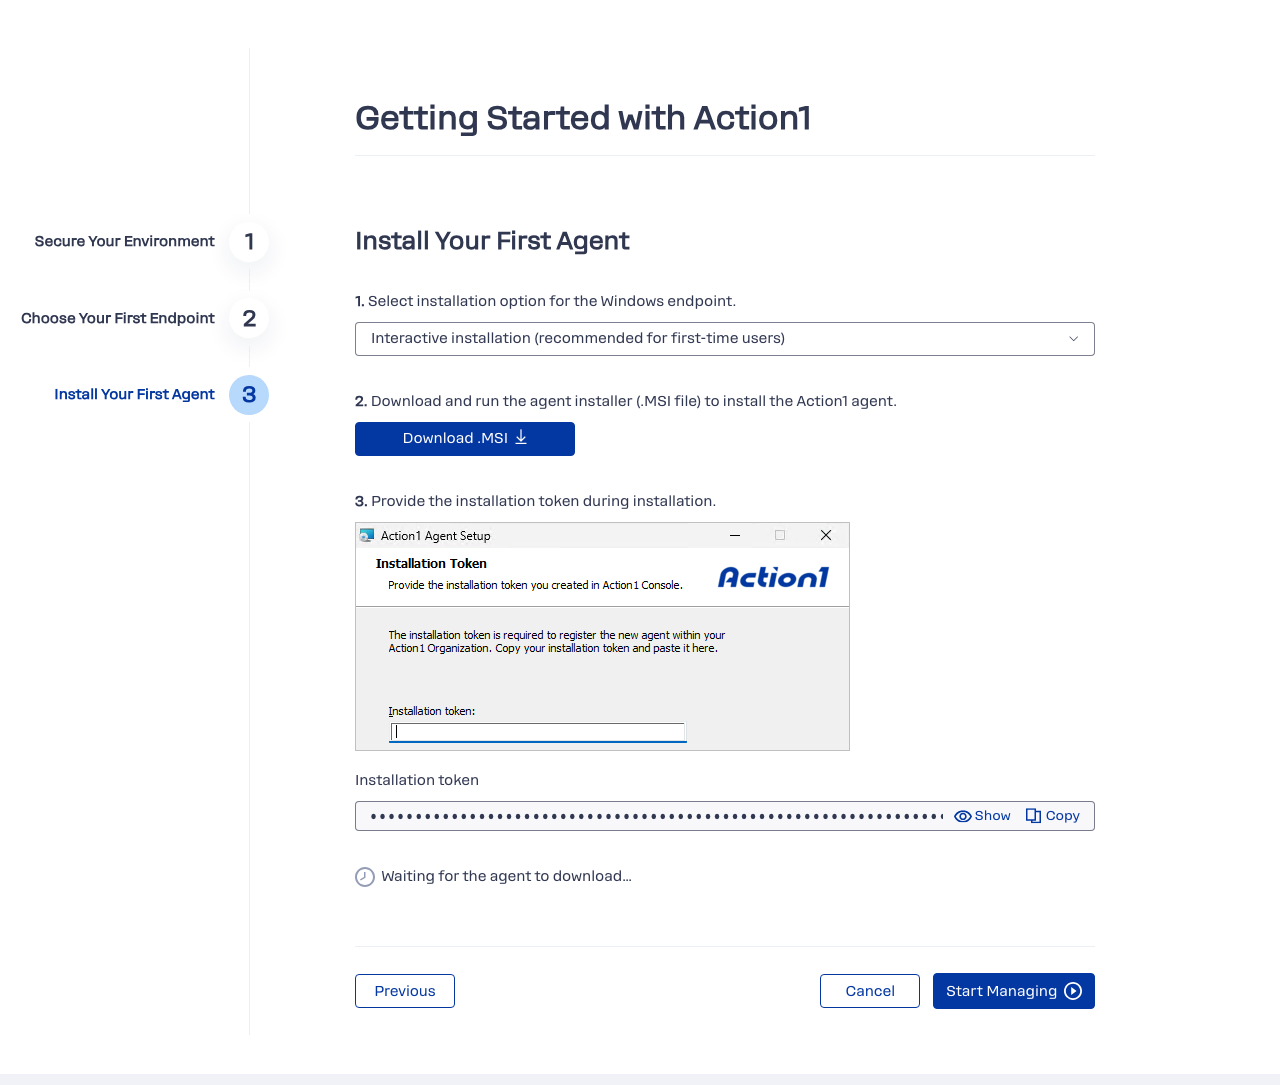
- Select Interactive installation as the installation option.
- Download the agent setup package for your target endpoint.
- Run the setup locally to install the agent.
- Provide the installation token to the agent using the wizard (for Windows) or the respective command (for macOS and Linux).
The installation token associates an Action1 agent with your Action1 organization. Each organization has its own token, which is used to install all agents in that organization. Without a valid installation token, an agent in an ETP-enabled organization cannot register in the Action1 console.
The console displays the token only when it is created. Copy it and store it securely for future agent installations.
For Windows endpoint
- Download the MSI package.
- Copy the generated Installation Token and store it in a secure location.
- Launch the MSI on the target endpoint and follow the agent setup wizard.
- When prompted, enter the installation token.
For macOS endpoint
- Download the SH file.
- Launch the Terminal app using an account with root privileges.
- Run the following command, providing the SH script name:
bash action1_agent.sh
The script will automatically download and start the Action1 agent setup.
Follow the setup wizard:
- Accept the EULA.
- When prompted for destination and type, select Install for all users of this computer.
- Don’t change the installation destination (/usr/local/action1).
- When prompted, enter the administrative credentials to install the software and authorize macOS system updates.
- Return to the agent installation wizard in the Action1 console and copy the generated Installation Token from the corresponding field. Store it in a secure location.
- Use the following command to provide the installation token to the agent:
sudo /usr/local/action1/action1_agent inst_token:<Your Installation Token>
For Linux endpoint
- Download the DEB or RPM package.
- Install the Action1 agent package using your package manager:
- For DEB package, use the following commands:
cp "action1_agent.deb" /tmp
cd /tmp
sudo apt install "./action1_agent.deb"
- For RPM package, use the following commands:
cp "action1_agent.rpm" /tmp
cd /tmp
sudo dnf install "./action1_agent.rpm"
Wait for the package manager to complete the installation.
- For DEB package, use the following commands:
- Return to the agent installation wizard in the Action1 console and copy the generated Installation Token from the corresponding field. Store it in a secure location.
- Use the following command to provide the installation token to the agent:
sudo /opt/action1/action1_agent inst_token:<Your Installation Token>
Verify the installation
- On the last step of the agent installation wizard, click Start Managing to open the Endpoints page.
- Locate the endpoint where you installed the agent and verify that its Status is Connected.
- Verify that the ETP column shows a green shield icon with a check mark. This indicates that the endpoint has an ETP-capable agent and is protected by the current ETP security configuration.
The Endpoints page displays all system information for the endpoint, including missing updates, installed software, hardware details, as well as ETP enablement status.
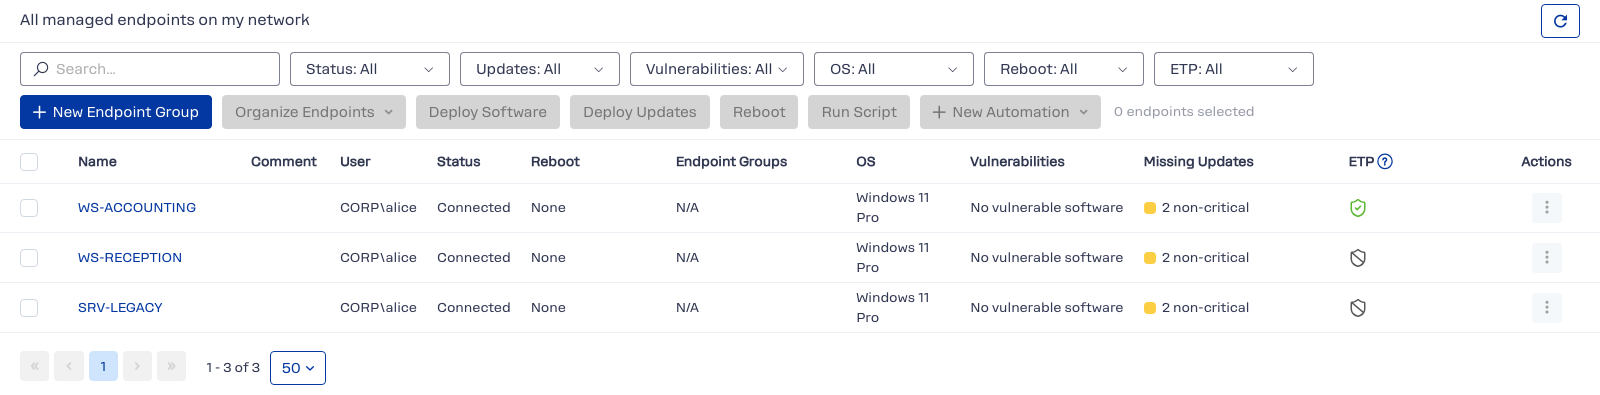
NOTE: A gray ETP icon indicates that the endpoint is not currently protected by ETP. The agent may need to be updated. For an explanation of the indicators, select the help icon next to the ETP column heading.
When you install the next agents, your Key passphrase and Action1 Key will be used to secure the deployment, and the installation token will be used to associate the new agents with the Action1 organization, so keep them both safe. A similar wizard will guide you through the subsequent agent setup process. For details, refer to Install Additional Agents.