
SSO Authentication with Entra ID
To provide easy and secure access to the Action1 console, Action1 allows users to log in using their Entra ID (formerly Azure Active Directory, Azure AD) credentials and single sign-on (SSO) authentication instead of maintaining Action1-specific user credentials. This section explains:
Enabling SSO with Entra ID
When you sign up for Action1, you create the initial Action1 credentials (without SSO). By default, this initial account has an Enterprise Admin role in Action1. Then you can use this privileged account to invite the users from your organization’s Entra ID to work with Action1.
Important! We recommend keeping the initial non-SSO Action1 credentials for emergency purposes, in case you lose access to Entra ID. Store these credentials securely.
After creating the initial Action1 credentials while signing up, take the following steps:
- Log in to Action1 using your initial Action1 credentials.
Important! Do not click “Entra ID” during this initial login.
- In Action1 console, navigate to Advanced page and click Identity Provider.
- From the list of identity providers, select Entra ID.

- Keep the Scope set to Enterprise.
- Click Save.
Inviting users from Entra ID organization to Action1
Now you can invite the existing users from your Entra ID organization to work with Action1 users, accessing it with their Entra ID credentials and SSO. For that, you will need the Entra ID user’s primary email address and use it in the Action1 invitation.
Stage 1: Obtaining the user’s primary email address
- Open your organization’s Entra ID portal and select the required user
- Go to Properties and locate the Email property.
- Copy this primary email address.
Important! Only this primary email should be used when configuring SSO with Entra ID. Make sure you copy the correct property value.

If you are using Microsoft 365 Admin Center, go to Users | Active users, click on the required user account, and on the Account property tab, copy the address shown under Username and email.
Important! Make sure you copy the correct property value. Do not copy any Other email addresses or Aliases.
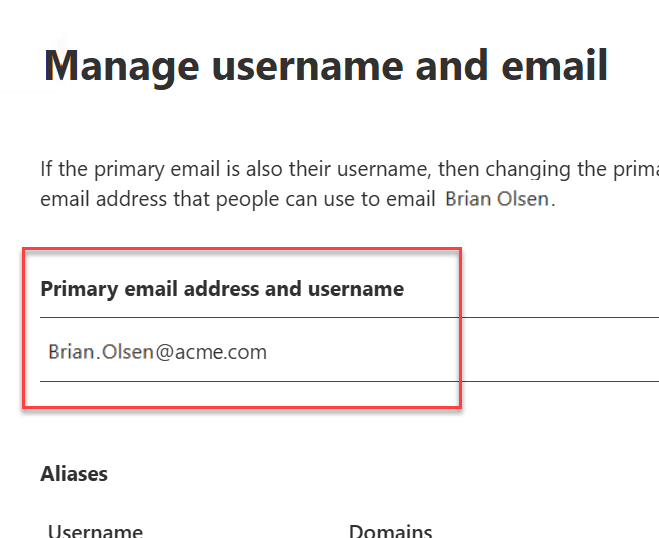
Tip: To verify the primary address, in the Microsoft 365 Admin Center, click Manage username and email – the required email will be shown under Primary email address and username.
Stage 2: Inviting the user
- Open the Action1 console.
- Navigate to the Users & API Credentials section and click +Invite User.
- In the Invite New User dialog, go to the Login Email field and paste the user’s primary email address you copied at Stage 1.

- Finally, click Invite.
An invitation email will be sent to the user’s primary email address you provided.
Tip: To assign an Action1 role to the new user, see Assigning Role to User.
Signing in to Action1 as Entra ID user
This procedure explains how your newly invited users can sign in to Action1 with their Entra ID account and SSO.
- At https://app.action1.com/login/ do not enter any credentials but continue with Entra ID:

- The Microsoft Entra ID Sign-in window is displayed. Sign in with your User principal name that you usually use to access Microsoft Entra ID.

Important! As shown in the example below, User principal name may differ from the primary Email. Make sure to sign in with the principal name.

- Click Next. The SSO authentication is performed, and you can start working with Action1.
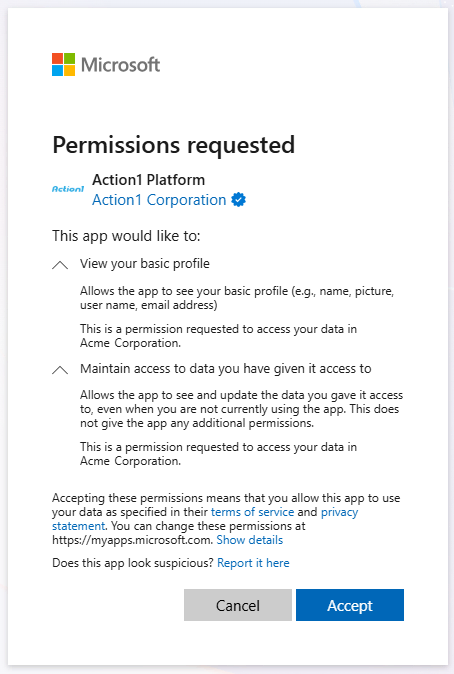
Consent to the required app permissions
The Action1 application requires several delegated permissions for Microsoft Graph API:
- profile
- offline_access
- openid
An authorized administrator can grant admin consent for these permissions through the Microsoft Entra admin center. For more information, refer to this Microsoft documentation article.
If admin consent has not been granted for the required permissions, users will be prompted to accept them in the following dialog after initiating SSO:
To learn more about application permissions and consent, refer to Microsoft documentation.
Switching existing Action1 users to SSO with Entra ID
This procedure explains how to switch your existing Action1 users to SSO with their Entra ID accounts.
Important! To run the migration procedure, an account with the Enterprise admin role in Action1 is required. Make sure you have at least one Enterprise admin present; otherwise, admin account access will be lost. You can also create a secondary Enterprise admin, or elevate another user to the Enterprise admin role.
Important! To migrate to SSO with Entra ID, the Action1 user accounts need to be first deleted from the Action1 configuration. The users will be unable to access Action1 until the procedure completes.
- Navigate to the Users & API Credentials page.
- Locate the user account you want to switch to Entra ID. Go to its Roles property tab and make sure it has no role assignment; otherwise, Unassign its roles.
- Then you can either click Delete, or set the user’s email to non-existent (such as “[email protected]”).
- Invite the user again into Action1 by sending an invite link to their Entra ID primary email (see Stage 2: Inviting the user above).