
Prepare Multi-File Custom Packages for Windows
To simplify software distribution, Action1 allows you to upload custom application packages containing multiple files and deploy them through the Software Repository. For example, you can create packages for Microsoft Office applications, development tools, and other software that is not available in the Action1 Software Repository.
Supported Packages
To upload your app to the Software Repository for further distribution, you need to pack it in a ZIP archive. A ZIP can contain:
- An EXE installer and additional files, such as configuration files.
- An MSI installer with MST transform files that customize the installation, such as adding a license code or creating a preconfigured profile. To create custom MST files, consider using the Orca tool.
- Regular files that are not installers, such as configuration files, scripts, or other resources that need to be copied to managed endpoints.
NOTE: Make sure the packages you create perform per-machine installation. Per-user installations are not supported by Action1.
Preparing a ZIP package with EXE file
- Create a work folder, for example:
C:\work - Copy your files to this folder. Make sure to include a setup EXE file.
- If you need to add custom logic to your EXE installer, create a script and place it in the same folder as the installer.
NOTE: If you only need to run an EXE file with command-line parameters, a script is not required. Instead, specify the necessary parameters in the Silent Install Switches field, as described later in this topic.
- Select all files in the folder and use your zipping tool to create a ZIP archive.
TIP: For ease of use, keep all files in the archive root.
Preparing a ZIP package with MSI file
- Create a work folder, for example:
C:\packages\MyApp - Copy all setup files (.MSI, .MST, etc.) into that folder. To keep the package structure simple, do not create a folder hierarchy inside the work folder.
- In the work folder, create a script (for example, setup.ps1) that contains a command required to launch the MSI installer. An example command that launches MyApp.msi with a transform file:
msiexec.exe /i ‘MyApp.msi’ /quiet /qn /norestart TRANSFORMS=MyApp.mst - Select all files in the work folder and create a ZIP archive, for example:
setup.zip
NOTE: Make sure the work folder itself is NOT included in the ZIP archive. All files must be located in the archive root. Keep the work folder in case you need to make adjustments later.
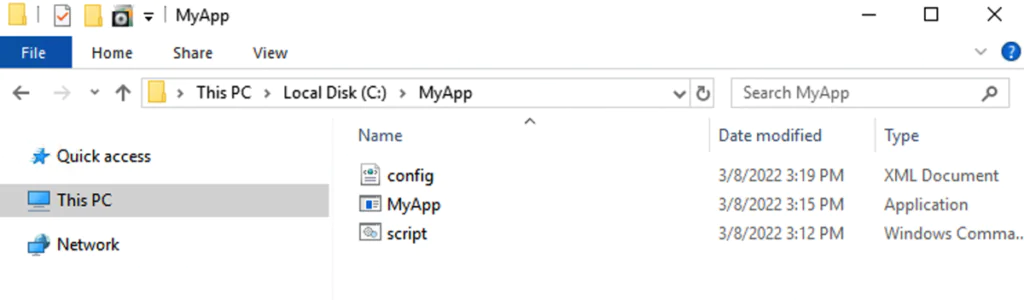
Preparing a ZIP package with regular files
- Create a temporary folder, such as
C:\MyApp\Temp. - Copy your files to this folder.
- Create a simple CMD, PowerShell, or batch script that copies files from the folder to the target location.
- Place the script next to your files.
NOTE: It is recommended to use a flat file structure in the temporary folder. This will allow you to use relative file paths without specifying a folder name.
Example:mkdir "C:\Program Files\MyApp"copy file.txt "C:\Program Files\MyApp"
- Select all files, including the script, and specify Add to archive.
Preparing an uninstall entry
To make a file deployment package uninstallable, create an uninstall entry in Add/Remove Programs and reference an uninstall script. Include the uninstall script in the ZIP archive and copy it to the target endpoint during installation.
The following example commands can be used to create an uninstall entry:
REG ADD HKLM\SOFTWARE\Microsoft\Windows\CurrentVersion\Uninstall\MyApp /v UninstallString /t REG_EXPAND_SZ /d "cmd.exe /c C:\Program Files\MyApp\uninstall.cmd"
REG ADD HKLM\SOFTWARE\Microsoft\Windows\CurrentVersion\Uninstall\MyApp /v DisplayName /t REG_SZ /d "MyApp"
REG ADD HKLM\SOFTWARE\Microsoft\Windows\CurrentVersion\Uninstall\MyApp /v DisplayVersion /t REG_SZ /d "1.0"
After this entry is created, the package can be detected as an installed application and uninstalled later using the referenced uninstall script.
Adding the Package to the Software Repository
After you prepare the ZIP archive, add the package to the Software Repository.
- Add a new package to the Software Repository. For more information, see Add Custom Packages to Software Repository.
- Add a package version and upload the ZIP archive you created.
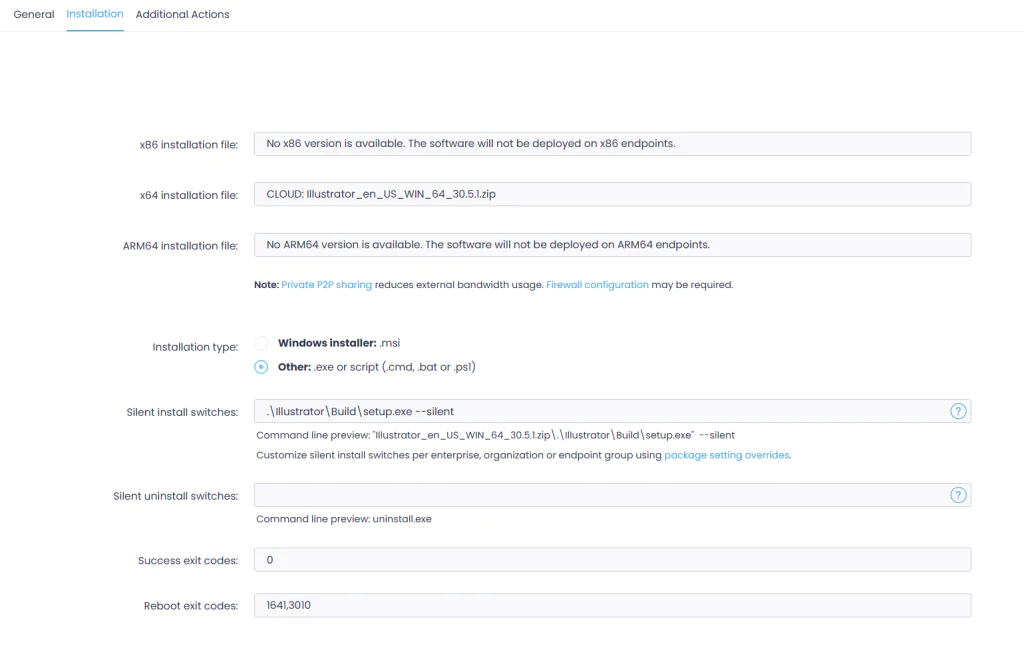
- Select Other as the installation type.
- In Silent Install Switches, specify the file to run after the archive is extracted on the target endpoint:
- For an EXE-based package, enter the EXE file name, for example,
setup.exe - For an EXE-based package that uses a script, enter the script name, for example,
install.ps1 - For a ZIP package with an MSI installer, enter the script name, for example:
setup.ps1 - For a file deployment package, enter the script name, for example:
copy.ps1 - If the file name contains spaces, enclose it in quotation marks, for example:
"Office setup.exe"
- For an EXE-based package, enter the EXE file name, for example,
- If necessary, specify silent install parameters after the file name. Separate parameters with spaces, for example:
"Install Office.exe" /silent - Examine the preview line. It uses the
archive_name.zip\file_to_launchnotation to show which file Action1 will run after extracting the archive on the target endpoint.
After uploading your app package to the Software Repository, you can deploy it to your managed endpoints. For detailed instructions, see Deploy Software.
See also: Example: Deploying Office 365 Package, Prepare Multi-File Custom Packages for macOS