SSO Authentication with Duo
To provide easy and secure access to Action1 console, Action1 enables users to log in using single sign-on (SSO) instead of maintaining Action1-specific user credentials. This explains how to configure SSO with Duo as an identity provider.
Stage 1: Configure Duo
- Sign in to Duo console.
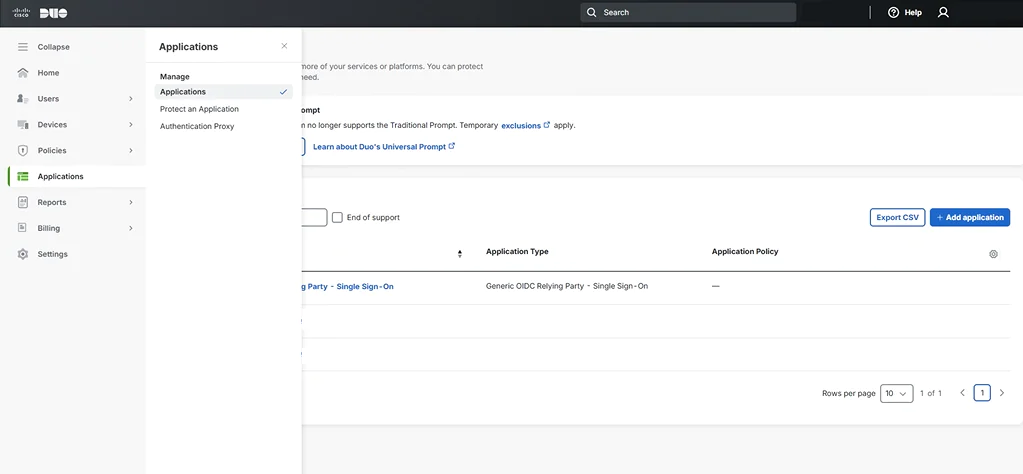
- Navigate to Applications and select Protect an Application.
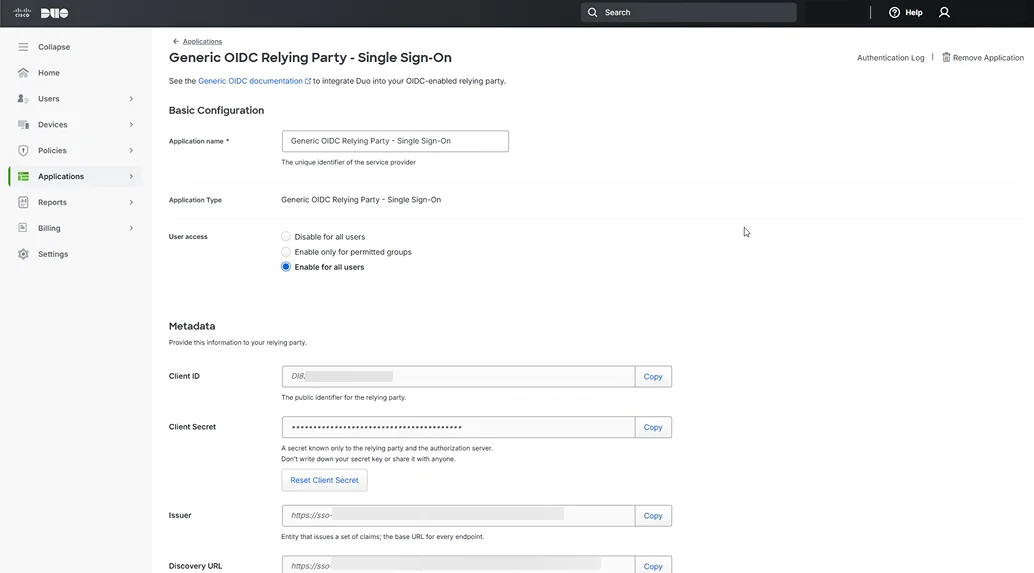
- Locate the Generic OIDC Relying Party – Single Sign-On application and click Protect.
- In the Metadata section, copy Client ID, Client Secret, and Issuer.
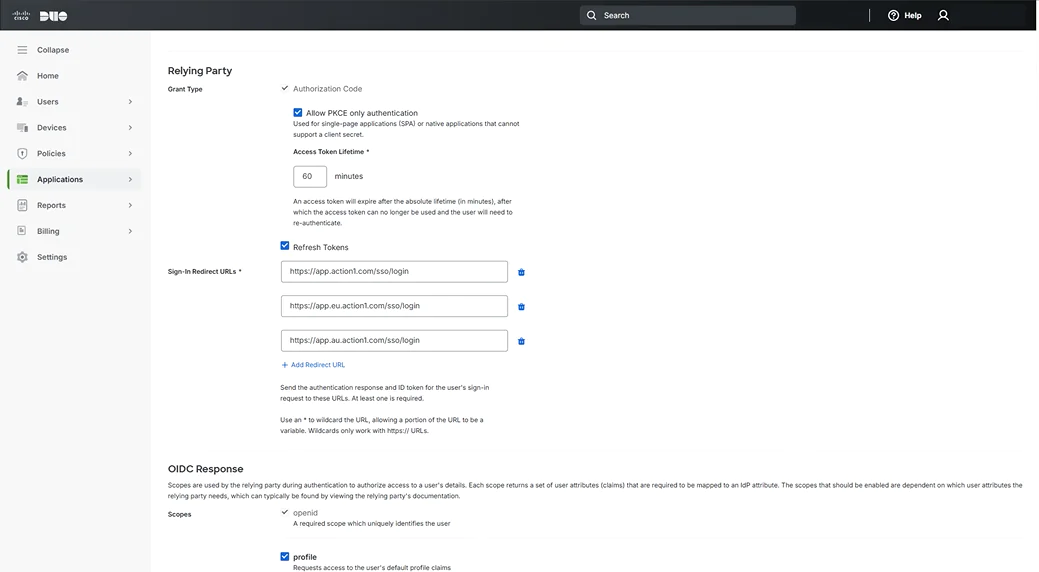
- In the Relying Party section:
- Enable Allow PKCE only authentication
- Set Access Token Lifetime to 60 minutes
- Enable Refresh Tokens
- Add “https://app.action1.com/sso/login” , “https://app.eu.action1.com/sso/login” and “https://app.au.action1.com/sso/login” to Sign-In Redirect URLs
- In the OIDC response section, configure the following claims to be included in the token:
- Enable profile and add the following attribute-claim pairs:
- <First Name> and given_name
- <Last Name> and family_name
- Enable Email and add the following attribute-claim pairs:
- <Email Address> and email
- Enable profile and add the following attribute-claim pairs:
- Save configuration.
Stage 2: Enable SSO with Duo in Action1 Console
When you sign up for Action1, you have to create the initial Action1 credentials (without SSO). By default, this initial account has an Enterprise Admin role in Action1. Then you can use this privileged account to invite the existing accounts from your organization’s Duo.
After creating the initial Action1 credentials while signing up, follow these steps to enable Duo SSO:
- Log in to Action1 using your initial Action1 credentials (do not click Duo during login).
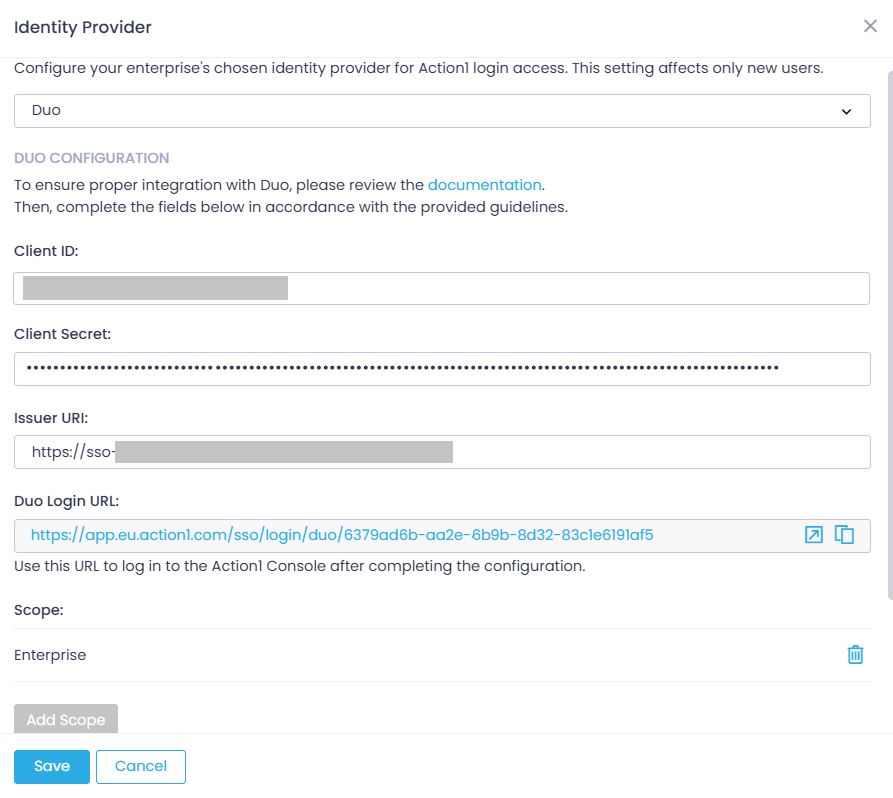
- Navigate to Advanced page and select Identity Provider.
- Specify Duo as the identity provider. Keep the scope set to Enterprise. With this setting changed, all new users will use Duo.
- Enter Client ID, Client Secret, and Issuer URI of your Duo application (you copied them at step 4 of Stage 1 above).
NOTE: Keep the initial non-SSO Action1 credentials for emergency recovery purposes, in case you lose access to Duo. Store these credentials securely, as they have Enterprise Admin access by default.
Step 3: Invite Duo Users to Action1
- Make sure that users already exist in Duo. If not, proceed to Duo to create users.
- Make sure these users have passwords to sign in to Duo.
IMPORTANT! For users who are only using push notifications to sign in, SSO is currently not supported.
- Navigate to the Users page and click +Invite.
- Provide the user settings in the dialog displayed, then click Invite.
- After you invite users, they will receive an Action1 login link to their email.
The procedure above explains how to invite your colleagues with accounts in Duo to become new Action1 users. The next procedure describes configuring your existing Action1 users to utilize Duo for SSO authentication.
How to enable SSO with Duo for existing Action1 users?
Before you start, make sure these Action1 users already have Duo accounts and can sign in to Duo using passwords (not just push notifications). Otherwise, proceed to Duo to configure such accounts.
IMPORTANT! To perform the required steps, an account with the Enterprise admin role in Action1 is required. Make sure you have at least one Enterprise admin present; otherwise, admin account access will be lost. You can also create a secondary Enterprise admin, or elevate another user to the Enterprise admin role.
NOTE: To migrate to SSO with Duo, the Action1 user accounts need first to be deleted. The users will be unable to access Action1 until the process is completed.
- Navigate to the Users page.
- Locate the user account you want to switch to SSO with Duo. If this user has an Action1 role assigned, make sure to revoke this role.
- Select Delete. Alternatively, set the user’s email to non-existent such as “[email protected]”.
- Invite the user again into Action1 by sending an invite link, as described in the “Inviting Users to SSO with Duo” section above.


