

TL;DR
-
Linux server patch management protects systems from vulnerabilities, malware, and compliance risks.
-
Critical security patches should be deployed within 24–48 hours of release.
-
A structured patching workflow helps prevent downtime and configuration issues.
-
How to patch Linux servers: plan maintenance, run pre-checks, back up systems, review updates, test patches, deploy updates, reboot if needed, verify results, and document the process.
-
Kernel updates typically require reboots, while most application patches only require service restarts.
-
Automated patch management platforms reduce manual effort and improve patch compliance across Linux environments.
-
Tools like Action1 centralize patch visibility, automate deployment, and help secure distributed Linux servers.
Action1 Linux Server Patch Management Software
Linux server operating systems power many large, complex data centers and workload environments, virtual machines (VMs), containers, and private or public cloud ecosystems. Organizations rely on these servers because they are known for their scalability, flexibility, stable performance, and security features like robust permissions, powerful firewalls, encryption, and mandatory access control.
Needless to say, every piece of software needs updates and patches, and your Linux servers are no exception. Keeping them patched on time means they stay secure, efficient, stable, and compliant with the strict regulations your organization operates under.
However, the reality is that many companies struggle to build a strong Linux patch management strategy that would make the process as smooth and effective as possible.
Whether the problem comes from the inability to find appropriate maintenance windows, fear of unpredictable downtime, or simply neglecting the importance of patches, the consequences can be severe both for the organization itself and its clients.
That’s why this article covers what Linux server patch management is, how to patch your servers step-by-step, how to automate the entire process with Action1, the tools available, best practices, and the most common challenges you will encounter along the way.
What Is Linux Server Patch Management?
Linux server patch management is the process that protects your systems from cyberattacks, fixes bugs, improves their performance, and keeps them compliant with regulatory standards. It works by identifying, testing, deploying, and verifying software patches across your servers.
Why Is Linux Server Patching Critical?
Linux server patching is critical because, according to recent DeepStrike research, the window between a vulnerability being disclosed and actively exploited has shrunk from 63 days in 2018-2019 to just 5 days in 2023-2025.
Delaying patch deployments is no longer a calculated risk, it is real exposure. Bouncing back from a data breach or ransomware attack takes weeks to months and hundreds of thousands of dollars, and in some cases you never fully recover.
So do yourself a solid and keep each of your servers up-to-date because patches deliver four critical benefits:
- Security protection: Security patches are released by vendors to remediate known software code imperfections. Once these patches are deployed, they prevent unauthorized access to your servers that cybercriminals might gain in case of vulnerability exploitation.
- System stability: Bug-fixing patches are designed to fix software problems like crashes, glitches, and malfunctions.
- Regulatory compliance: Timely patching of security vulnerabilities guarantees that your servers adhere to the regulations your organization is obligated to follow.
- Performance improvements: Some updates equip you with the latest features, a more intuitive interface, or AI-assisted systems, which directly translates into better user experience, system performance, and boosted productivity.
How to Patch Linux Servers? (Step-by-Step)
Patching a Linux server is not rocket science. Indeed, it is a straightforward and easy-to-execute process that requires just ten simple steps: planning and scheduling, pre-patching checks, backing up your server, identifying available updates, reviewing security advisories, testing in a staging environment, applying patches, rebooting, verifying installation, and finally, documenting the result.
However, that is just a glimpse into the process. To make your life easier, we have created a step-by-step guide with detailed explanations of each stage. What follows is everything you need to patch your servers successfully.
Step 1: Plan and Schedule
Before starting anything, you have to have a clear plan and define a maintenance window. Presumably, the best time to do it is outside business hours to avoid a temporary service interruption. However, if you can’t patch during weekends or evenings, then you must notify everyone who might be affected by the planned downtime.
Your next task is to create a change request and, of course, confirm which particular servers are going to be patched. Acting without a plan is a bad idea and almost always leads to unexpected situations.
Step 2: Pre-Patching Checks
Check the current state of your server, because this way you will have a baseline to compare against after the patching process is completed.
To do so, just open the terminal on your server and run the following checks:
- Verify the current kernel version and system uptime:uname -auptime
- Check if you have enough free disk space:df -h
- Finally, have a look at the running services to identify anything that may be affected:systemctl list-units –type=service –state=running
Step 3: Back Up Your Server
Take a snapshot or create a full backup of your server because it serves as a “plan B” in case anything goes wrong. It will enable you to quickly bounce back from any issue. Keep in mind that for virtual machines, a snapshot is your best option since it takes minutes and can save hours of recovery work.
Full backups are the right call for physical servers. The only downside is that they can take hours to complete. But that makes sense, since it is better to wait a few hours and have a rescue plan instead of rushing into patching and regretting it later.
Step 4: Identify Available Updates
Check which software updates are available on your Linux systems, and confirm each server is running a supported version of its distribution. Each distro uses a different package manager, so use the right command for yours from those we’ve listed below:
- Debian or Ubuntu machines and servers (apt):sudo apt updatesudo apt list –upgradable
- RHEL/CentOS (dnf/yum):sudo dnf check-update
- SUSE Linux Enterprise (zypper):sudo zypper refreshsudo zypper list-updates
Step 5: Review Security Advisories
Before stepping into patch deployment of the missing updates, it is a good idea to check what type of vulnerabilities are going to be addressed. Based on the information you get in the advisories, you can adequately prioritize the installation sequence. Below, you can find links to the advisories:
- Ubuntu: https://ubuntu.com/security/notices
- RHEL: https://access.redhat.com/security/security-updates
- SUSE: https://www.suse.com/support/update
Step 6: Test in a Staging Environment
Always deploy patches in a testing environment first before touching any of your production servers. This way, you can catch any problematic updates causing conflicts, broken dependencies, or service disruptions before they reach mission-critical servers, saving yourself from unexpected downtime and late nights in the office fixing the issues.
So test every patch there, and if everything works as expected, great! You can continue deploying the updates to your production servers.
Just a quick tip: the fastest and easiest way to test a patch is by using VMs, so consider this opportunity.
Step 7: Apply Patches
Applying critical security patches, kernel updates, or any other updates to your servers is simple. Just run the right command for your distribution:
- Ubuntu/Debian:sudo apt upgrade -y
- RHEL/CentOS:sudo dnf upgrade -y
- SUSE Linux Enterprise:sudo zypper update
Step 8: Reboot If Required
Many security updates and all kernel updates require a full system reboot to take effect and reload the OS with the latest fixes. So, reboot immediately, or at the first convenient moment, to make sure the vulnerabilities are addressed.
Below we will provide you with a few handy commands that give you a choice to check if a reboot is required in the first place, to reboot immediately when needed, or to delay it for a more convenient time.
Check whether a reboot is needed:
- Ubuntu/Debian:cat /var/run/reboot-required
- RHEL/CentOS (requires dnf-utils — if not present use this command to install it : sudo dnf install dnf-utils):sudo dnf needs-restarting -r
- SUSE(requires lsof — if not present, install it first with: sudo zypper install lsof):sudo zypper ps -s
Reboot immediately (works across all Linux distros mentioned above):
sudo reboot
or
sudo shutdown -r now
Schedule a delayed reboot (in our case with 30 minutes):
sudo shutdown -r +30
Reboot at a specific time:
sudo shutdown -r 02:00
Cancel a scheduled reboot:
sudo shutdown -c
Step 9: Verify Patch Installation
After deploying your patches and rebooting the servers, confirm the patch status and check whether the updates were applied correctly. You can easily do that with the following commands:
- Ubuntu/Debian:sudo apt list –installed | grep <package-name>
- RHEL/CentOS:sudo rpm -q <package-name> sudo dnf history
- SUSE:sudo zypper search –installed-only <package-name>
(If you need) Confirm the active kernel version:
uname -r
Verify that no updates remain pending:
- Ubuntu/Debian:apt list –upgradable
- RHEL/CentOS:sudo dnf check-update
Step 10: Document the patching lifecycle
Finally, you must clearly document which servers were updated, whether the process was successful or not, when it was performed (date and time), which packages were updated, any services restarted, and whether a reboot was performed.
You shouldn’t write an essay, but keep the documentation detailed and clear if you want to pass audit trails. One last tip: name these files in a way that allows you to easily search and find them whenever needed.
How to Patch Linux Servers with Action1?
Action1 is a cloud-native autonomous endpoint management platform that helps you automate the entire patching process across your Linux, Windows and macOS endpoints, and their third-party applications, from vulnerability identification to remediation and report generation.
What follows is a detailed step-by-step guide on how to use the software to protect your servers with minimal downtime risks, less manual work, a reduced mean time to remediation, and patch success rates that reach 99%.
Step 1: Create Your Action1 Account
If you are about to use Action1 for the first time, visit the website and create your account. It is completely free for your first 200 servers or endpoints. Once you complete the registration, you will land in the Action1 console, where patch automation starts, and vulnerabilities vanish.
Step 2: Deploy the Agent on Your Linux Servers
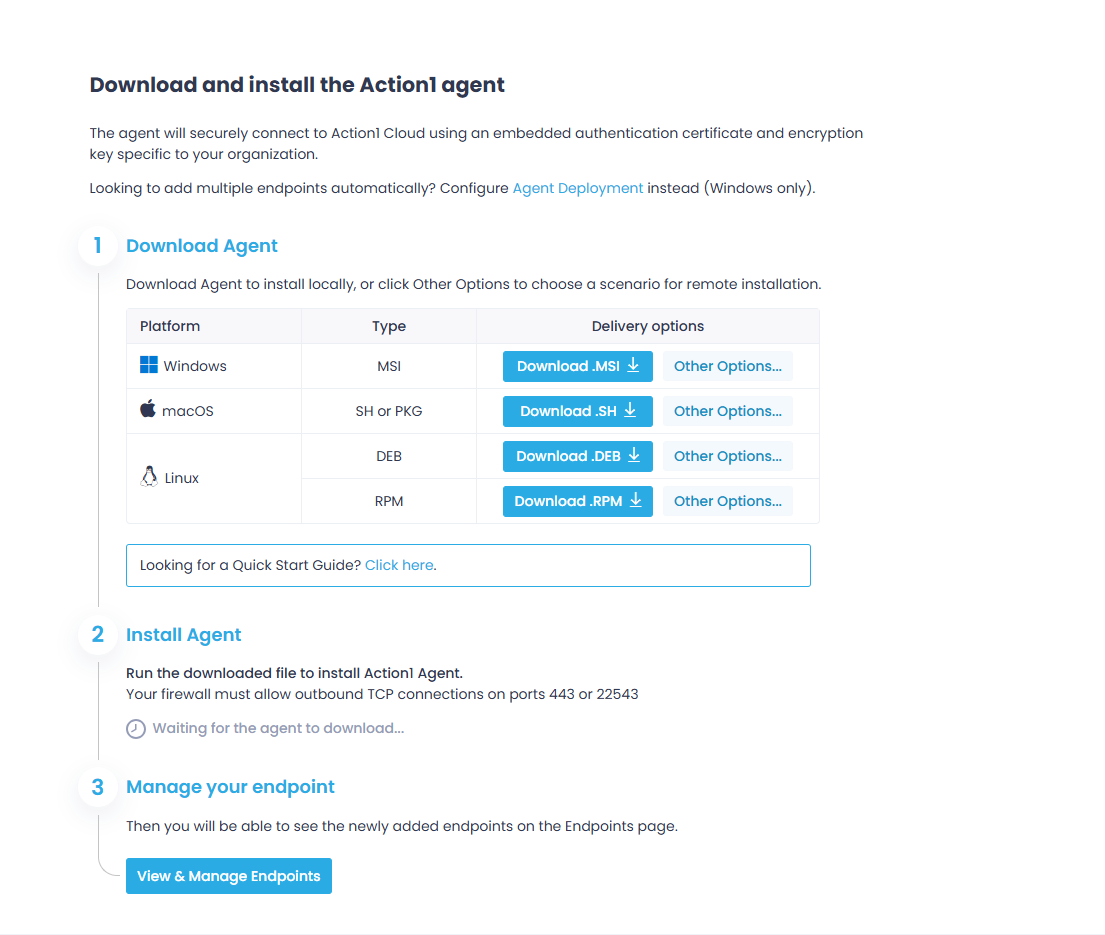
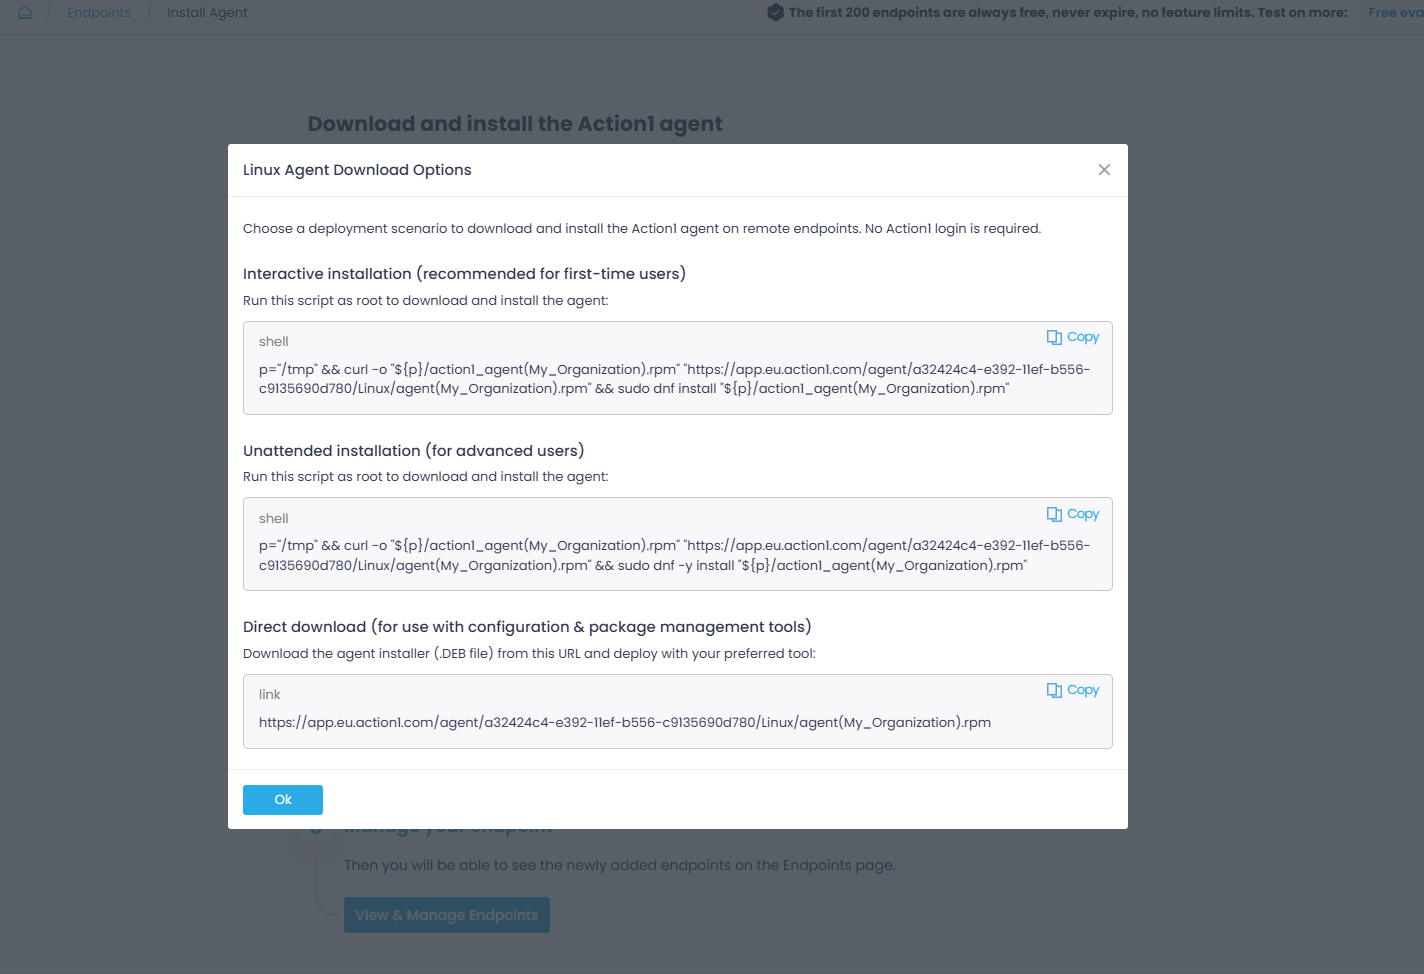
To start patching your Linux servers, you must first deploy the lightweight agent on each of them. In the upper right corner of your screen, find and click “Install Agent.”
You can deploy the agent on both local and remote servers.
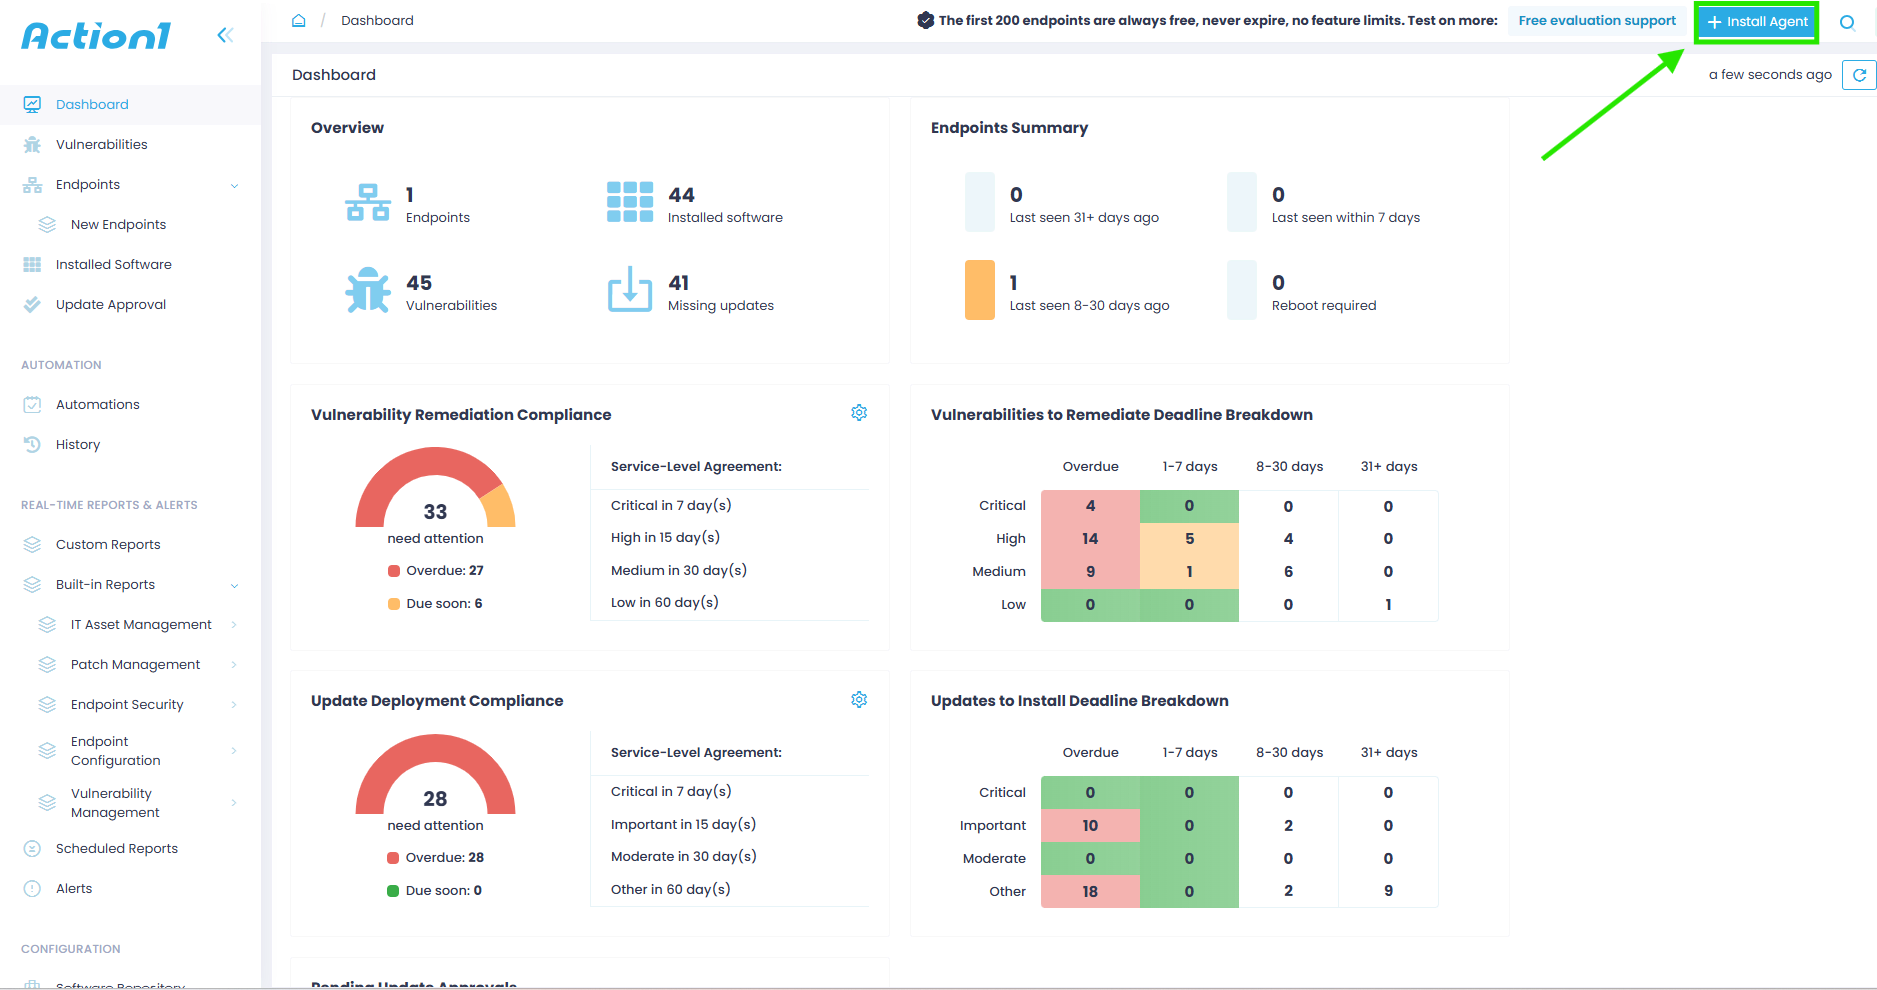
Once installed, the agent connects to Action1 Cloud and your servers start appearing in the “Endpoints” section.
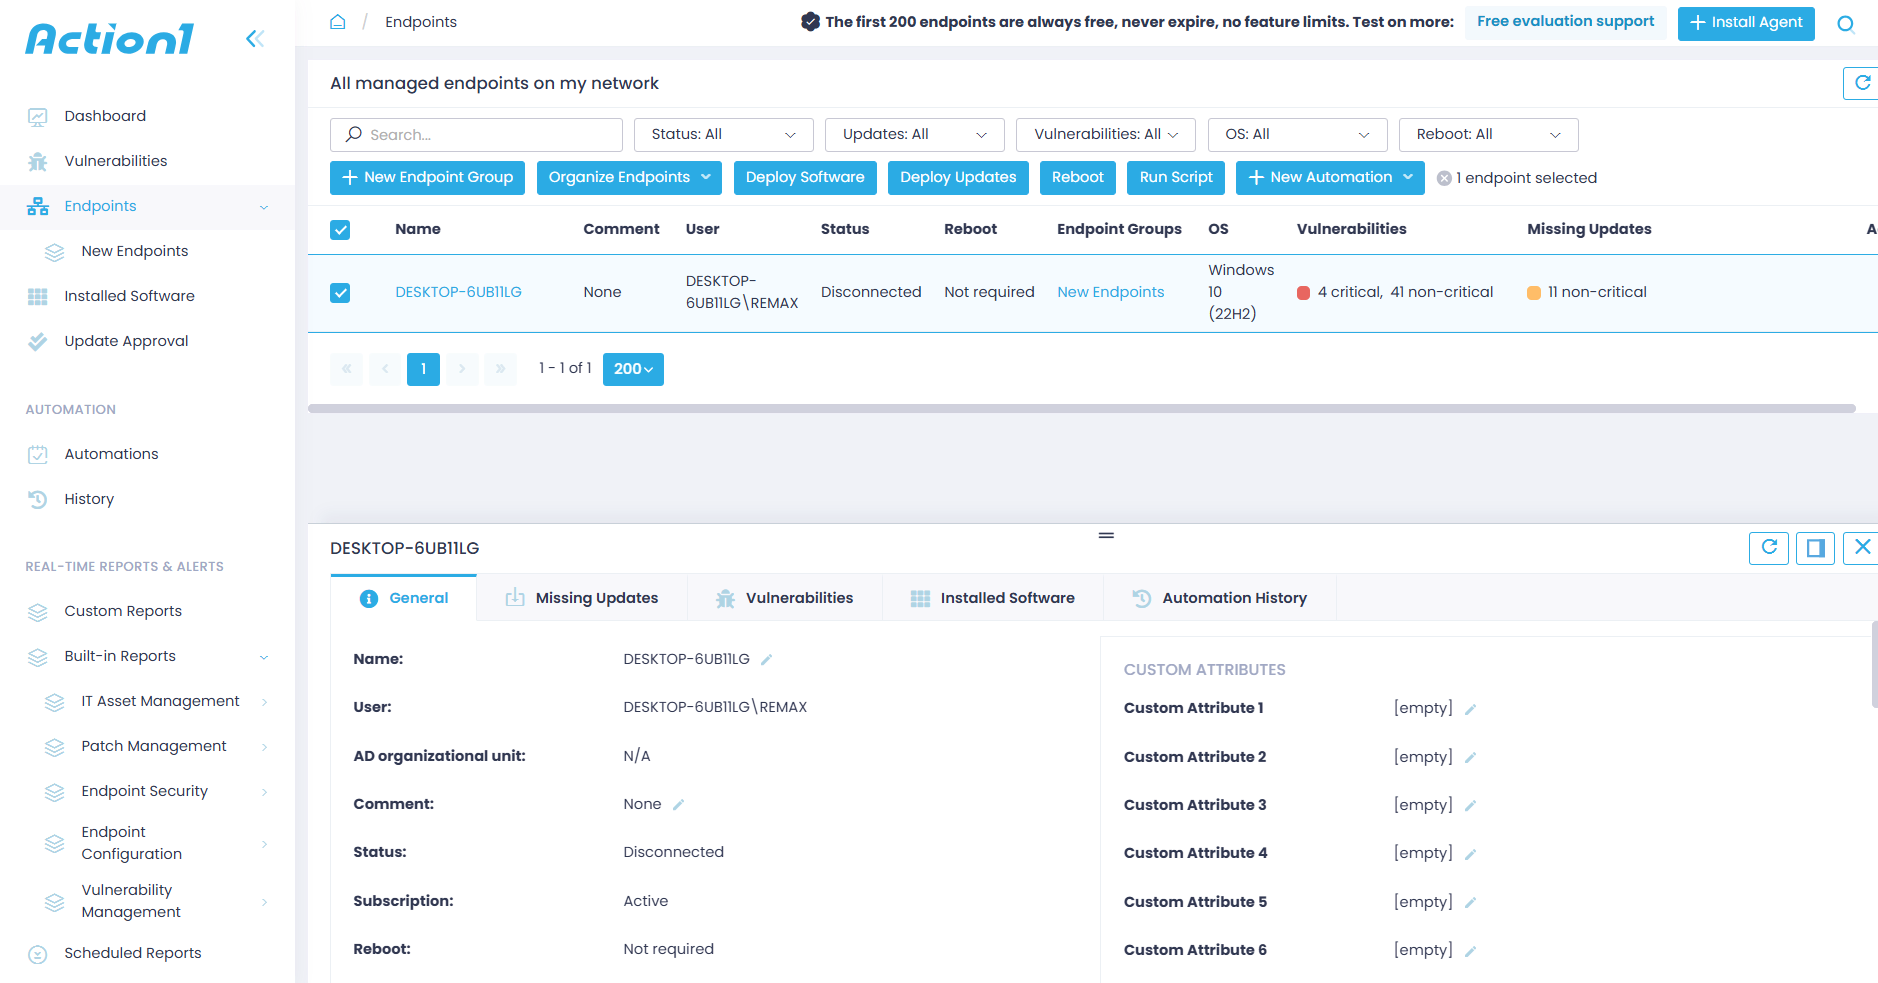
Step 3: Review Your Endpoints/Servers and Missing Patches
On the central dashboard, you can see the number of managed servers across your network, alongside their installed software, identified vulnerabilities, and missing patches. And, of course, you can easily track their vulnerability and update compliance status.
Navigate to “Endpoints” in the left-hand menu for a full breakdown of each server across five sections:
- General: Provides detailed information about each server.
- Missing Updates: Lists all missing updates.
- Vulnerabilities: Lists all known vulnerabilities on the server, including the CVE number, CVSS score, CISA KEV, published date, remediation status, and vulnerable software.
- Installed Software: Lists each piece of software installed on the server.
- Automation History: Shows all automations in chronological order. However, as a new user, you won’t see anything here yet, since we are about to create your first automation now.
Step 4: Automate Patch Deployment
Now it’s time to start remediating the detected software flaws by applying the missing patches to your servers. Navigate to the Automations page, select “New Automation,” and click “Deploy Updates.”
First, you must select which updates to deploy. Choose between the following three options:
- All: Installs every available update regardless of severity or status.
- Matching filters: Installs only updates matching your criteria, like update source or severity level. You can stack multiple filters and even exclude specific values, for example, deploying security updates from Microsoft or Google but excluding low-severity ones.
- Only selected: Installs specific updates you have manually picked.
Then, continue fine-tuning the automation according to your preferences:
- Set whether updates require manual approval before deployment or should be automatically approved after a set waiting period.
- Configure reboot options, including a notification offset so users have time to save their work before the server restarts.

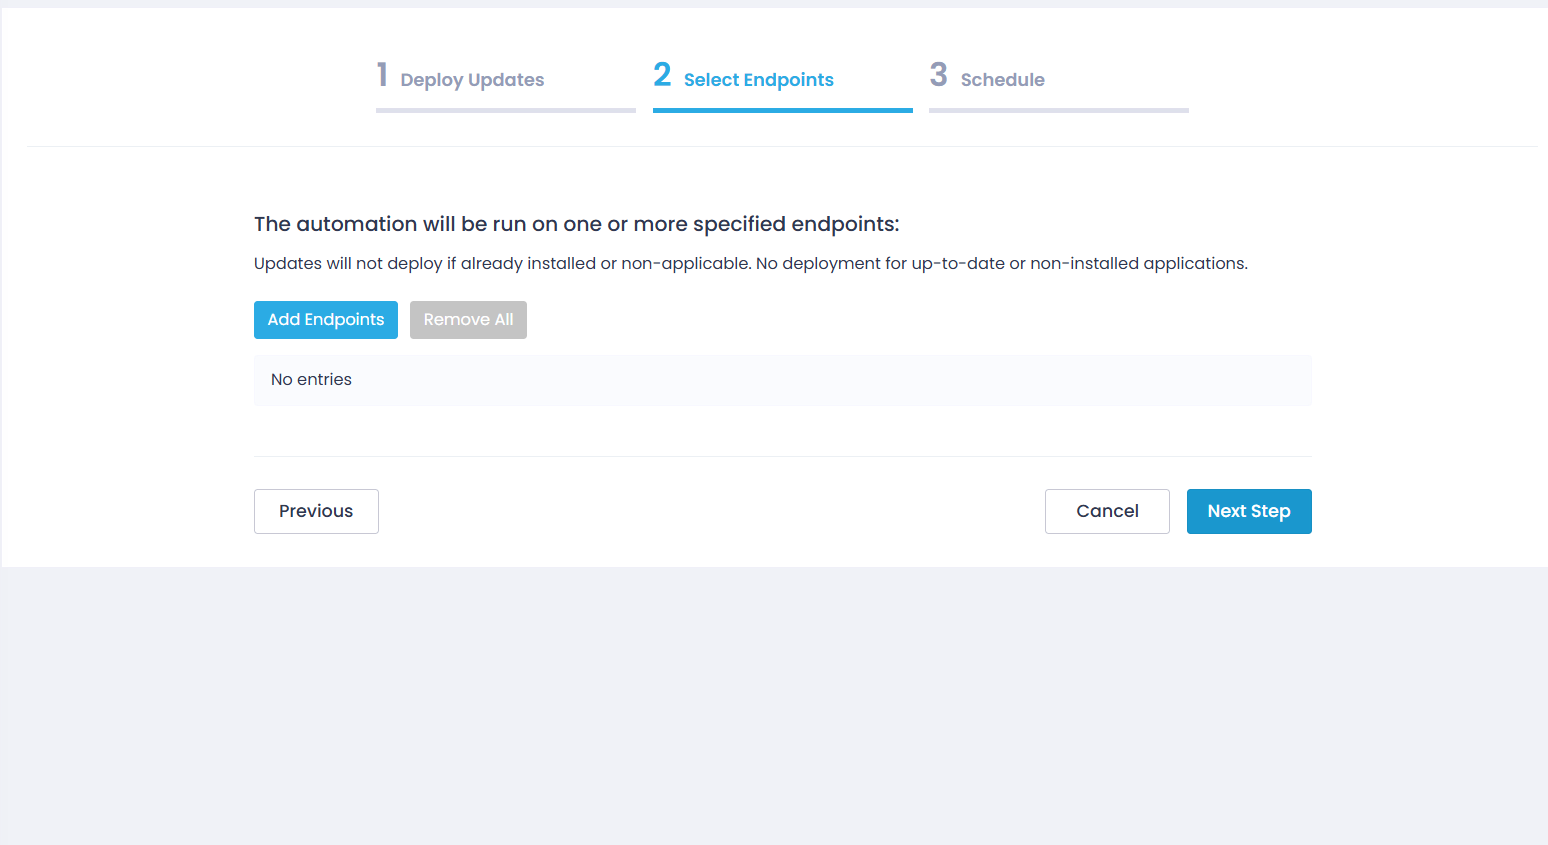
Then select your endpoints. You can add them one by one, select a group, or select all managed servers at once.
On the Schedule step, name your automation and select when you want to run it:
- Run once: For a one-time deployment.
- Every 6, 12, or 24 hours
- Weekly: At a specified day and time.
- Monthly: At a specified day and time.
You can also define a missed schedule retry window for servers that were offline during the scheduled deployment.
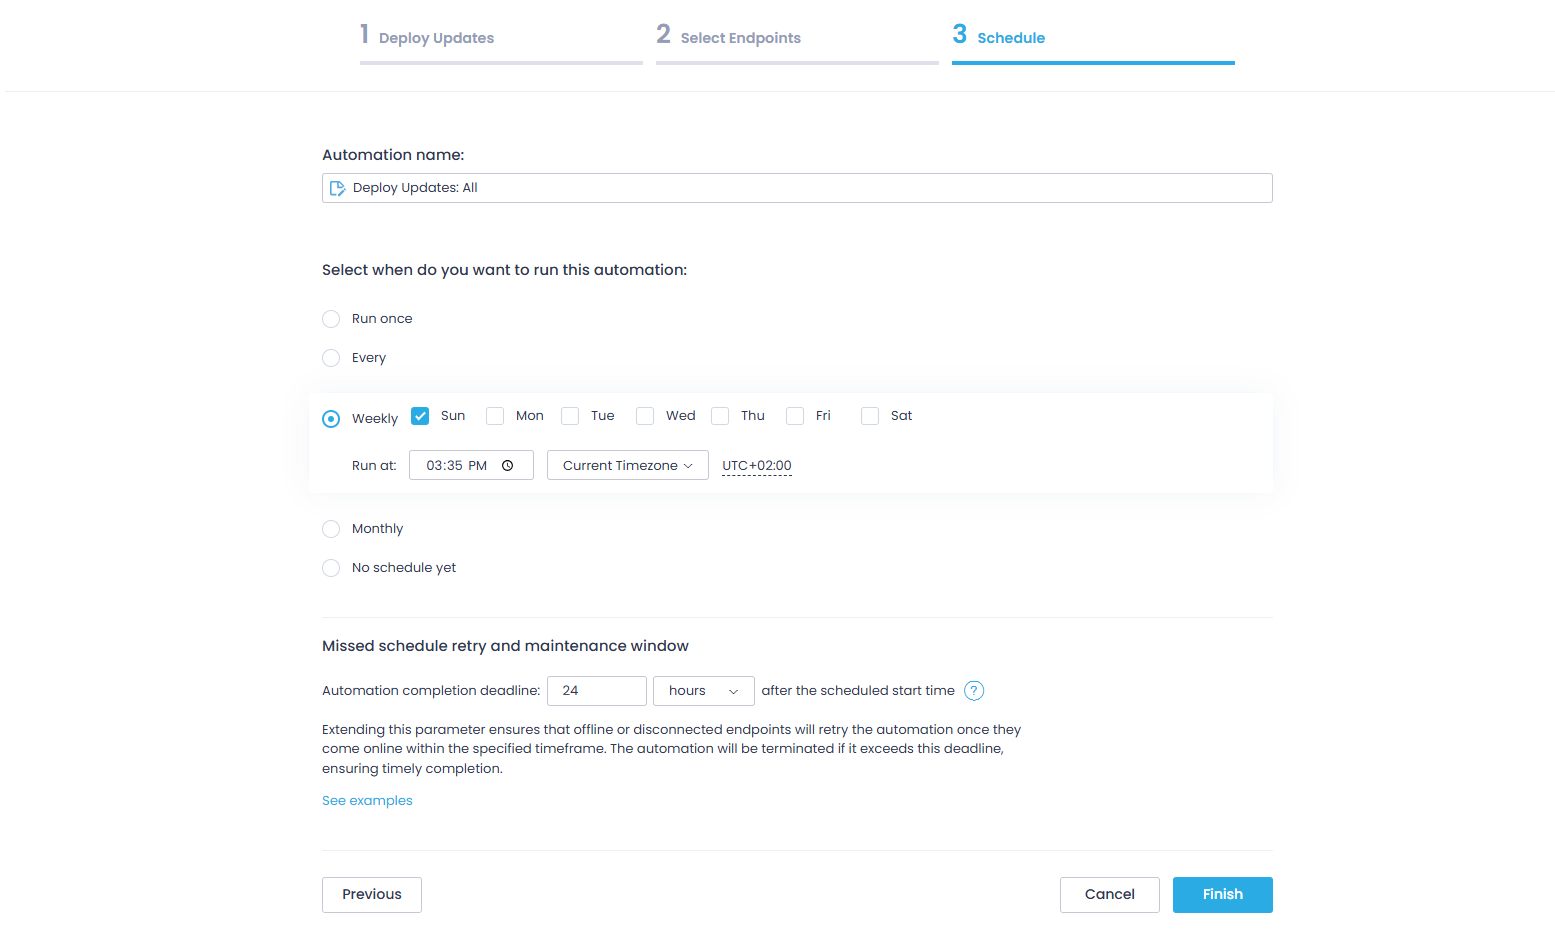
Now click “Finish” and you will see a confirmation saying “Automation Successfully Scheduled.”
Want to roll out patches in stages instead of all at once? Use Update Rings! Here you will find practical instructions on how to create an update deployment automation using the Update Rings structure.
Manual vs Automated Linux Server Patching
You can use Linux patch management software for updating your servers, or do it manually each and every time. Now we will discuss both of them to help you make an informed choice, whether to do it manually or forget about time-consuming processes by automating everything from a to z.
| Manual Patching | Automated Patch Management |
|---|---|
| CLI-based | Centralized tools |
| Risk of inconsistency | Policy-driven |
| Time-consuming | Scalable |
Manual Patching
Manually patching your Linux servers is possible by running commands directly in the CLI on each server. And maybe the only advantage it offers is that you have complete control over the process.
Yet it comes with a bunch of downsides. It is a time-consuming process, and the bigger the number of servers, the higher the risk of human error, coverage gaps, and deployment inconsistencies. This approach may work when maintaining 5 or 10 servers, but you cannot use it on 500. It’s just not possible.
The undeniable truth is that manual patching is best for:
- Small Linux environments
- One-time or emergency patching situations
- Admins that need and prefer having direct, hands-on control over each update
Automated Patch Management
To automate Linux patching, you need a third-party patch manager like Action1. With such software, you can define a patch management policy that fits your preferences, and the platform takes care of the rest, from vulnerability identification and missing patch listing to scheduling, testing, deployment, and report generation, all in just a few clicks.
Cloud-native platforms let you patch tens or hundreds of thousands of on-premises and remote servers simultaneously, which makes them the most preferred option today. They reduce the human error factor, minimize MTTR, and cut your attack surface by keeping each server up-to-date, secured, and compliant.
On top of that, a single administrator equipped with a patch manager can take care of your entire server fleet, which not only strengthens your defenses against cyberattacks but also proves to be a cost-effective solution.
You also get a single dashboard for monitoring the compliance and patch status of each server, with real-time information about its state (offline/online), hardware, and installed apps, giving you everything needed to turn patching into a set-it-and-forget-it process with no mistakes, weak links, or inconsistencies.
Automated patching is best for:
- SMBs, large enterprises, and MSPs
- Administrators that need to manage patches across more than one distro simultaneously
- Companies obligated to follow strict compliance requirements around data security and security updates.
Linux Patch Management Tools You Must Know About
Linux patch management tools come in three main categories. Knowing which one fits your environment can save you a lot of time and headaches, and funds.
Configuration Management and Automation Tools
Ansible, Puppet, and Chef are such tools. They are designed to manage infrastructure as code, but it turns out they deal with patch management pretty well too. They work by using orchestration tools and scripting to apply patches at scale, which is why they are so popular among teams that already use them to manage their Linux operating systems. Yet, the biggest hurdle is that your team must be tech-savvy and comfortable working at the command line.
Enterprise patch management platforms
These third-party programs are designed to automate update processes entirely. The best Linux patch management software platforms identify vulnerabilities across your servers, list the missing OS patches and third-party updates, and offer features that enable extensive testing, scheduled staged rollouts, and easy audit report generation.
Cloud-native platforms have a significant advantage since they are easy to deploy and enable the management of on-premises and remote endpoints without requiring additional hardware or VPNs. Directly from your browser, you can create a patching policy according to your organization’s preferences and monitor each stage from the intuitive dashboard these solutions offer.
Undoubtedly, these are the most widespread tools among businesses of all sizes, because they deliver everything needed to protect your Linux devices and servers, keep them performing well, and ensure adherence to strict regulatory compliance. They guarantee faster remediation, minimized attack surface and downtime risks, 99% less manual work, great ROI, and boosted team productivity.
Native Package Managers
As the name suggests, these are built-in Linux tools that detect and deploy software updates directly from official repositories. Every distro ships with one, and many smaller teams rely heavily on them since they find them more than enough to get the job done, especially in smaller environments with fewer servers.
Ubuntu and Debian-based servers use apt, RHEL and CentOS rely on dnf or yum, and SUSE Linux Enterprise uses zypper. Their obvious advantage is simplicity. They need no additional tools, no licenses, and no extra configuration.
Things look great on paper, but as mentioned earlier, they are ineffective for organizations with hundreds or thousands of Linux servers, as running commands one by one is simply not a realistic option.
Linux Server Patch Management Best Practices
What follows are some of the best practices for Linux server patch management. Each of them has proved its efficiency and can help make the process as effortless, efficient, and smooth as possible.
Maintain an Asset Inventory
To start, you need a complete, real-time inventory of every Linux endpoint used across your environment. You must know the operating system of each one, every installed software title, and the current patch status.
Without this, you will always leave blind spots from unpatched systems, leading to potential data breaches or cyberattacks. A single vulnerable server or software app among 200 up-to-date ones can expose the entire network to risk.
So, you can’t afford that, and the best way to prevent it is by using cloud-native patch management software, where agents keep feeding the platform 24/7/365 with information about each server’s patch, compliance, and device status.
Establish a Patching Policy
A patch management policy is an IT document that outlines a company’s strategy for identifying, evaluating, testing, and installing software patches across its environment (endpoints, servers, workstations, mobile devices, etc.).
In short, this document gives you a clear framework for managing security patches, software upgrades, and system modifications to protect your assets against vulnerability exploitation, improve system performance, and maintain operational integrity.
Every organization must have its own policy that is “handmade” for its infrastructure, risk tolerance, compliance obligations, system criticality, and operational constraints. A well-defined policy is the shortest path to consistent decision-making, controlled deployments, and measurable risk reduction.
To create an effective policy for your company, you must ask yourself the following questions:
- What assets are in scope, how are they classified by criticality, and which regulatory requirements apply to them?
- How are critical vulnerabilities and zero-day vulnerabilities prioritized, and what remediation timelines are defined for each severity level?
- Who is responsible for identification, patch testing, approving patches, deployment, verification, and exception handling?
- What testing standards must patches meet before production rollout?
- What maintenance windows are established for different system tiers, and how are emergency patches handled?
- What rollback procedures exist if a deployment causes instability?
- How are remote or offline Linux servers monitored and updated?
- How is patch compliance measured and reported for audit purposes?
- What level of automation is in place, and how are exceptions formally approved and tracked?
Define Patch Severity Tiers
It is important to prioritize patch deployments based on the problem they solve. For example, a patch that fixes a critical security vulnerability should always be first. A bug fix or feature update must be considered as a secondary one that can be installed during the next maintenance slot or at another convenient time.
That said, most organizations separate patch groups into a four-tier system based on severity, which perfectly outlines the urgency and prioritization of each patch. The system uses CVSS scores, real-exploit indicators, CVE numbers, and potential business impact on your servers, and it looks like this:
- Critical (CVSS 9.0-10.0): Flaws in this range demand immediate action. Deploy these patches within 24-48 hours of disclosure, but honestly, the sooner the better, since attackers are likely already trying to exploit them.
- High (CVSS 7.0-8.9): Serious flaws that carry real exploitation risk, so you must address them within seven days of their disclosure.
- Medium (CVSS 4.0-6.9): Real risk, but not actively exploited in the wild yet. Queue them for your next scheduled maintenance window.
- Low (CVSS 0.1-3.9): These carry minimal risk and can be safely grouped with your next scheduled patching cycle.
Schedule Maintenance Windows
A maintenance window in patch management is the pre-approved time slot during which patches are tested, deployed, and systems are rebooted. They happen on a specified, recurring schedule to ensure that the servers in scope are up-to-date with the latest updates. With them, the patching process is well organized and your team knows when to expect downtime, so there are no unpleasant surprises.
You need two of them, and here is how each works:
- Regular maintenance window: You and your team should decide whether you need to patch weekly, bi-weekly, or once per month. Every organization relies on different environments and uses specific software, so it’s up to you to define the maintenance regularity based on your needs. It can be scheduled for weekends or outside business hours to avoid downtime risks and a decrease in your employees’ productivity.
- Emergency maintenance window: As the name suggests, this must be your action plan for immediate patch deployment that fixes vulnerabilities with high exploitation rates. Updates will often be deployed during business hours, meaning they will cause downtime, but it’s way better to be protected and sacrifice an hour or two from the workday than to lose hundreds of thousands of dollars from fines, unplanned downtime, and client loss.
Automate Where Possible
Patching Linux systems manually is a pain, and we all know that. It is a time-consuming and error-prone process, especially when done across hundreds of servers. It just does not scale. Luckily, you can automate the entire process by using a cloud-native patch management solution like Action1.
These platforms automate vulnerability identification and remediation through patch deployment and enable detailed report generation in minutes. They come with a central dashboard where you can monitor your on-premises and remote servers in real time for their patch and compliance status.
Adding such a platform to your security toolkit is a must because it delivers complete asset coverage, strengthens your overall security posture, eases regulatory compliance, eliminates blind spots, and delivers amazing cost-effectiveness by allowing a single administrator to manage hundreds of thousands of servers.
Maintain Rollback Procedures
Even well-tested patches can cause problems in your production environment. It happens from time to time. But when you have a software solution with one-click rollback capability by your side, you can save yourself tens of hours fixing what shouldn’t have been broken in the first place. With one click, you can uninstall the patch that caused the instability and get things back to normal.
We also advise you to take a snapshot of your virtual machines and create a full backup of your physical servers before every patching cycle, because this is your “plan B” that protects you from any unexpected scenario.
Reporting and Tracking Patch Compliance
After each successful patch deployment, you must document the outcome. You can do that manually, which might take you anywhere from a couple of hours to days, or use a patch management platform like Action1 that offers fully customizable report templates, allowing you to generate audit-ready documentation in minutes.
You are going to need these reports to prove compliance once regulatory bodies knock on your door. They are also very helpful for your IT team, allowing them to track patch deployments, monitor success rates, and keep a clear record of every patching cycle.
Monitor Post-Patch Performance
Once updates get deployed successfully, you have an equally important task, monitoring your Linux servers closely for the next day or two for any strange behavior like performance regression, downtime, compatibility issues, and bugs. So if something like that happens, you can act quickly with a rollback or use the previously taken snapshot or full backup to address the problem.
Common Challenges in Linux Server Patch Management
An effective and well-implemented Linux server patch management strategy really makes your life easier, safer, and less stressful by helping you keep all of your servers up-to-date and protected. However, many organizations report facing the same or similar challenges when building their patching automation.
Here are the most common ones and how to deal with them:
Kernel-Related Downtime
After deployment of kernel updates, you have to restart the server for the changes to take effect, meaning that your servers will be offline during that period of time.
That’s a real problem for organizations that rely on high availability or 24/7 operations. Healthcare providers, airlines, financial institutions, and data centers all share the same problem.
The good news is that there is a solution, and it is called live patching. Tools like KernelCare, RHEL’s kpatch, and Ubuntu’s Livepatch can apply kernel patches without requiring a reboot.
It works by loading a kernel module that redirects execution from vulnerable code to patched code in memory using ftrace, also known as function tracing, resulting in patch deployment with no downtime. So if your organization is in one of the aforementioned sectors, you definitely need to add live patching to your toolkit to eliminate this problem.
Dependency Conflicts
When updating packages on your Linux servers, you may experience dependency conflicts. It’s not that common, but it happens once in a while. One update can negatively affect a particular application if it depends on a specific version of a library or package.
To avoid such issues, never skip patch testing before proceeding to organization-wide deployments. Virtual machines, or a group of 2-3 servers, work miracles in these situations. Testing every patch there will reveal any dependency conflicts before they reach production.
With Action1, for instance, you can use the update rings feature, which enables staged, risk-free, autonomous deployments. You can create multiple rings, starting with a testing ring (1-10% of your servers), then expanding to a pilot ring (10-30%), and finally a broad ring(30-100%).
Updates advance from inner to outer rings based on pre-defined success metrics, where only qualified patches move forward automatically, while problematic ones do not. This successfully reduces downtime and dependency conflict risks while ensuring timely vulnerability remediation.
Multi-Distribution Environments
Most organizations rely on multiple Linux distributions across their servers, like Ubuntu, Red Hat Enterprise Linux, and SUSE Linux Enterprise. They all use different package managers, different patch repositories, and different update commands. As you can imagine, this makes managing such an environment a bit challenging, especially when done manually.
Cross-platform patch management solutions handle this problem with ease since they can identify missing updates, then test and deploy them simultaneously, allowing you to manage all your servers from a single dashboard with equal success.
Remote Server Fleets
Patching Linux machines and servers located in different parts of the world simultaneously is another major challenge for IT teams. If you are using patching tools that require VPN access or direct network connectivity, this can get messy and create blind spots for remote or offline servers.
For cloud-native patch management platforms like Action1, this is not a problem. You can manage servers around the globe directly from your browser, with no VPN or additional hardware required.
On top of that, with Action1 you can queue updates for systems that are offline during the scheduled deployment, so once they reconnect, they get automatically updated.
Change Management Resistance
One of the biggest fears of IT teams is breaking something that works during or after patch deployments. This can lead to delayed patches, a wider attack surface, and in the worst case, a successful cyberattack. However, this mostly applies to teams lacking proper patch management tools, or teams that cannot cover the entire server fleet and have to rely on workarounds or manual patching.
It’s pretty simple to solve this by using a cloud-native patch management system that offers cross-OS platform support, broad third-party application coverage, flexible scheduling, reliable testing features, and rollback capabilities. This set of functionality allows them to effortlessly patch every Linux server with minimal risk. When the process is controlled and reversible, resistance drops.
How often should Linux servers be patched?
You should patch your Linux servers as soon as possible after a critical security update is released, ideally within the first 24-48 hours. General or routine patches that fix software bugs, introduce new features, or address low-severity flaws can be applied during your next maintenance window, whether that is weekly, biweekly, or monthly.
What happens if you don’t patch your Linux servers?
Not patching your Linux servers leaves them vulnerable to cyberattacks like ransomware, malware, and data breaches, increases downtime risks, and can result in compliance penalties. These business-destructive consequences become real the moment a hacker exploits an unpatched vulnerability and gains unauthorized access to your systems.
Why is patch management important?
Patch management is important because it keeps your Linux servers and the rest of the endpoints across your organization protected, compliant with different regulatory standards, and performing at their best.
By implementing an automated and efficient patching process, you ensure that the chances of experiencing a cyberattack due to an exploited security flaw are minimized, regulatory fines won’t be your concern, and a single admin can control the entire process. You get stronger security, easier compliance, boosted team productivity, and maximized uptime with minimal effort.
Do Linux servers need to be rebooted after patching?
Yes and no. A reboot is always required after kernel updates or when systemd and critical system libraries are updated, because these changes cannot take effect on a running system. For application-level patches, a reboot is not mandatory. You can simply restart the affected app and move on.
If rebooting is not an option for your environment, live patching tools like KernelCare or RHEL’s kpatch let you apply kernel patches directly in memory, with no downtime required.
What is the difference between patching and upgrading?
Patches address software vulnerabilities, bugs, or performance issues. Upgrades, on the other hand, literally replace your current software with a newer version, bringing the latest features. Patches are smaller in size, while upgrades are larger, which means each of them requires a different amount of time to be deployed across your servers.
Can Linux servers be patched without downtime?
Yes, in most cases. Application-level patches and regular software updates can be applied without taking your servers offline. You simply restart the updated app instead of the whole server. Kernel updates are the exception, as they require a full reboot to take effect.
That said, even kernel updates can be applied without any downtime by using live patching tools like KernelCare, RHEL’s kpatch, or Livepatch. They patch the running kernel directly in memory, so your servers stay online and protected the whole time.
Key Takeaways
There used to be a time when manually patching your Linux servers would work, but with the constantly growing number of cyberattacks and the reduced window between vulnerability disclosure and exploitation from 63 to just 5 days, things have changed.
Nowadays, organizations manage tens or even thousands of Linux servers, and keeping them up-to-date is essential in protecting them against data breaches, ransomware, malware, a damaged reputation, and costly regulatory penalties. However, this is easier said than done.
Some organizations with up to 10 servers still prefer manual patch management because it’s cheaper, and say it works. On the other hand, SMBs, large enterprises, and MSPs rely on patch management platforms to automate the process end to end, eliminate human error, and maintain compliance without overwhelming their IT teams.
Action1 is among the best patch management solutions, offering cloud-native architecture that takes up to 5 minutes to set up and start patching all your servers simultaneously. The software allows managing on-premises and remote endpoints with no VPN or additional hardware required. Action1 combines cross-OS support, broad third-party application coverage, staged and autonomous deployments, strong security, and a rich feature set to simplify and streamline the patching process.
In general, having a reliable third-party patch manager and following the best practices in Linux server patch management help you avoid costly mistakes and unexpected downtime, while boosting your overall security posture and your IT team’s productivity.
About Action1
Action1 is an autonomous endpoint management platform trusted by many Fortune 500 companies. Cloud-native, infinitely scalable, highly secure, and configurable in 5 minutes—it just works and is always free for the first 200 endpoints, with no functional limits. By pioneering autonomous OS and third-party patching with peer-to-peer patch distribution and real-time vulnerability assessment without needing a VPN, it eliminates routine labor, preempts ransomware and security risks, and protects the digital employee experience.
In 2025, Action1 was recognized by Inc. 5000 as the fastest-growing private software company in America. The company is founder-led by Alex Vovk and Mike Walters, American entrepreneurs who previously founded Netwrix, a multi-billion-dollar cybersecurity company.


