



TL;DR
- A missing Windows update is an available update that hasn’t been installed yet. Missing updates can include security and quality updates, feature updates, drivers, Defender definition updates, and optional updates.
- Start by checking Windows Update in Settings and reviewing Update History to determine whether updates are missing, pending, or previously failed.
- Missing, failed, and pending updates are different states. A missing update hasn’t been installed, a failed update encountered an installation problem, and a pending update is waiting to finish—often after a restart.
- PowerShell provides another way to check for missing Windows updates, making it particularly useful for administrators, troubleshooting, and automated update checks.
- Common causes of missing updates include paused or disabled update services, metered connections, low disk space, corrupted update caches, driver conflicts, firewall or security software interference, and damaged Windows components.
- Windows Update error codes can help identify the underlying problem. Errors such as
0x800f0922,0x8024200D,0xC1900101,0x80073712, and0x80070570point to issues including storage limitations, incomplete downloads, driver conflicts, or corrupted system files. - For common update failures, run the Windows Update Troubleshooter first. More persistent problems may require resetting Windows Update components or repairing Windows with DISM and SFC.
- If Windows Update cannot install a required update automatically, the Microsoft Update Catalog can be used to locate and manually install the appropriate update package.
- Persistent Windows Update problems may require a full Windows Update reset or repair installation when underlying Windows components are damaged.
- For organizations managing many endpoints, centralized patch management can automate detection and deployment. Action1 can identify missing Windows updates across managed endpoints and deploy the required patches without administrators checking each computer individually.
To detect and fix missing updates on Windows 10 or 11, you have several effective options available. These include manually checking for updates through the Settings app, running the built-in Windows Update Troubleshooter, and using advanced methods such as PowerShell commands or direct installation from the Microsoft Update Catalog. For persistent issues, you can also reset Windows Update components to restore normal functionality.
Missing updates are a common problem for millions of users around the world. We’ve all paused, delayed, or been unable to install the updates and patches that Microsoft releases to remediate critical software vulnerabilities, fix OS and application bugs, or introduce the latest features. However, missing such updates makes our systems vulnerable to cyberattacks, system and application crashes.
The problem is that even when we miss a couple of updates for one reason or another, our computers continue to operate without any obvious problems, and this false sense of security makes us think they are not that important. But that is not true… at all.
What’s even more concerning is that skipping updates happens without our knowledge due to metered connections, corrupted update cache files, or misconfigured system services. In such situations, we don’t even know that our computer runs with outdated software or the risks and cyberthreats it is exposed to.
And this is what we are going to cover in this guide. You will learn how to quickly identify which updates are missing and apply reliable and effective solutions that just work to get your system up to date. We will show you how to effortlessly check for pending updates using the built-in Windows tools and some advanced PowerShell scripts. You’ll also learn how to fix stuck updates at 0%, clear caches containing broken files, and even run system scans to repair potential damage that interferes with patching.
The good news is that all the methods are applicable for both Windows 10 and Windows 11. Whether you are a home user managing a few computers in your network or an IT professional managing thousands or hundreds of thousands of endpoints, this guide will assist you in staying updated and preventing silent failures that put your devices at unnecessary risk.
So let’s waste no more time and get started.
Action1 is free for up to 200 endpoints, fully featured, forever! Watch the demo to see it in action. Or sign up in five minutes and start managing, securing, and updating your endpoints.
Read also: How to Fix Windows 11 Update stuck at 0%?
What are Missing Updates in Windows?
A missing Windows update is an available update that hasn’t been installed on your device yet. Missing Windows updates often happen for a few reasons, like disabled update services, paused or skipped updates, software conflicts that prevent successful update installations, or, corrupted update cache. To successfully troubleshoot these problems, you must check your computer’s update settings, run the Windows Update Troubleshooter, or eventually reset or reinstall your Windows for more serious issues.
The major causes for missing updates stem from your computer’s background settings or overlooked and unresolved technical issues. For instance, a metered connection can block update downloads without even knowing about it, or if you use outdated drivers, this can also cause compatibility problems with newer patches and their successful deployment. In other cases, updates fail because of silently stopped services like BITS or Windows Update itself. Keep in mind that third-party antivirus software and strict firewall rules can also negatively influence the update process without displaying any error.
So if you don’t see updates being installed when Patch Tuesday comes, start digging for any possible issues across your system to prevent the risks of running your computer with outdated software.
Missing vs Failed vs Pending Windows Updates: What’s the Difference?
Missing, failed, or pending, the bottom line is the same. Your computer isn’t up to date. But let’s look at what makes each of them different.
- Missing Windows Update:
A missing update is an available update that hasn’t been installed on your computer. Behind this can be stopped automated checks, a deferral policy holding the update back, not enough storage space, an unstable or weak internet connection, or many other reasons. - Failed Windows Update:
A failed update is one that started its installation but, for one reason or another, didn’t complete. Corrupted files, insufficient disk space, a conflicting driver, or an unresponsive update service may be the root cause of the problem. - Pending Windows Update:
A pending update is one that has been downloaded to your computer and is ready to install, but it hasn’t been applied yet. In most cases, the issue is that the system must restart to automatically launch the installation process.
Which Types of Windows Updates Can Be Missing?
Any kind of Windows update can go missing, but let’s name them one by one:
- Quality updates (monthly security updates): These updates often include multiple fixes and are called cumulative updates. They are released on a strict schedule known as “Patch Tuesday.” On the second Tuesday of every month, Microsoft releases these updates to fix vulnerabilities identified since the last release.
- Feature updates: These introduce new features and tools or upgrade your operating system to the latest version, such as moving from Windows 11 version 24H2 to 25H2. They are released once or twice per year, following an annual or semi-annual schedule.
- Driver updates: These software packages help your operating system connect and communicate with hardware components like graphics cards, printers, and other peripheral devices. Keeping your drivers up to date fixes bugs and helps your hardware run faster and more reliably.
- Definition updates: These update the database of your security software, such as Microsoft Defender. Their purpose is to give the built-in antivirus tool the latest signatures, behavior rules, and intelligence needed to recognize and block new viruses, malware, and other digital threats.
- Optional non-security preview updates: As the name suggests, these are not mandatory and are early test versions of upcoming Windows monthly fixes and features. They are also released on Tuesdays, but on the fourth Tuesday of each month (sometimes called “D week” releases). Their purpose is to let you test non-security improvements and bug fixes before they roll out officially on the regular Patch Tuesday schedule.
What are the Most Common Windows Update Error Codes and What They Mean?
Both basic users and IT professionals managing thousands of endpoints have experienced the unpleasant feeling of seeing an error code during a Windows update deployment. Every time, the code is different, and so is the solution. So below, let’s look at the most common Windows update error codes and what they actually mean.
- 0x800f0922 (CBS_E_INSTALLERS_FAILED): This means a cumulative or feature update fails in the commit phase and Windows rolls the install back. In most cases, the issue is a full System Reserved (EFI) partition that does not have enough space to stage the update. A blocked VPN connection or a corrupted component store can also cause this error. Free up space in the EFI partition and disconnect any active VPN before retrying.
- 0x8024200D: This means the download process did not complete as expected or at all, so the installer ended up corrupted or incomplete. Remove the failed installer and download it again instead of trying to use it. Check your internet connection stability before the next installation attempt so you don’t end up with another incomplete download. If that does not help, the update cache is likely the problem and you will need to clean it.
- 0xC1900101: This error points directly to a driver conflict that blocks the installation of a feature update. Storage drivers, graphics drivers, or sometimes third-party security software are the usual causes.
- 0x80073712: This means you have a problem with a corrupted component in the Windows servicing store, usually left behind by an earlier update that did not finish cleanly. The fix here is to run DISM with the RestoreHealth option, followed by a System File Checker scan.
- 0x80070570: If you see this error, the installer is trying to read a file it needs, but the file is missing or damaged. The root cause might be disk errors or an interrupted download. Run a disk check and then clear the SoftwareDistribution folder to get things working properly again.
How to Check for Missing Updates in Windows 11?
To check for missing updates in Windows 11, you can use Windows Update in the settings, run the Windows Update Troubleshooter, check Update History, or use PowerShell.
To make things more clear, let’s go through each method step-by-step, in a way that anyone can follow:
1. Use Windows Update from Settings
We will start with the most basic yet very effective way to check for updates through using the Windows Update app:
- Step 1. Press the Windows key + I to open Settings, or alternatively click the start menu icon and in the search bar type “Settings.”
- Step 2. Click “Windows Update” in the left sidebar.

- Step 3. Click “Check for updates” and wait for the scan to complete.
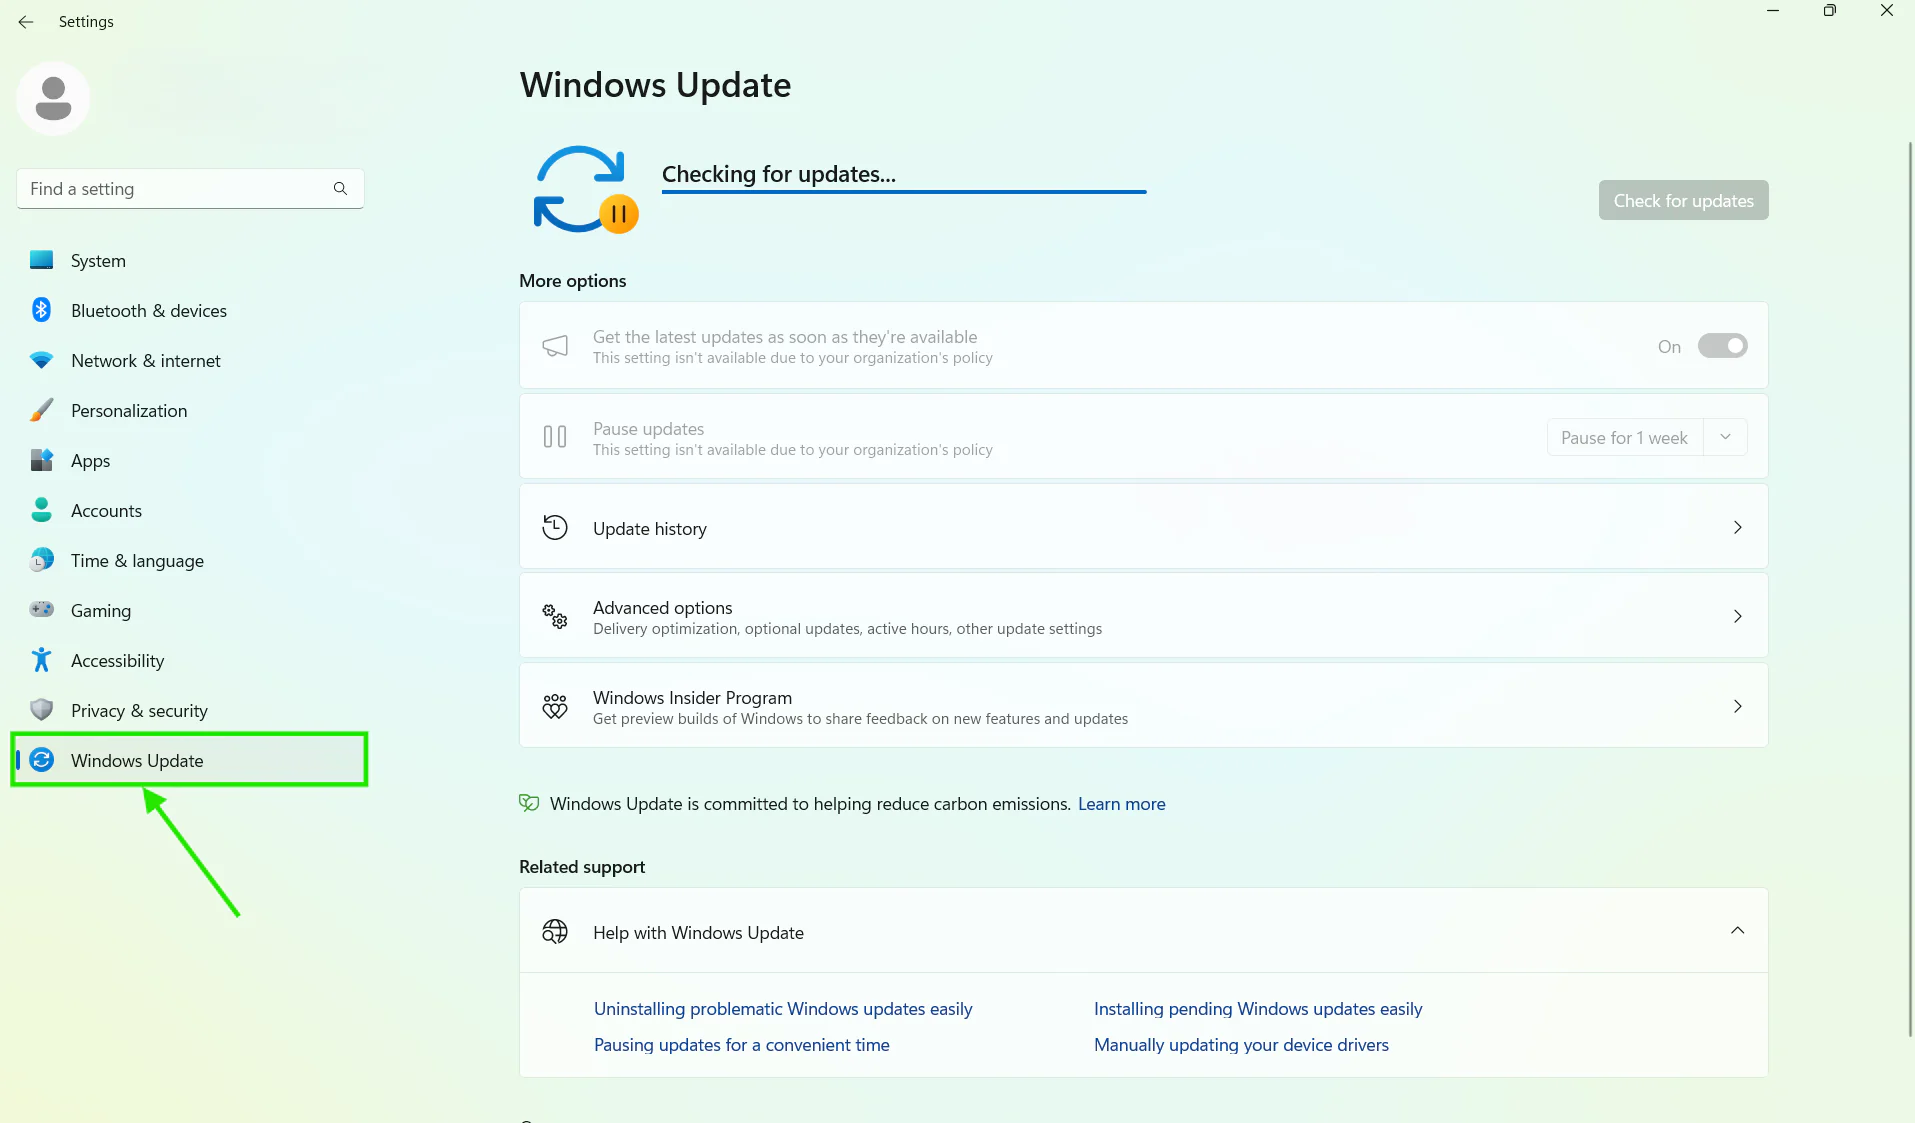
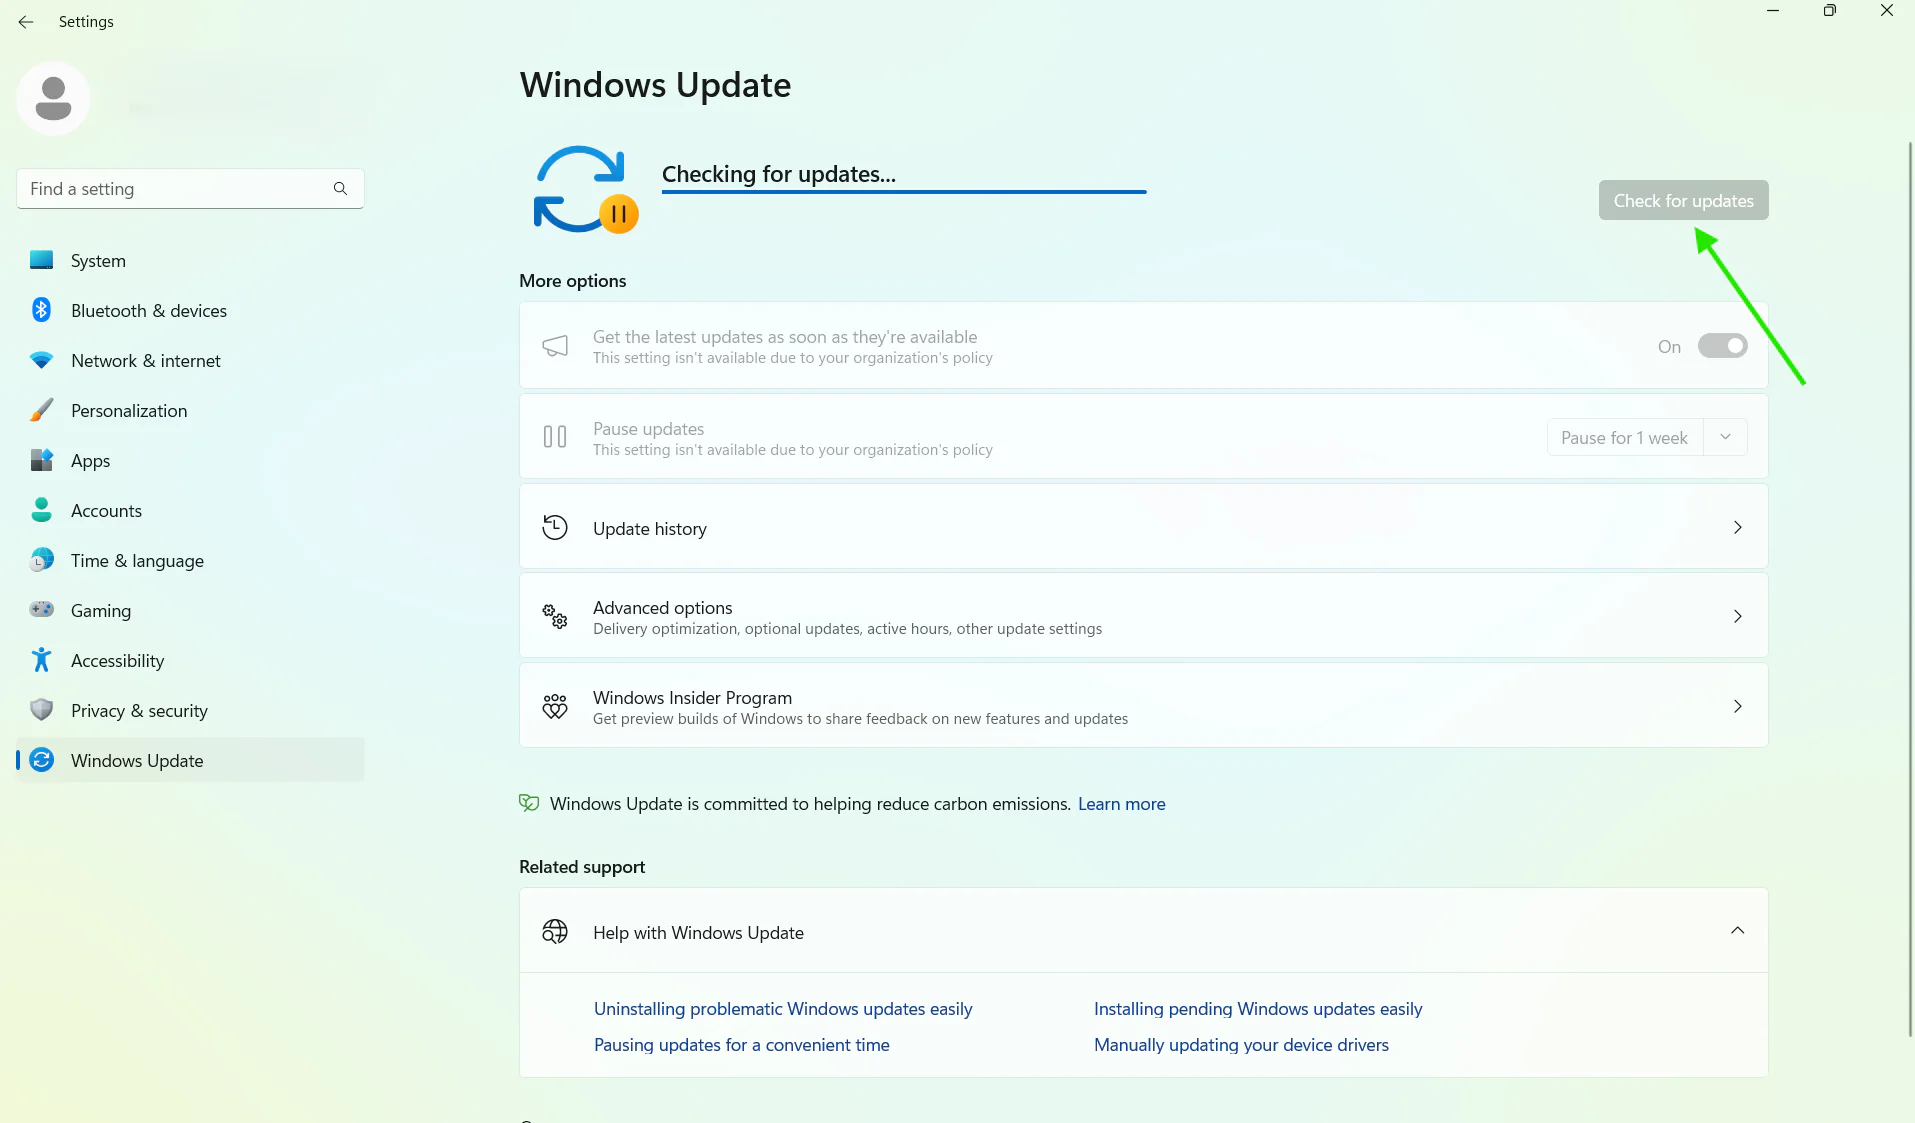
- Step 4. If any missing updates are identified, they will be displayed on your screen with “Download” or “Install” buttons. If not, you will see a message saying, “You’re Up to Date.”
- Step 5. Click “Download & install” to start the process of updating your system.
- Step 6. Your computer will restart automatically after the installation completes; if not, reboot your computer manually in order for the changes to take full effect.
2. Run the Windows Update Troubleshooter
To run the Windows Update Troubleshooter, which can successfully detect and fix the most frequent and basic update problems, follow these steps:
- Press the to open Settings.
- Scroll down and find “Troubleshoot.”
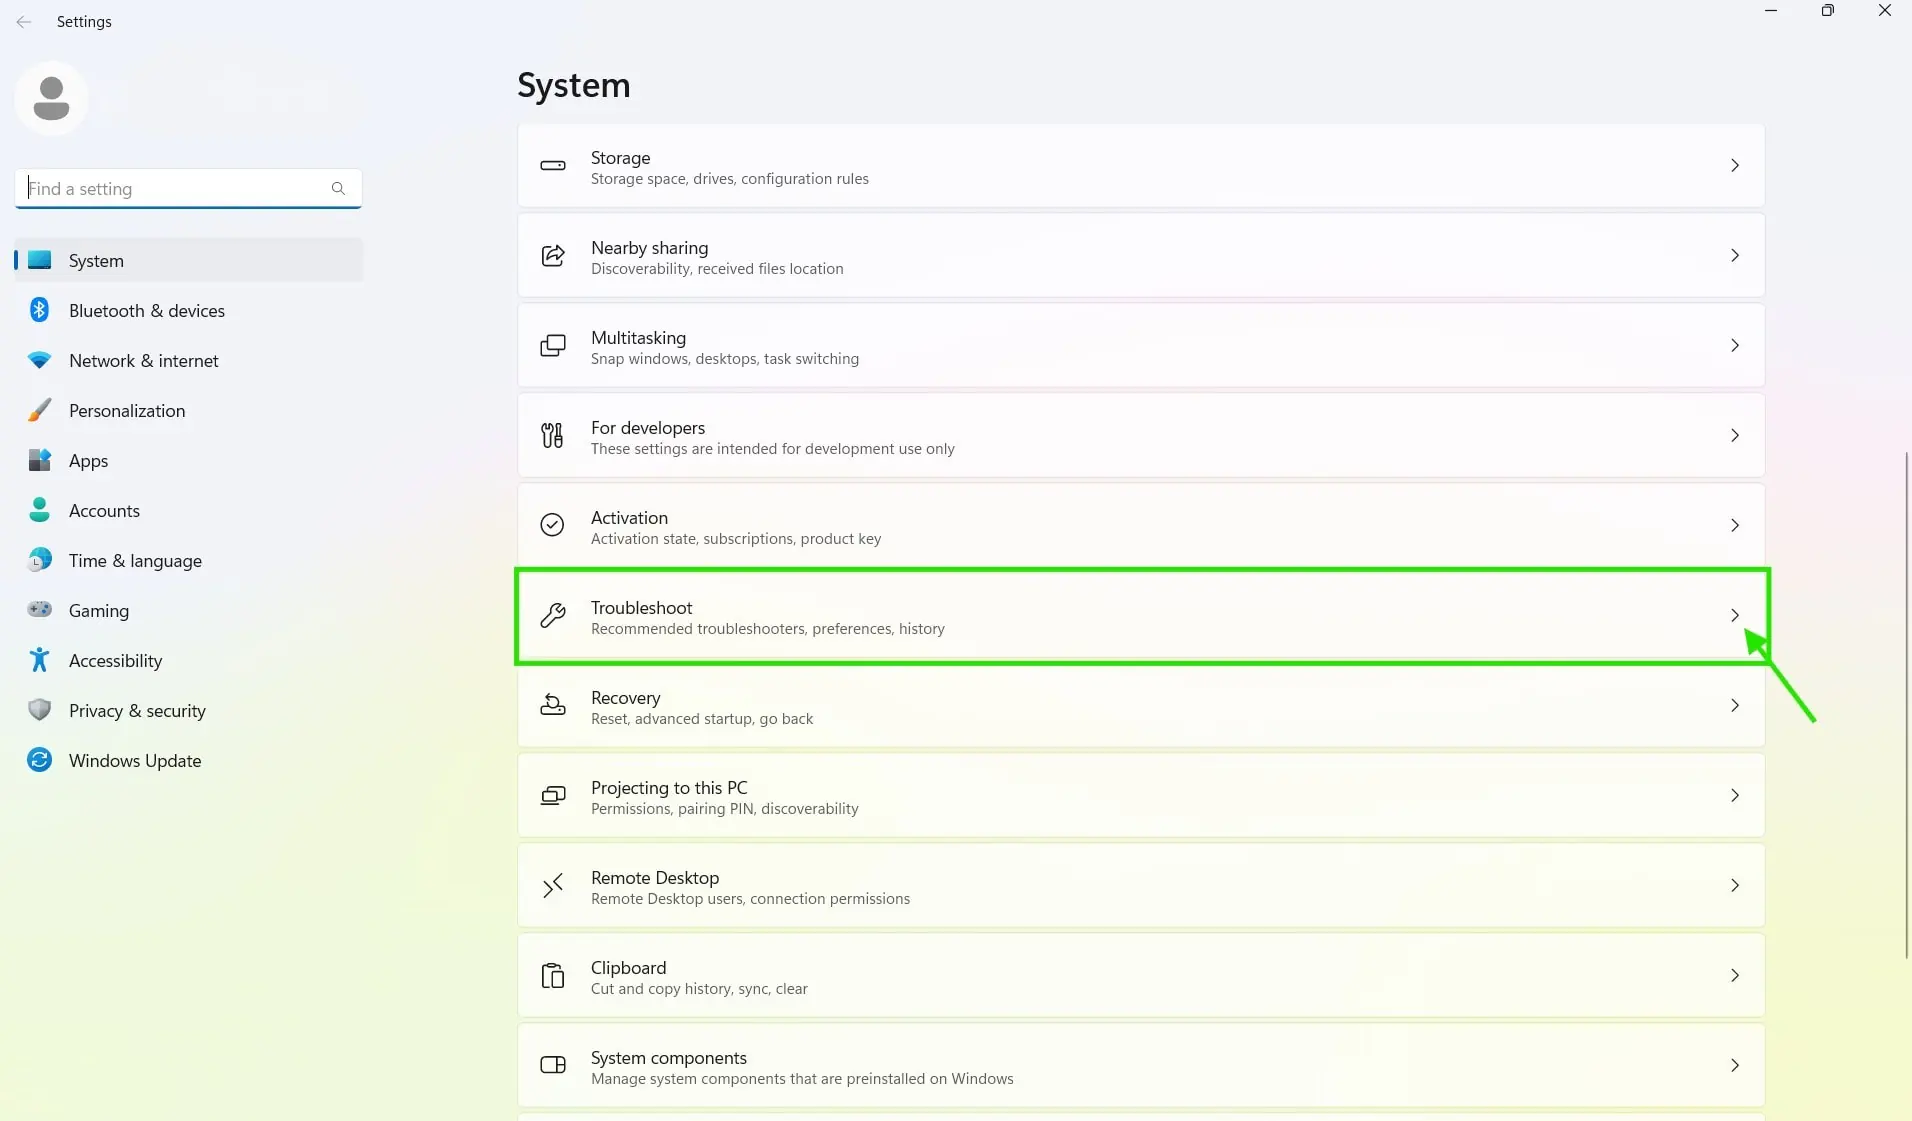
- Step 3. Now, select “Other troubleshooters.”
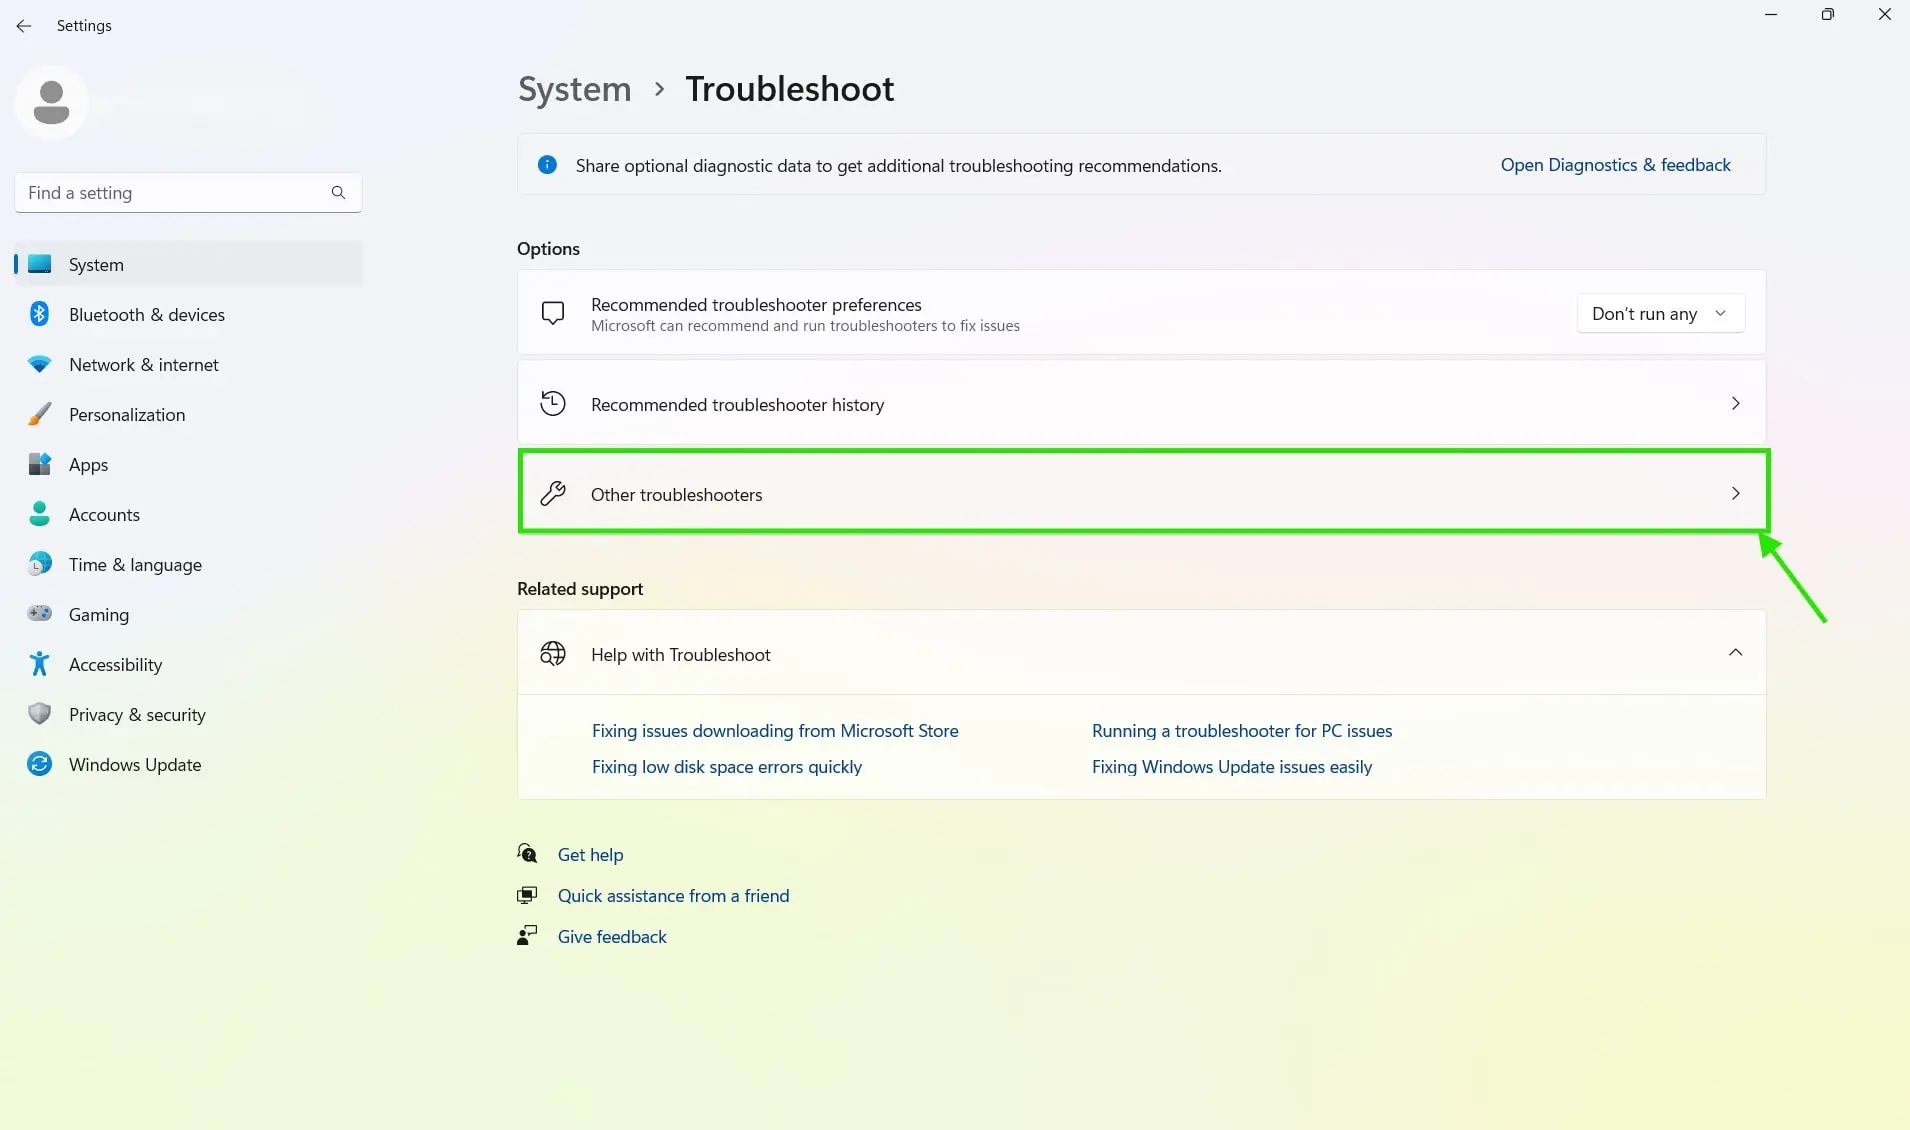
- Step 4. Find “Windows Update” and click the “Run” button next to it.
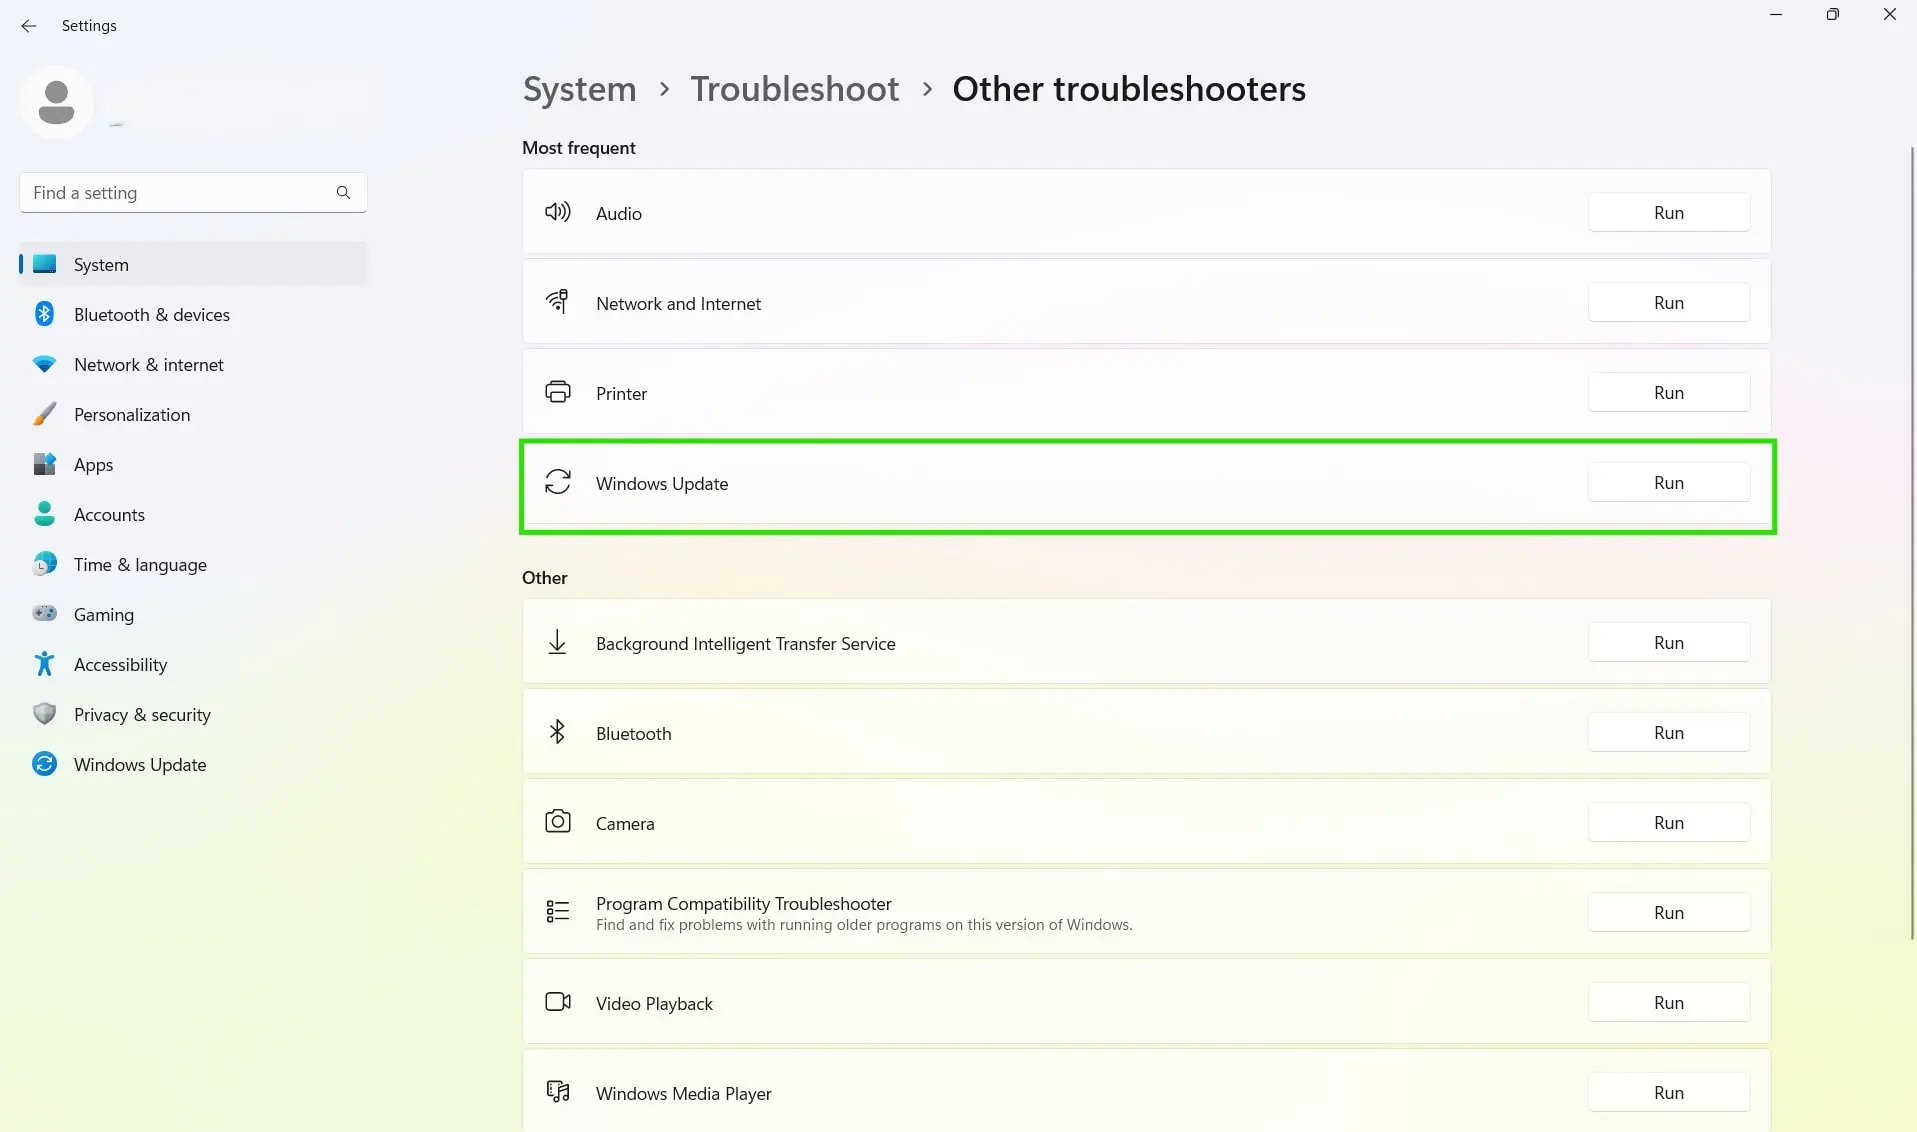
- Step 5. Wait for the process to complete, which takes 2-5 minutes.
- Step 6. Click “Apply this fix” in case the troubleshooter finds any problems.
- Step 7. Last but not least, restart your computer, and then run again the to see if it will detect and install any missing updates.
3. Check Update History and Installed Updates
You can easily detect missing updates through the update history on your computer. Sometimes particular updates appear to install, but they actually fail silently, without any error codes. Here’s how to verify if your system is up-to-date or if you are missing critical updates.
- Access Settings by pressing the Windows key + I, then go to “Windows Update.”
- Step 2. Click “Update history”; there you will find various options available, including Quality updates, Driver updates, Definition updates, and Other updates. Closely inspect each of these options to see if there are any updates marked as “Failed to install”, these are missing updates.
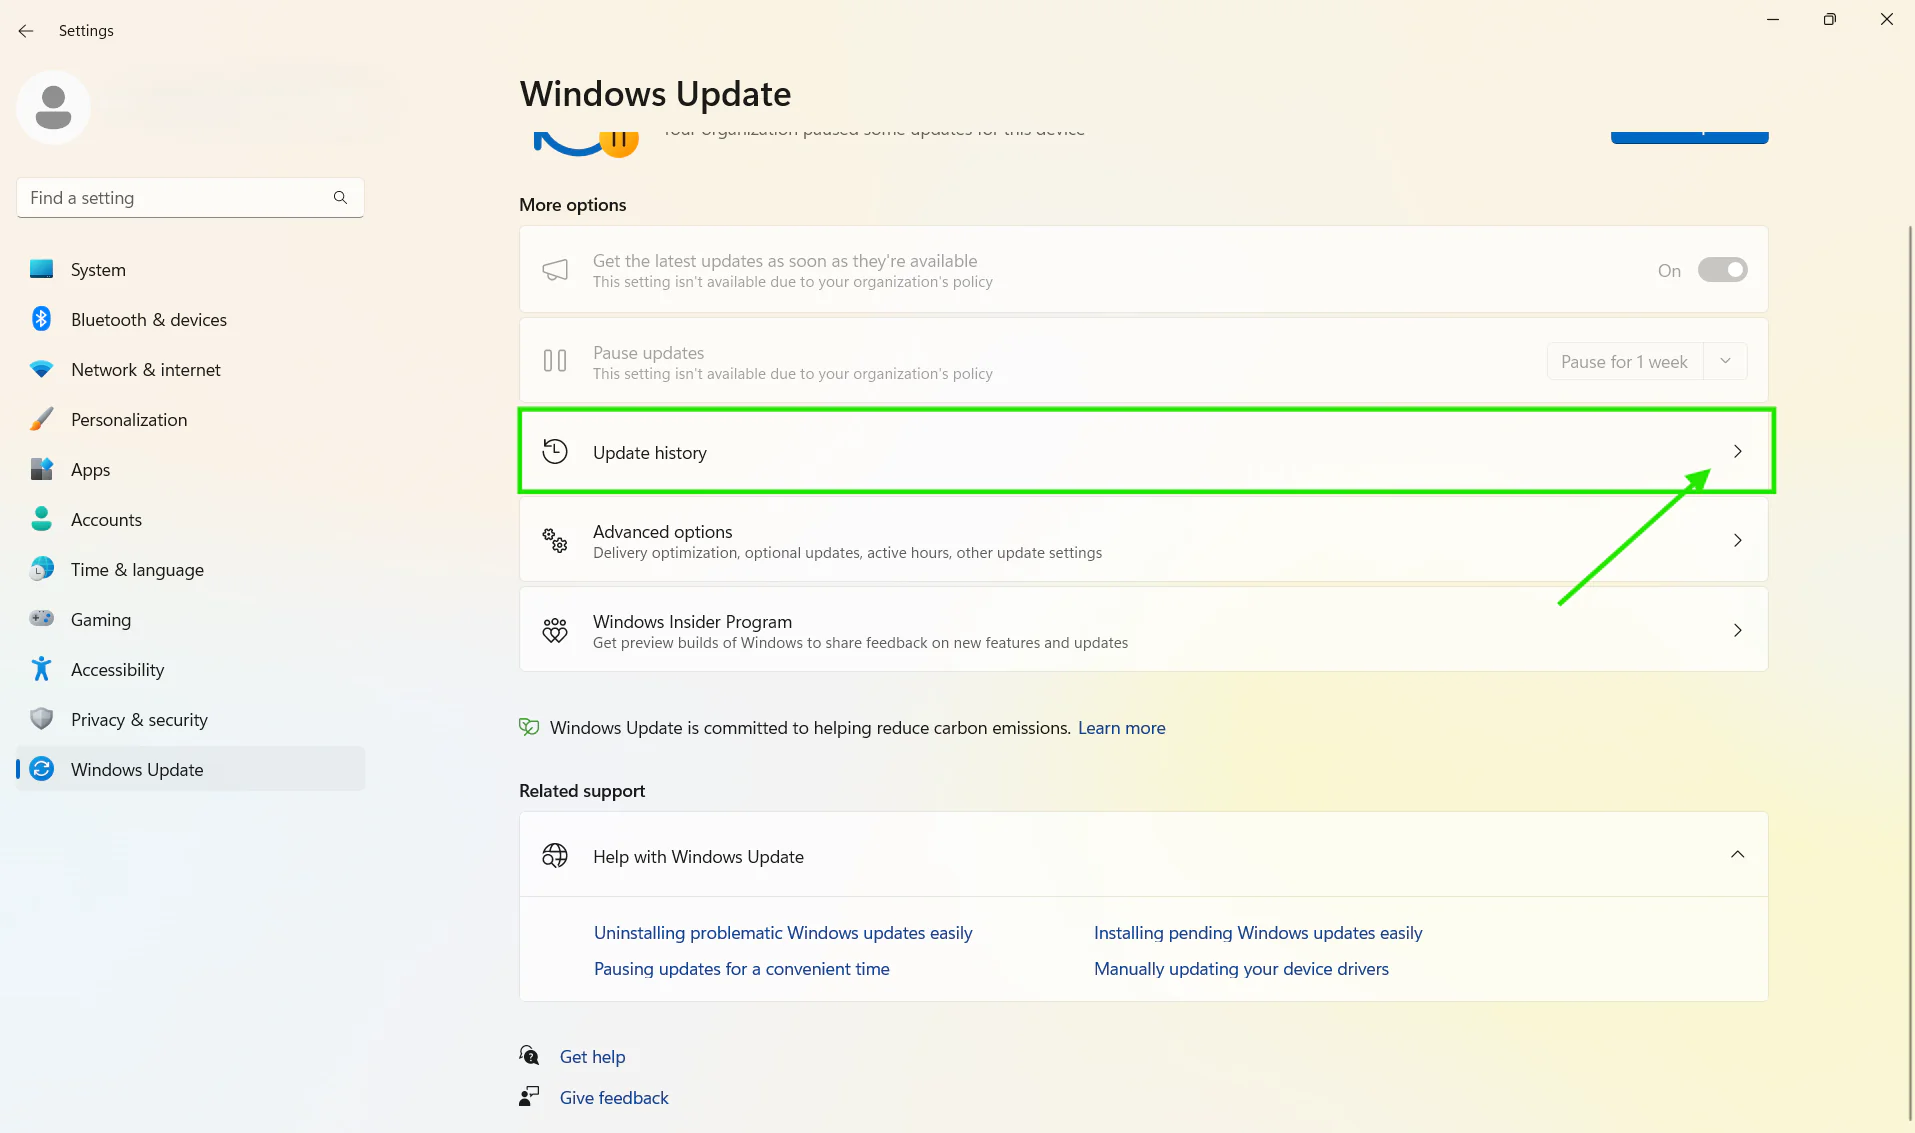
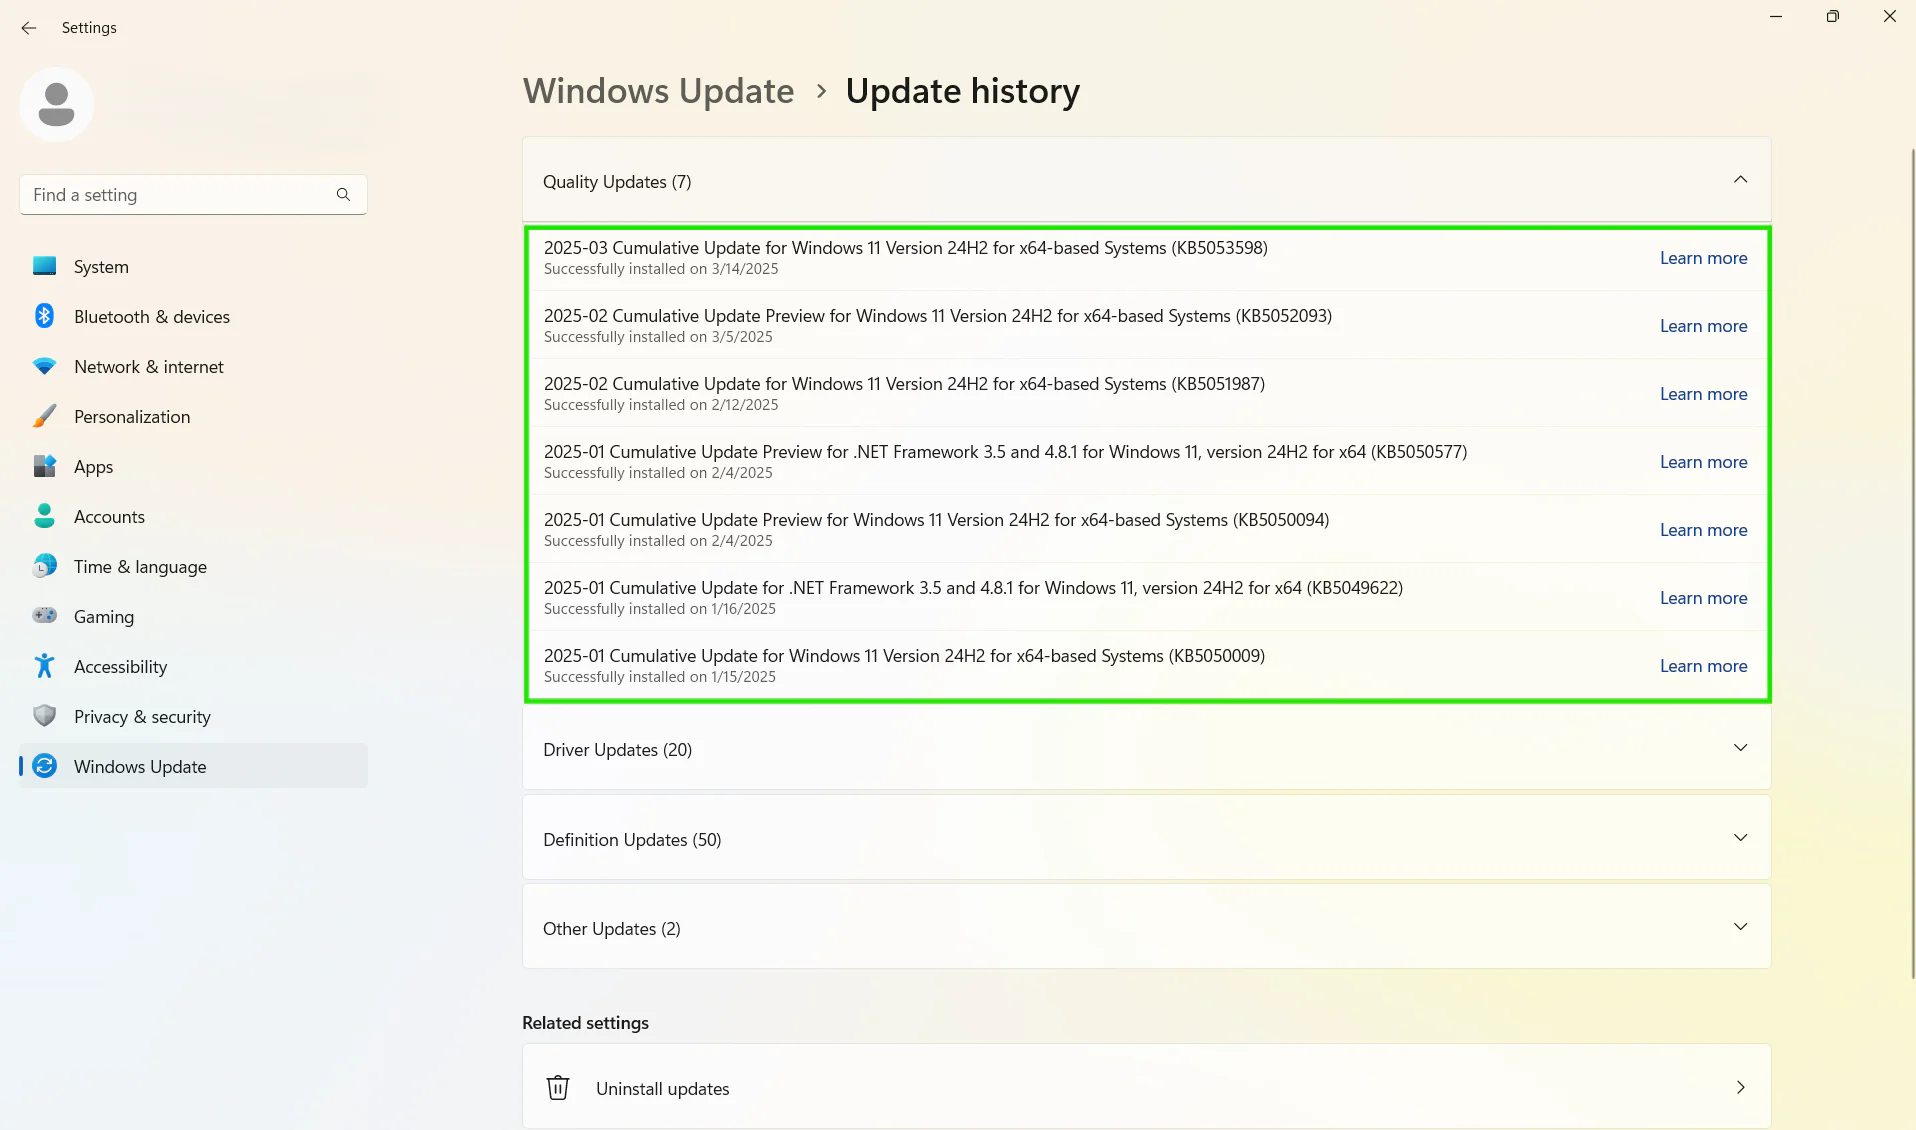
- Now click “Uninstall updates” to check in real time what’s really installed on your computer, along with the exact day when the update was deployed and its unique KB number.
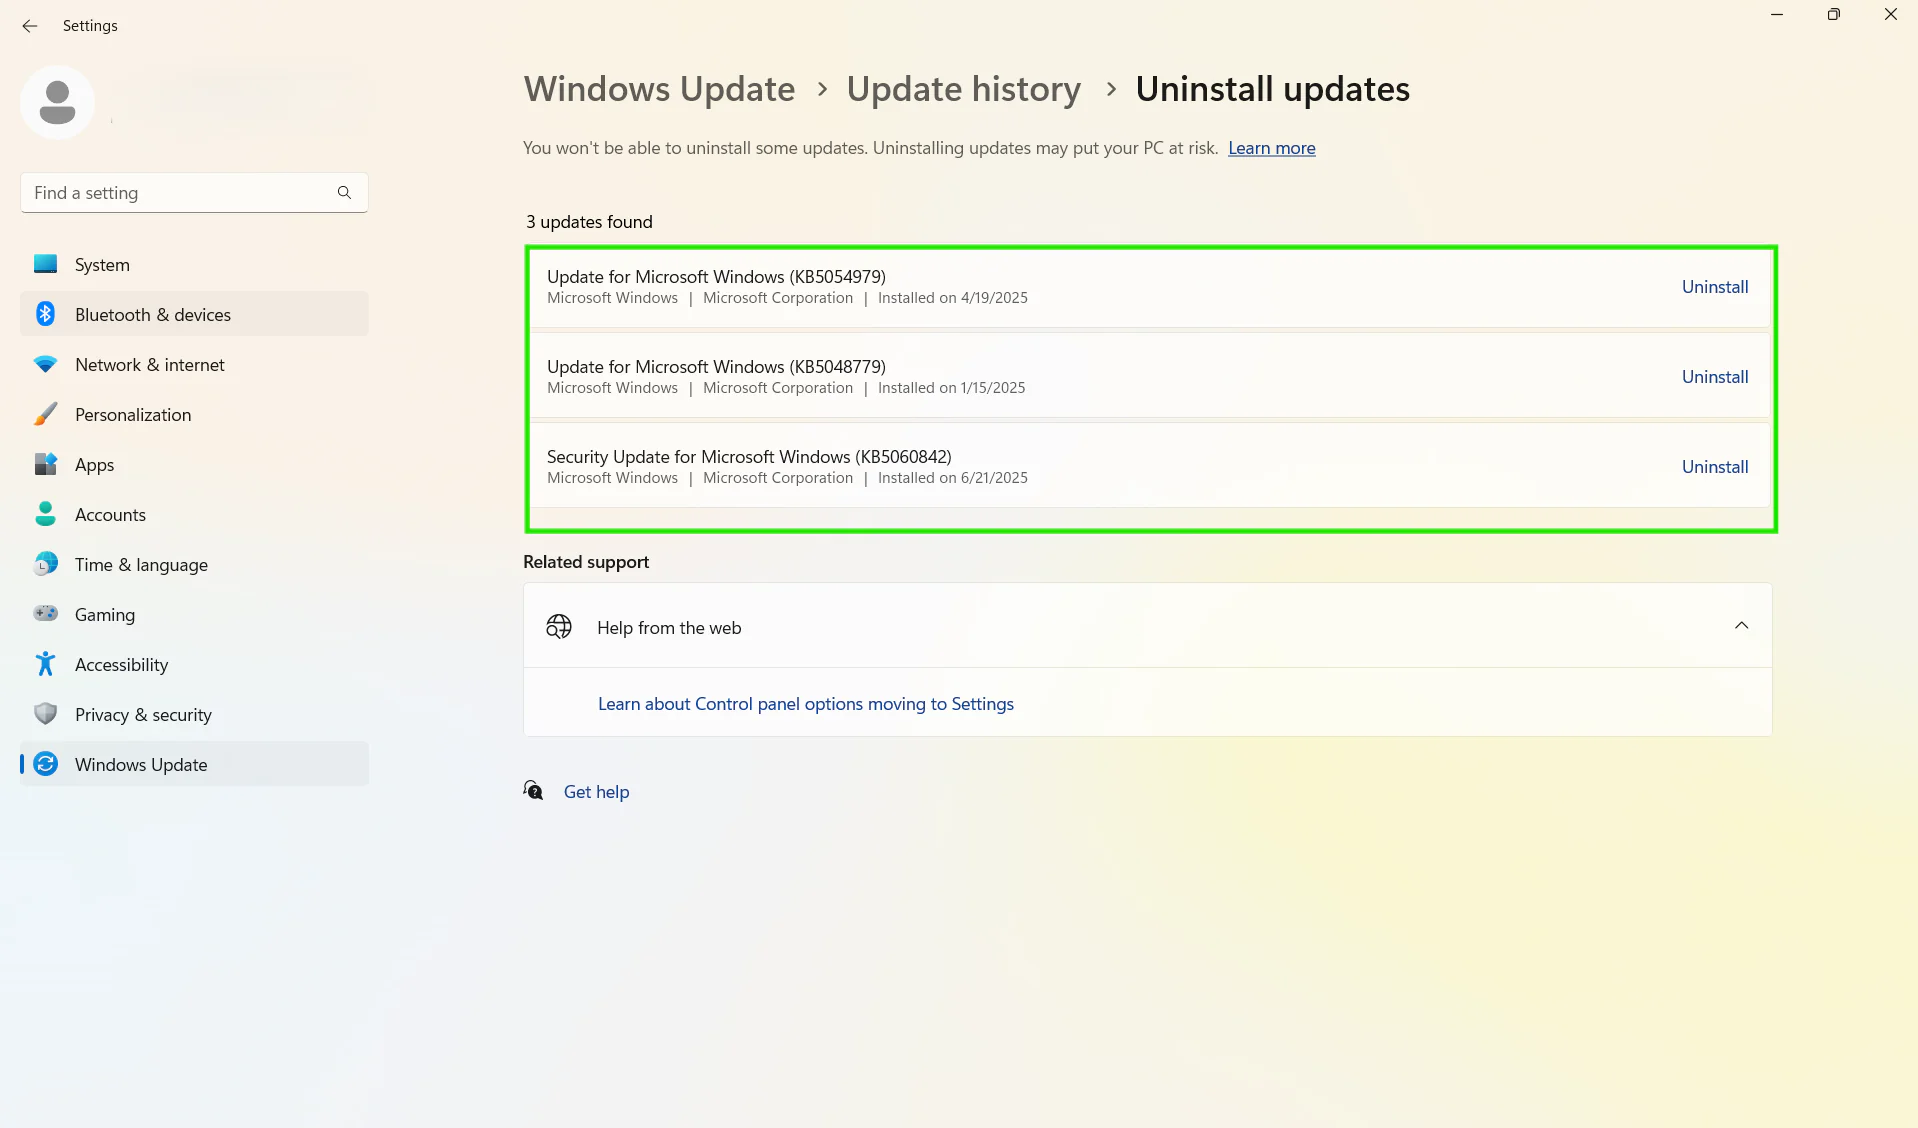
- Compare installed updates with Microsoft’s Windows 11 update history. This way you will be able to easily identify if the last update successfully installed on your computer matches the latest one released by the tech giant.
4. Use PowerShell to Check Installed Updates
PowerShell is a powerful and handy tool that can help you audit your system’s update status by showing both installed and missing updates with their specific KB numbers. The two-step process that we are going to use below gives you a complete picture of what updates your computer is missing.
Once you have this information, you can download those updates directly from the Microsoft Update Catalog and install them manually.
- Click on the start menu, then in the search bar type “PowerShell,” right-click it, and select “Run as administrator.”
- Once PowerShell is loaded, input the following command:
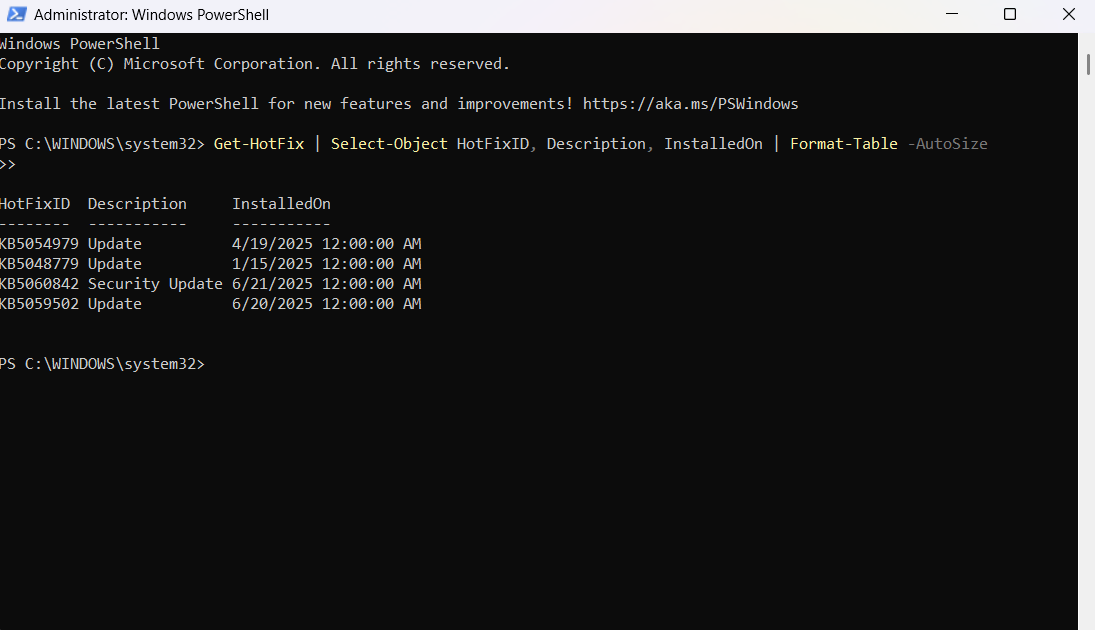
Get-HotFix | Select-Object HotFixID, Description, InstalledOn | Format-Table -AutoSize
This will provide you with detailed information, such as which updates are installed and their unique KB number.
- To see available updates that your Windows 11 misses, use this command:(New-Object -ComObject Microsoft.Update.Session).CreateupdateSearcher().Search(“IsHidden=0 and IsInstalled=0”).Updates | Select-Object Title
It connects directly to Windows’ internal update system and searches Microsoft’s servers for any missing patches on your computer. The results will show you the exact titles and KB numbers of updates that are available but not yet installed, helping you identify security gaps or missing feature updates immediately.
- Step 4. Compare the missing updates from Step 3 with the installed updates from Step 2 to get a complete picture of your system’s update status.
How to Check for Missing Updates in Windows 10?
To check for missing updates in Windows 10, you can use the Windows Update service, run the Windows Update Troubleshooter, check Update History, or use PowerShell. The interface differs slightly from Windows 11, but the core functionality remains the same.
Let’s go through each method step-by-step, tailored specifically for those of you that still use Windows 10:
1. Use Windows Update from Settings
You can check if your Windows 10 is missing updates by using the Windows Update service from the settings, just follow the steps below:
- Step 1. Press the Windows key + I to open Settings, or click the Start menu and select the gear icon for Settings.
- Step 2. Select “Update & Security.”
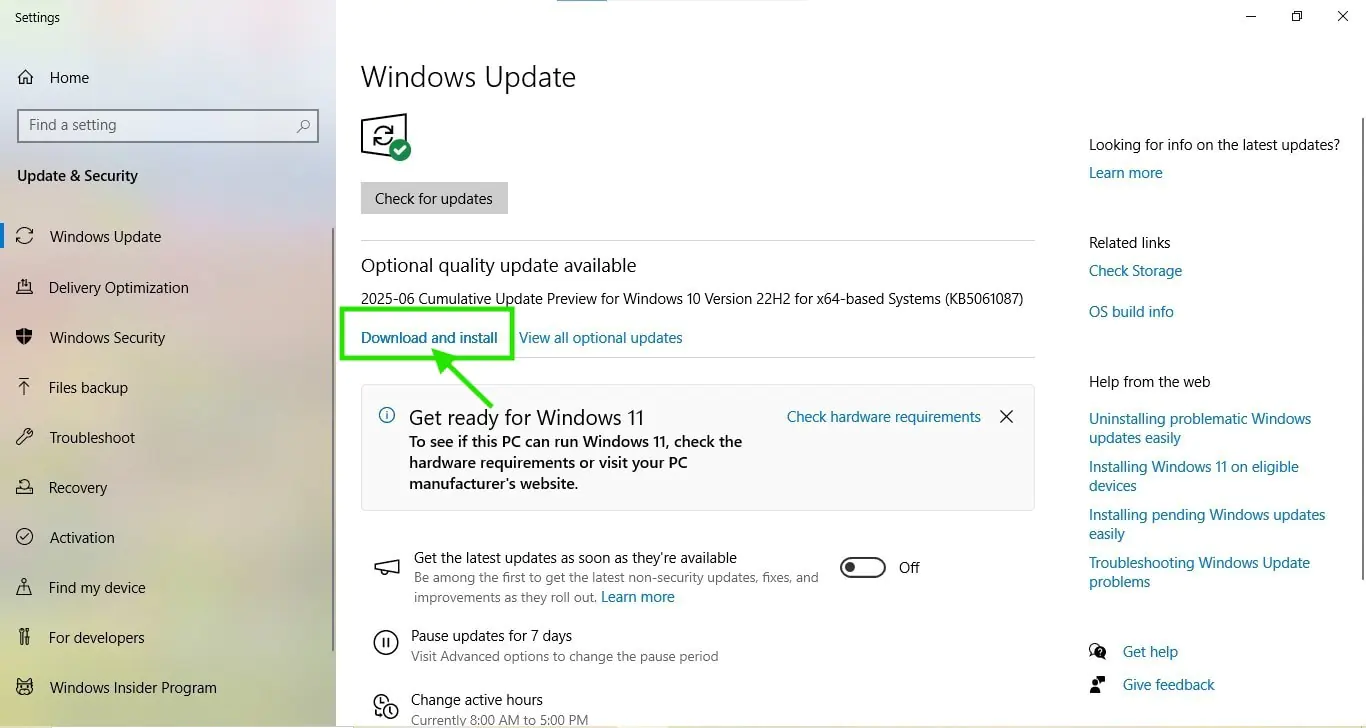
- Step 3. Click “Check for updates” and wait for the scan to complete.

- Step 5. In case the check identifies any missing updates, they will be displayed with “Download” or “Install now” buttons. If not, you’ll see “You’re up to date.”
- Step 6. Click “Download” or “Install now” to start updating your system.

- Step 7. Your computer will restart automatically after the installation completes; if not, manually reboot it to ensure changes take full effect.
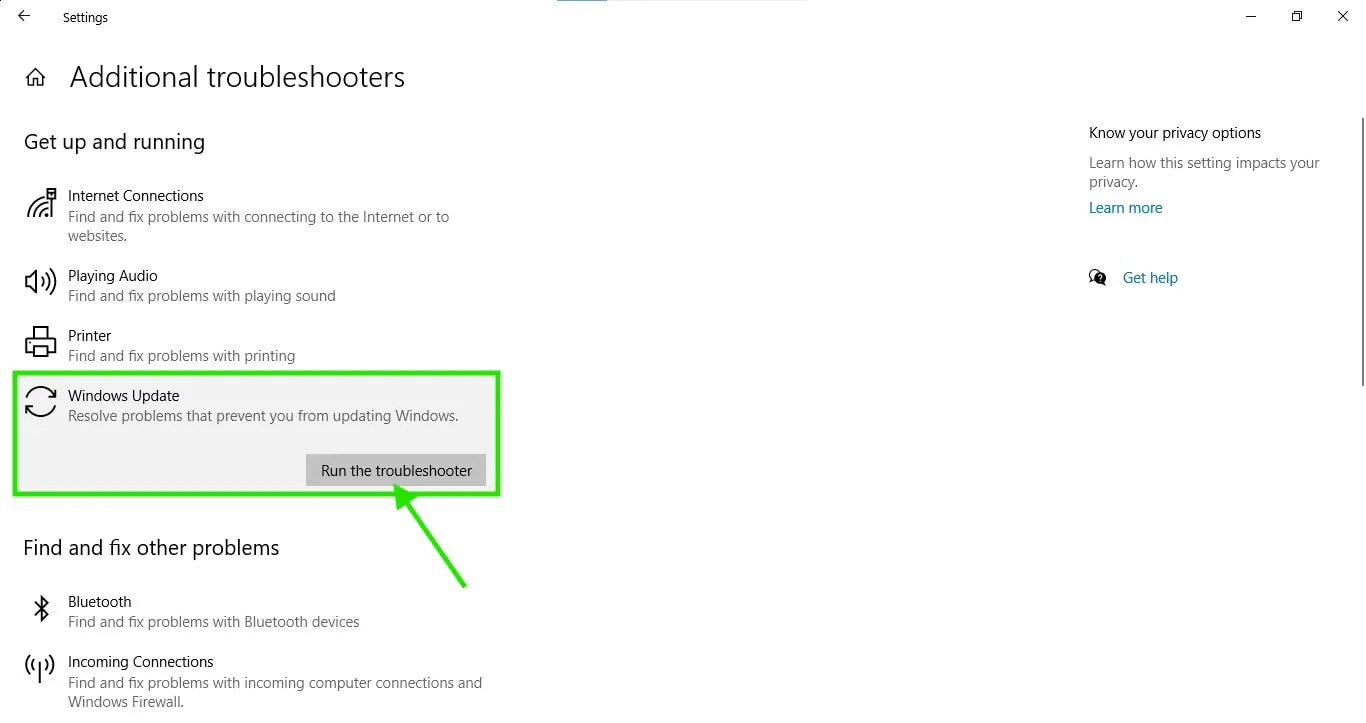
2. Run the Windows Update Troubleshooter
Your Windows 10 might be missing updates because Windows Update isn’t working properly. In such cases, run the Windows Update Troubleshooter to fix the most common update issues by following these steps:
- Step 1. Press the Windows key + I to open Settings.
- Step 2. Click “Update & Security.”
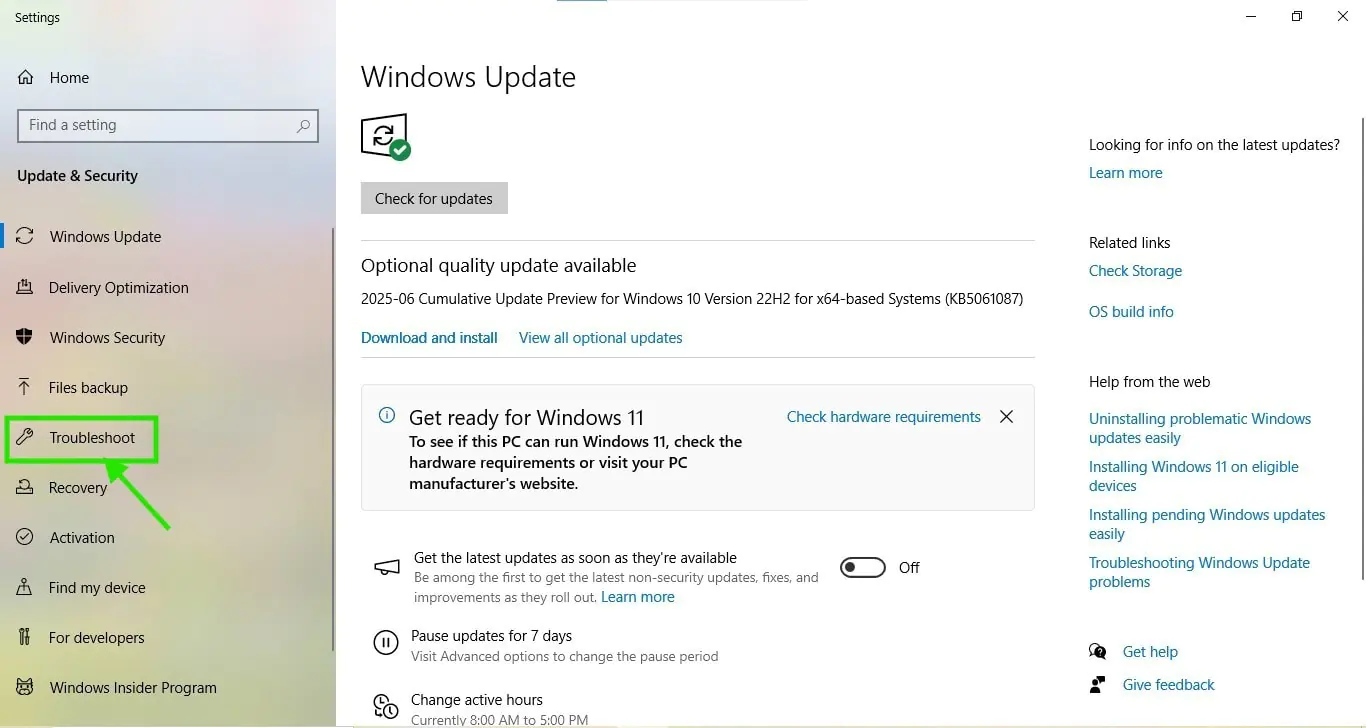
- Step 3. Now select “Troubleshoot” in the left sidebar.
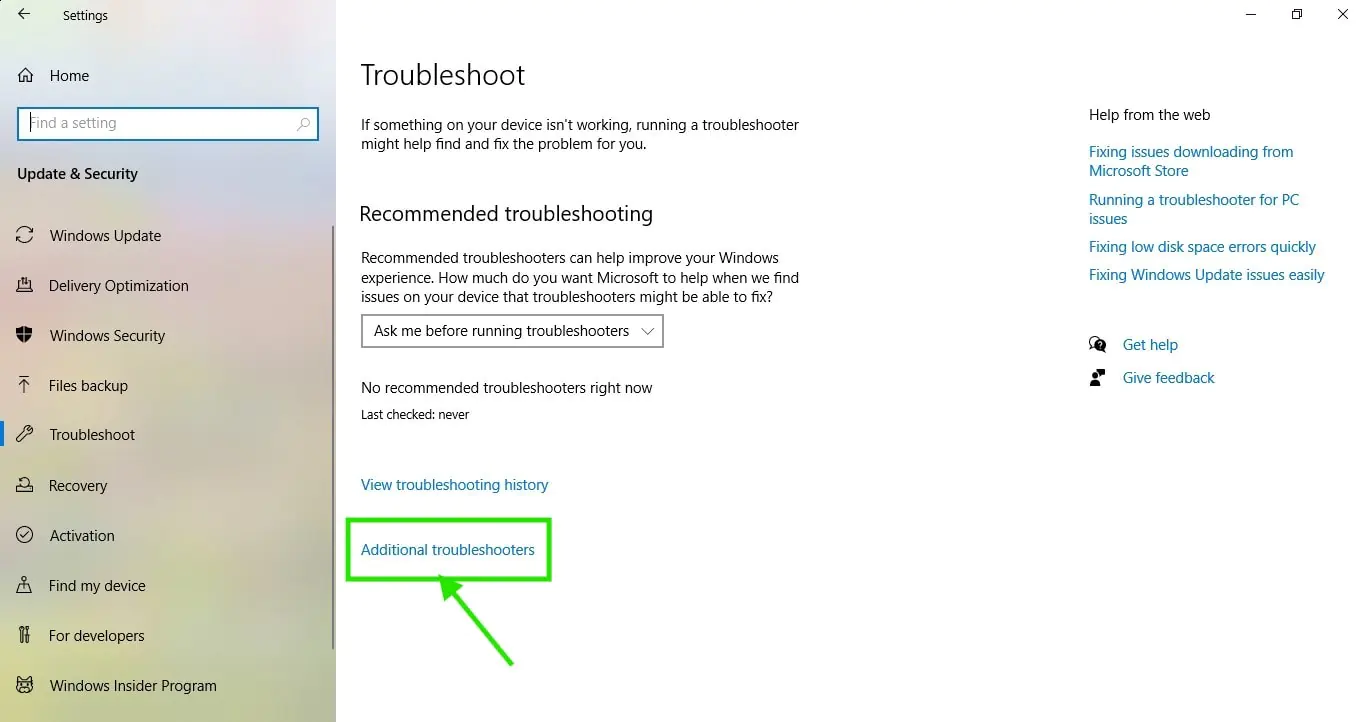
- Step 4. Click “Additional troubleshooters.“

- Step 5. Find “Windows Update” and click on it, then select “Run the troubleshooter.”

- Step 6. Wait for the procedure to complete, which takes 2-5 minutes.
- Step 7. If the troubleshooter finds any problems, click “Apply this fix.”
- Step 8. Reboot your computer and try to update your OS again.
3. Check Update History and Installed Updates
You can immediately spot missing updates by checking your OS update history, which provides detailed information about each update, whether it is installed successfully or not.
- Step 1. Press the Windows key + I to open Settings.
- Step 2. Click “Update & Security.”
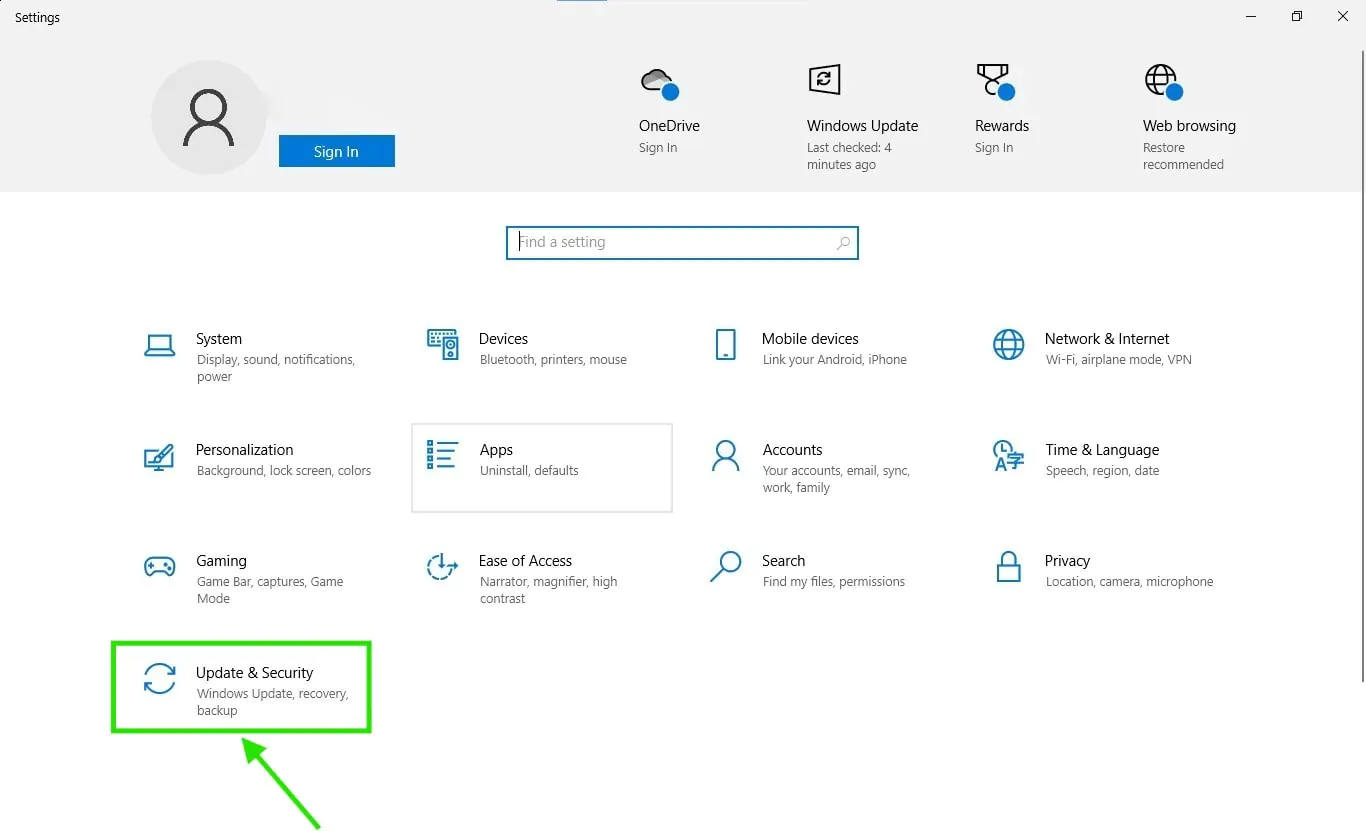
- Step 3. Click “View update history.”
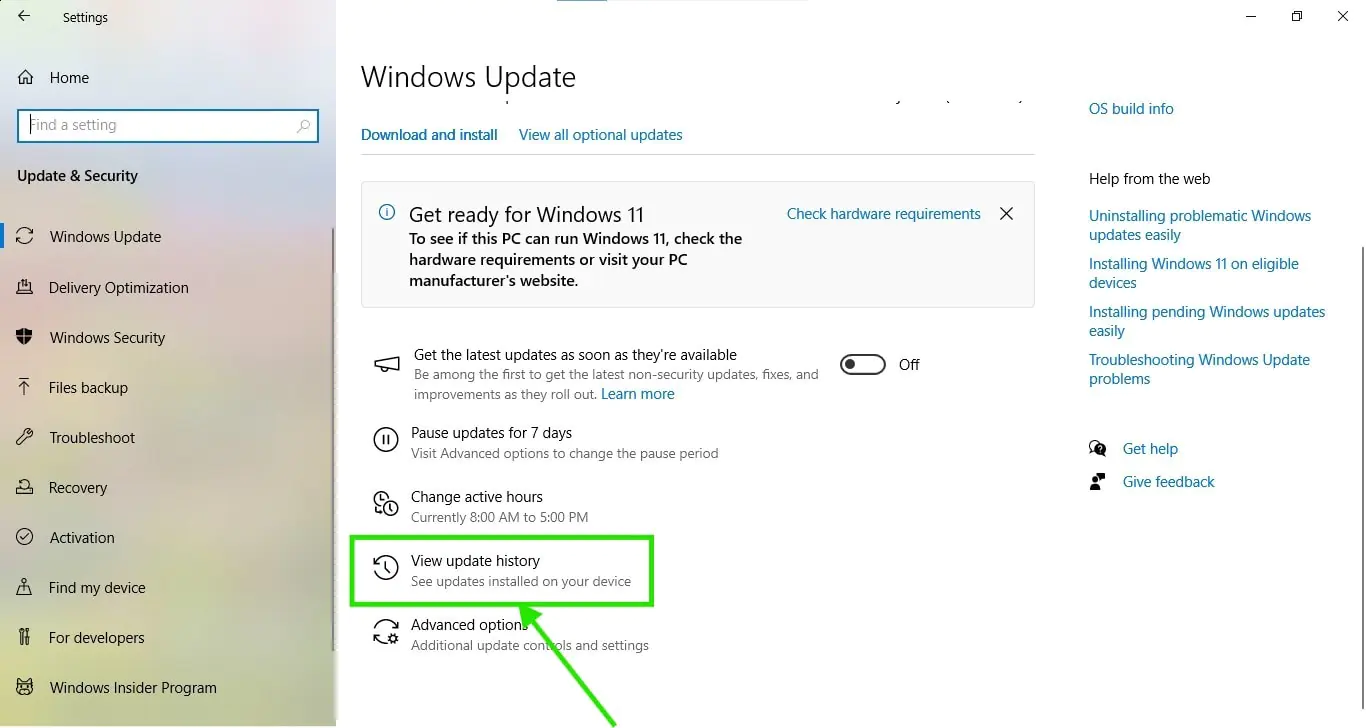
- Step 4. Review the update history. If there are updates marked as “Failed to install,” these are the ones your computer is missing.
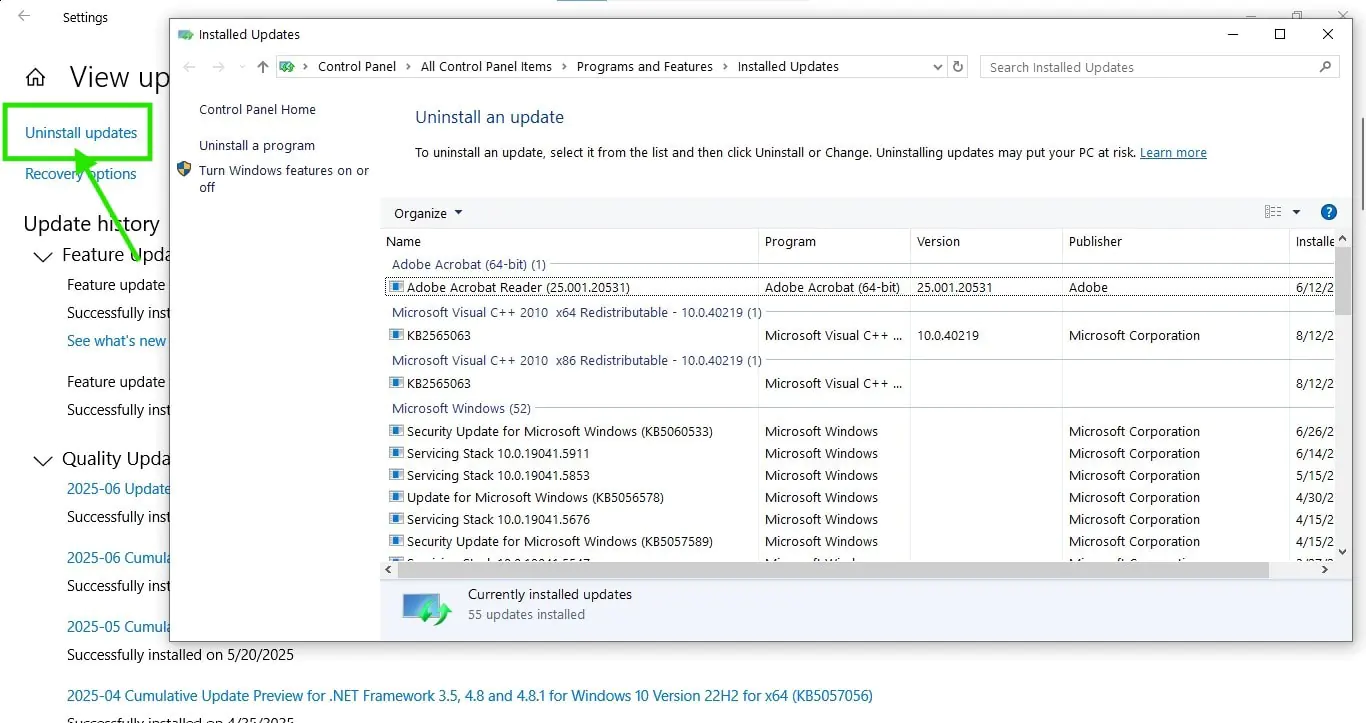
- Step 5. Click “Uninstall updates” to see exactly which updates are installed on your computer.
- Step 6. Compare installed updates with Microsoft Windows 10 update history to identify the missing updates.
4. Use PowerShell to Check Installed Updates
PowerShell works identically in both Windows 10 and Windows 11, showing you exactly what updates are installed with their unique KB numbers:
- Step 1. Click the Start menu, type “PowerShell,” right-click it, and select “Run as administrator.”
- Step 2. Once PowerShell loads, input the following command:
Get-HotFix | Select-Object HotFixID, Description, InstalledOn | Format-Table -AutoSize
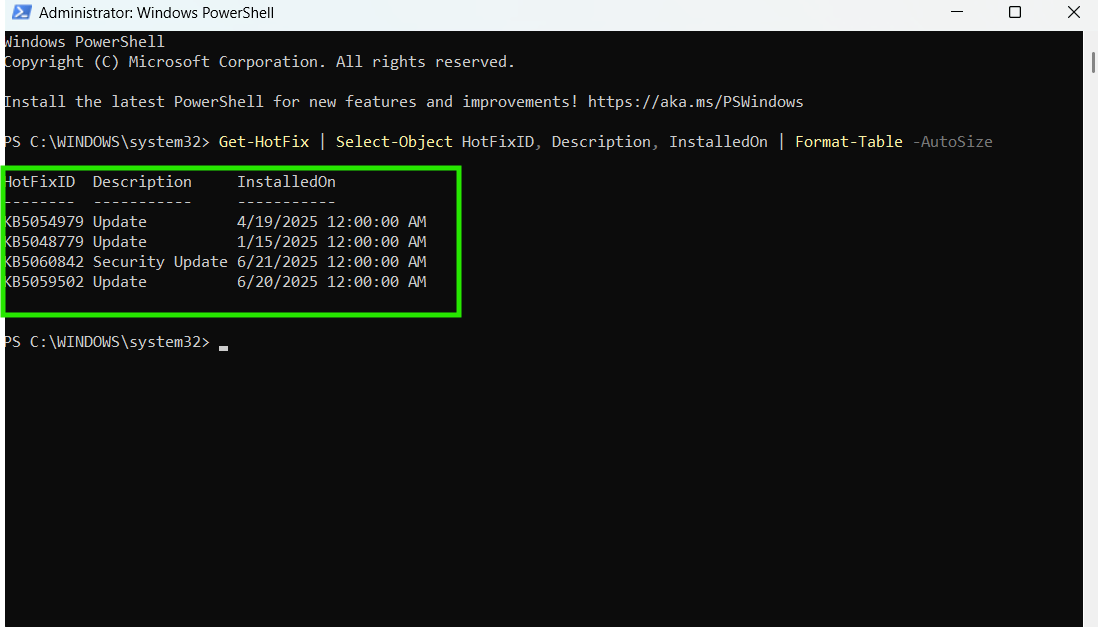
- Step 3. Review the output showing KB numbers (like KB5034441, KB5048779) and installation dates.
- To see available updates that haven’t been installed yet, proceed with this command:(New-Object -ComObject Microsoft.Update.Session).CreateupdateSearcher().Search(“IsHidden=0 and IsInstalled=0”).Updates | Select-Object TitleThis command connects directly to Windows’ internal update system and searches Microsoft’s servers for any missing updates on your PC. The results will show you the exact titles and KB numbers of updates that are available but not yet installed.
- Then you can visit the to download and install the missing updates from there.
Why You Might Be Missing Windows Updates
Windows 10/11 updates can fail to install due to a variety of reasons and problems, like metered connections, paused or deferred update services, corrupted Windows Update cache files, network and firewall issues, insufficient storage space, or third-party software conflicts.
Let’s have a closer and more detailed look at why your Windows 10/11 OS misses updates:
Metered Connections Are Blocking Updates
If your connection is metered, your Windows OS will automatically pause updates to save bandwidth, with the idea to prevent large downloads, but this also blocks important security patches from being successfully installed.
Update Services Are Paused or Deferred
If you pause or defer your update services, you won’t receive any updates. Keep in mind that sometimes business networks are purposely delaying updates for stability testing. On the other hand, home users sometimes pause updates and forget to resume them; however, in this situation they will automatically resume, since you can pause them only for up to 5 weeks.
Corrupted Windows Update Cache
Corrupted Windows Update cache files are another reason to miss Windows 10/11 updates; this can be a result of power outages, unstable internet connections, or insufficient storage space during update downloads.
Network and Firewall Issues
Network and firewall issues frequently cause missing Windows 10/11 updates, since they can block Windows Update connections and prevent your OS from downloading and installing critical updates. Keep in mind that in such situations you won’t receive any notification or error code, meaning that your computer will be running with outdated software without you even knowing it.
Insufficient Storage Space
If you don’t have enough storage space on your hard drive or SSD, Windows 10/11 updates will always be stuck at 0% or fail entirely. Updates range from 400 MB to 4.5 GB, and if you have less than the required storage, don’t expect it to be deployed successfully, because they require twice their size in temporary space during installation. Always keep 10-15 GB of free space on your computer, since this will not only prevent Windows stuck updates but also ensure the smooth performance of your device.
Third-Party Software Conflicts
Third-party software, especially registry cleaners and system optimizers, are a frequent cause for failed Windows 11/10 updates. These programs modify update services under the assumption that they improve performance, but they can actually become a reason for update failures. Temporarily disabling or uninstalling such software might be necessary to complete the updates.
How to Fix Missing Windows Updates?
You can fix missing Windows 10/11 updates by forcing their installation manually through using Microsoft Update Catalog, restarting Windows Update services, running DISM and SFC tools, executing a Windows Update reset, or reviewing your Group Policy settings that may be blocking update installations.
Manual Update Installation from Microsoft Catalog
If your computer fails to detect or download the latest Windows 10/11 updates automatically, you can solve this problem by downloading and installing them manually from Microsoft’s update catalog.
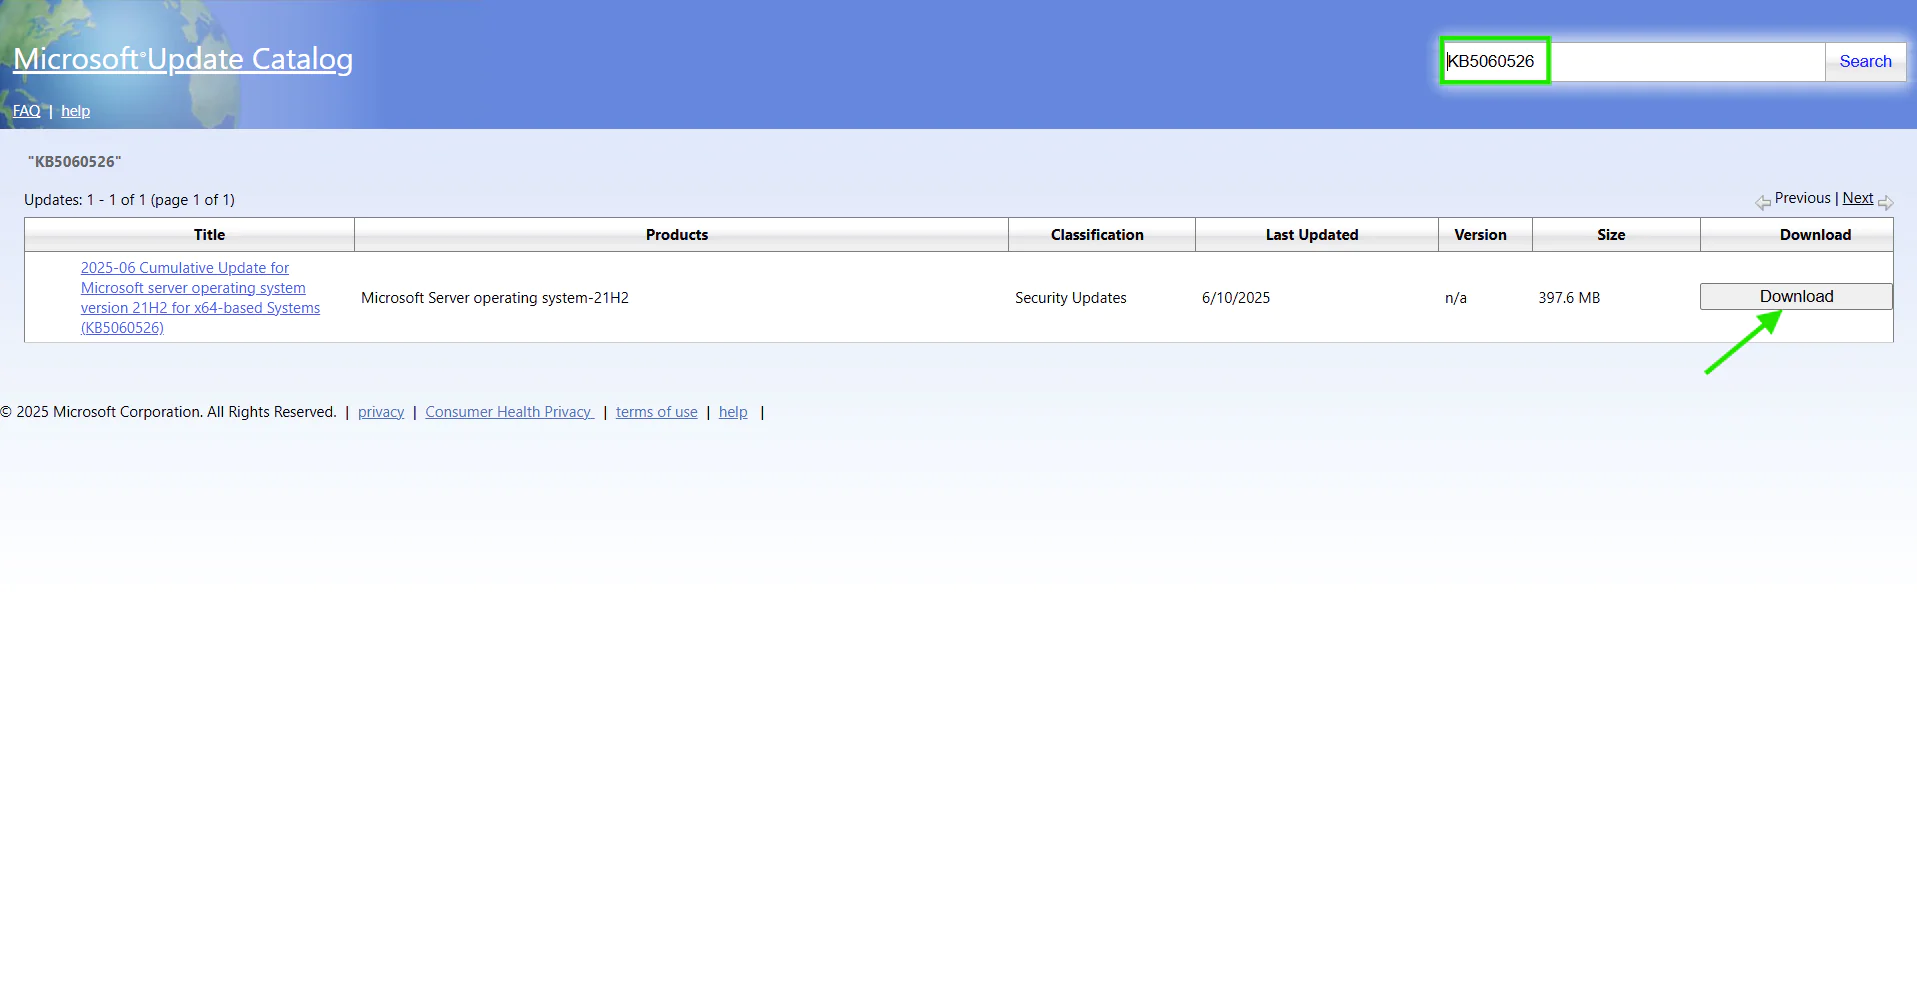
- Open your browser and visit .
- Search for your actual Windows 11/10 version and the specific KB number of the missing update.
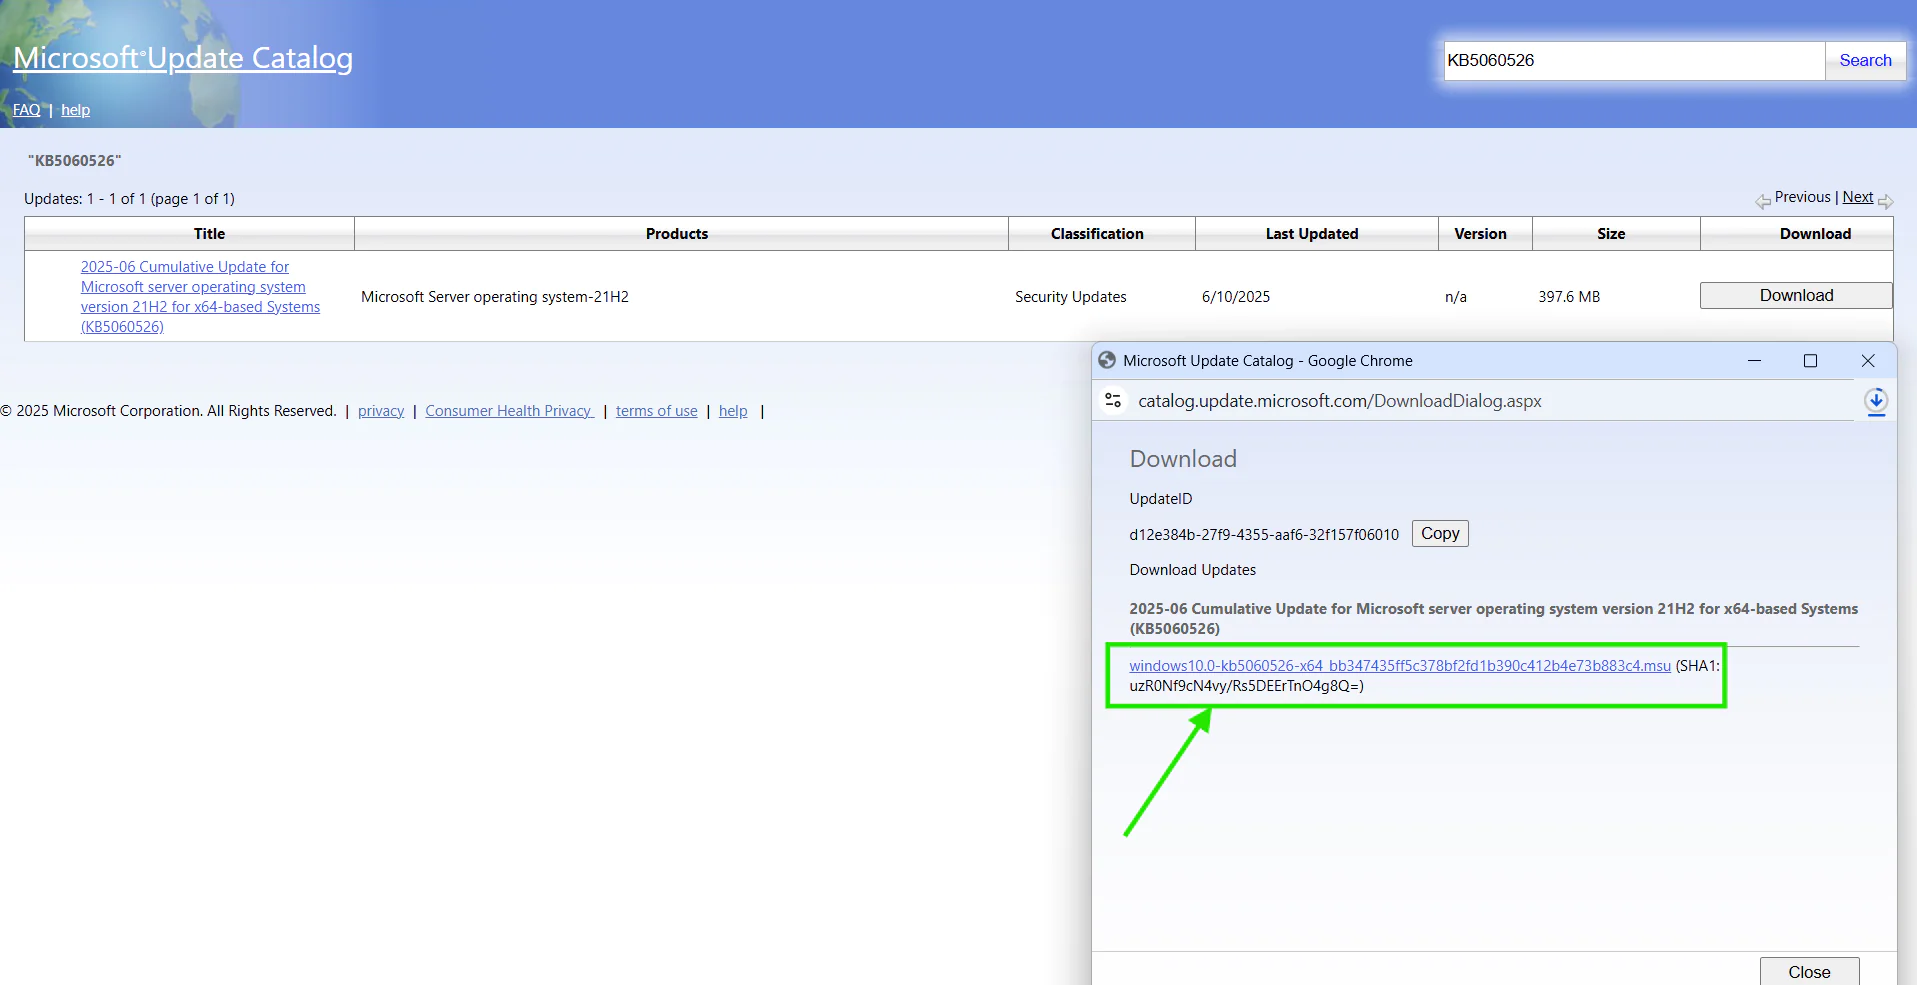
- If you are missing, for example, KB5060526, paste that number in the search bar, and then click the download link.


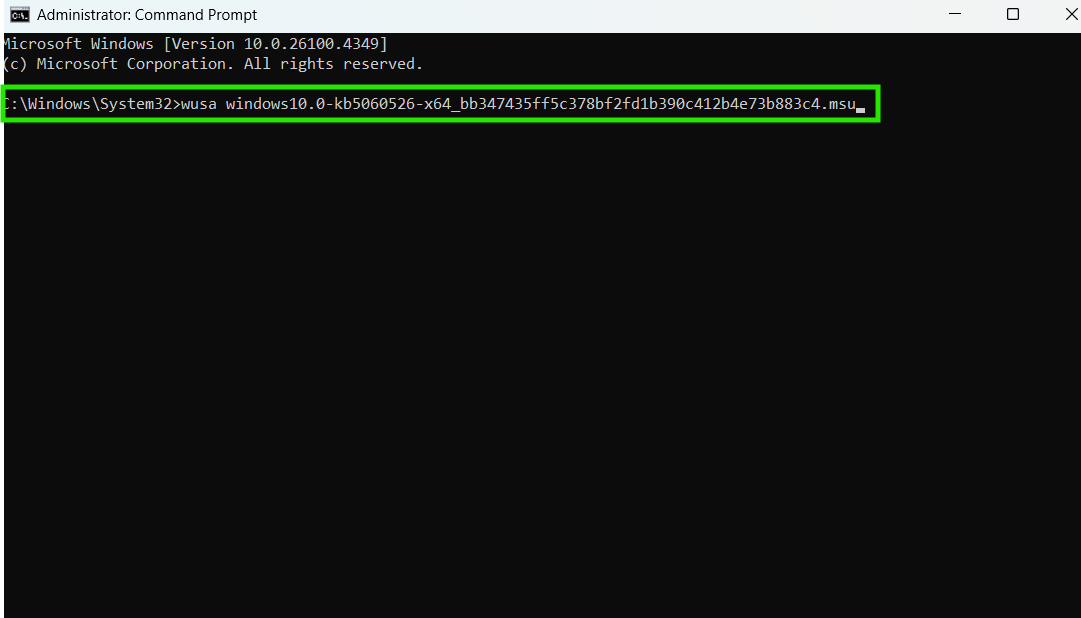
- Step 4. Run the downloaded MSU or CAB file to install it manually. Or alternatively search for “Command Prompt” in the Start Menu, right-click it, and select “Run as administrator.“ Then install the MSU file using this command:wusa filename.msu – replace “filename.msu” with your actual file name.In our case the command must be aligned with the specific file name of the downloaded update:wusa windows10.0-kb5060526-x64_bb347435ff5c378bf2fd1b390c412b4e73b883c4.msu

- Once the installation process completes, restart your computer in order for the changes to take effect.
Restart Windows Update Services
When your computer is missing critical updates, this can be caused by the Windows Update service itself, since this app sometimes becomes unresponsive or stuck in different error states, thus preventing proper communication with Microsoft’s servers.
Restarting it can fix this issue, because the process refreshes its operation and resolves temporary connection problems. To do so, just follow these simple steps:
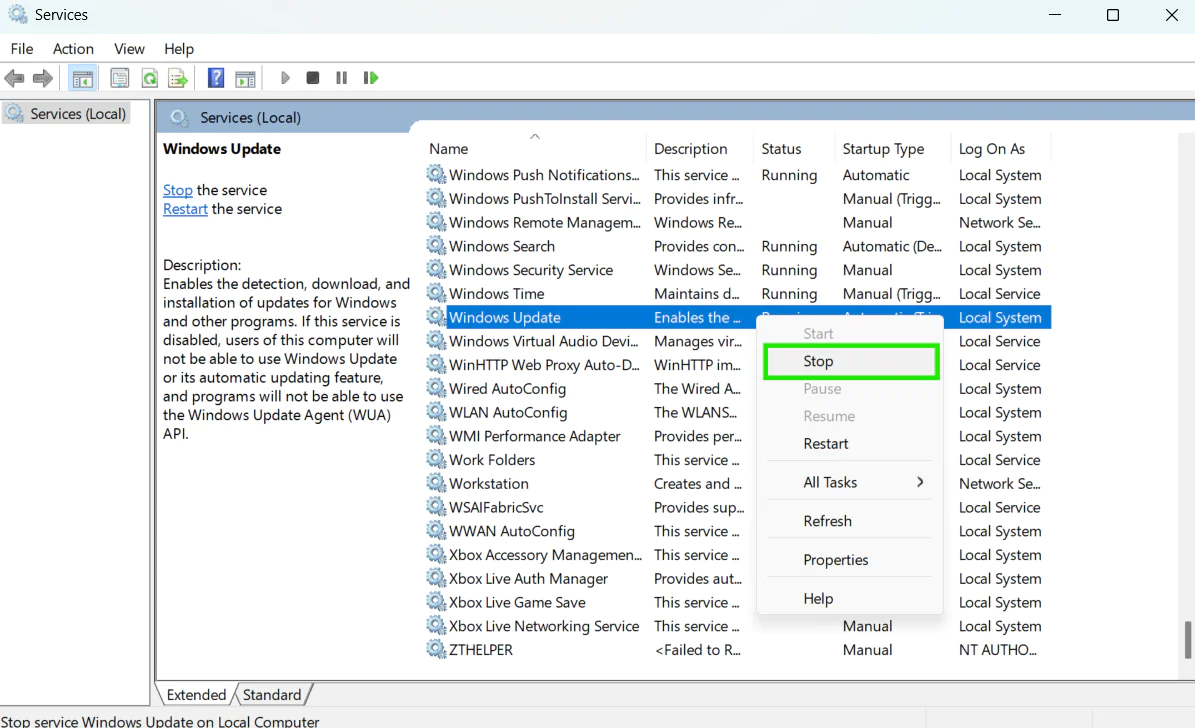
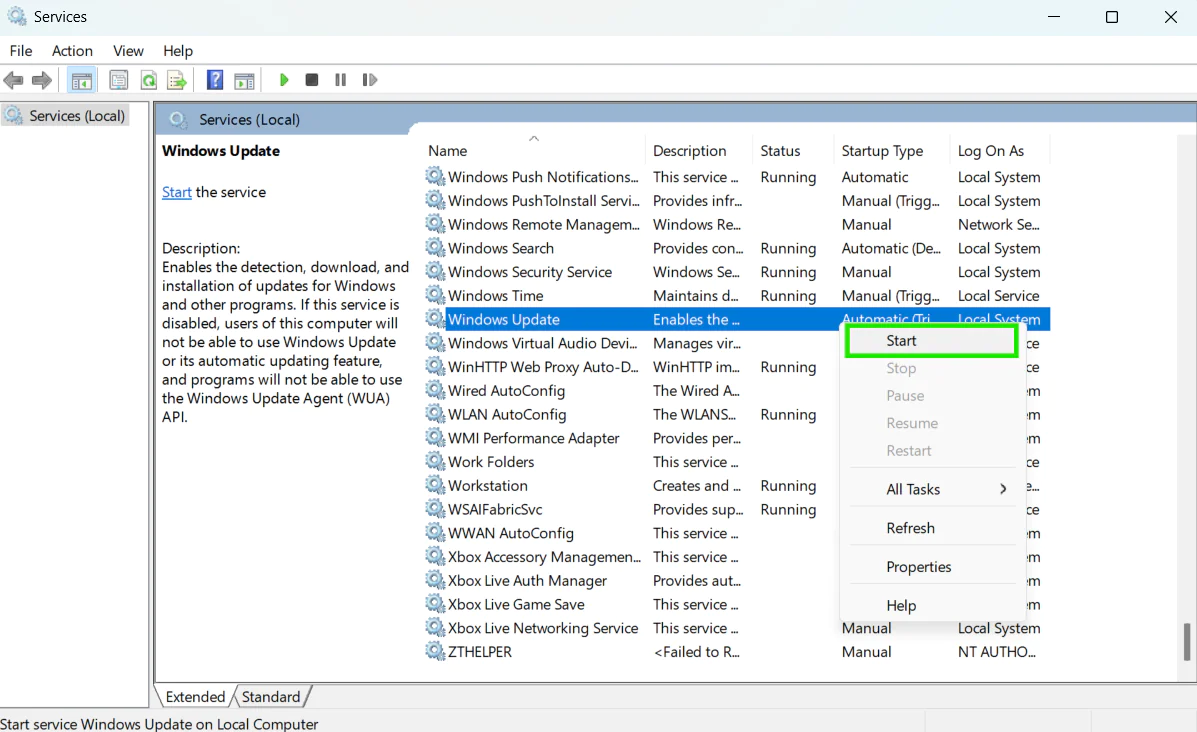
- Step 1. Press the Windows key + R to open the run dialog box, then type “services.msc” to launch the services console.
- Step 2. Find and stop these services in order by right-clicking each and selecting “Stop”:
- Windows Update
- Background Intelligent Transfer Service
- Cryptographic Services

- Step 3. Wait 10 seconds after stopping all three of them.
- Step 4. Now you must restart the services in reverse order by right-clicking and selecting “Start.”

- Step 5. Close the services window and check Windows Update again if it now works properly.
Run DISM and SFC Tools
It’s well known that corrupted system files or damaged Windows image components prevent updates from being installed correctly. Running DISM first repairs the Windows image, then SFC uses that clean image to scan and fix any remaining corrupted system files. If both tools fail to resolve persistent Windows component corruption, a repair install can be your next option. To apply the DISM and SFC fix, follow these steps:
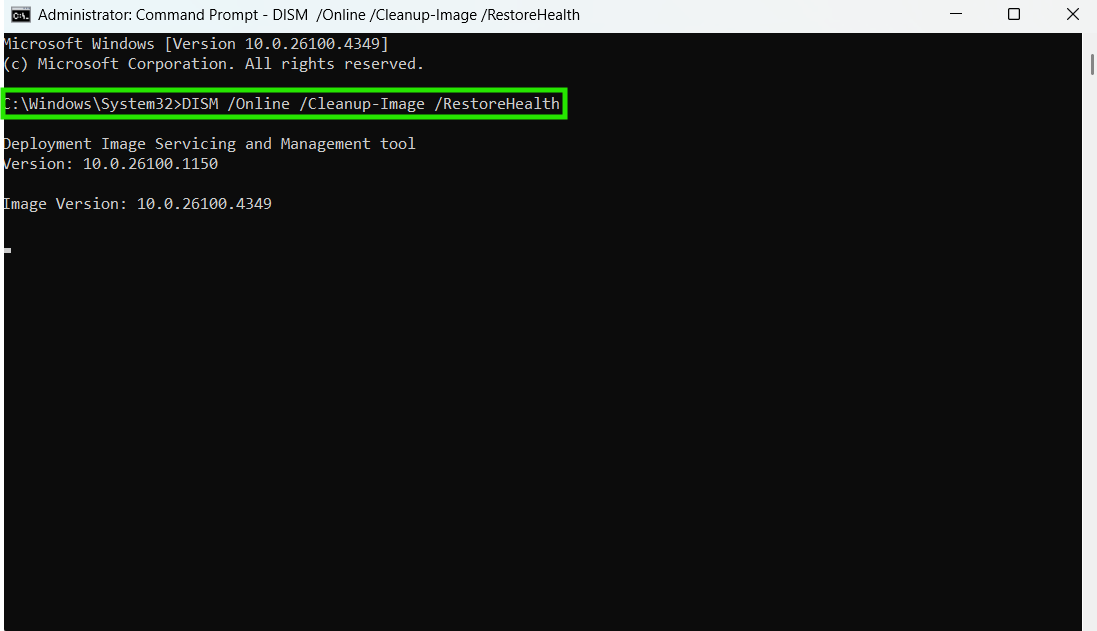
- Step 1. Left-click the Start button, and type “Command Prompt” in the search bar, then right-click on the icon and select “Run as administrator.”
- Step 2. Type the following command: “DISM /Online /Cleanup-Image /RestoreHealth” and press Enter.

- Step 3. Wait for DISM to complete (which normally takes 20-45 minutes depending on your system).
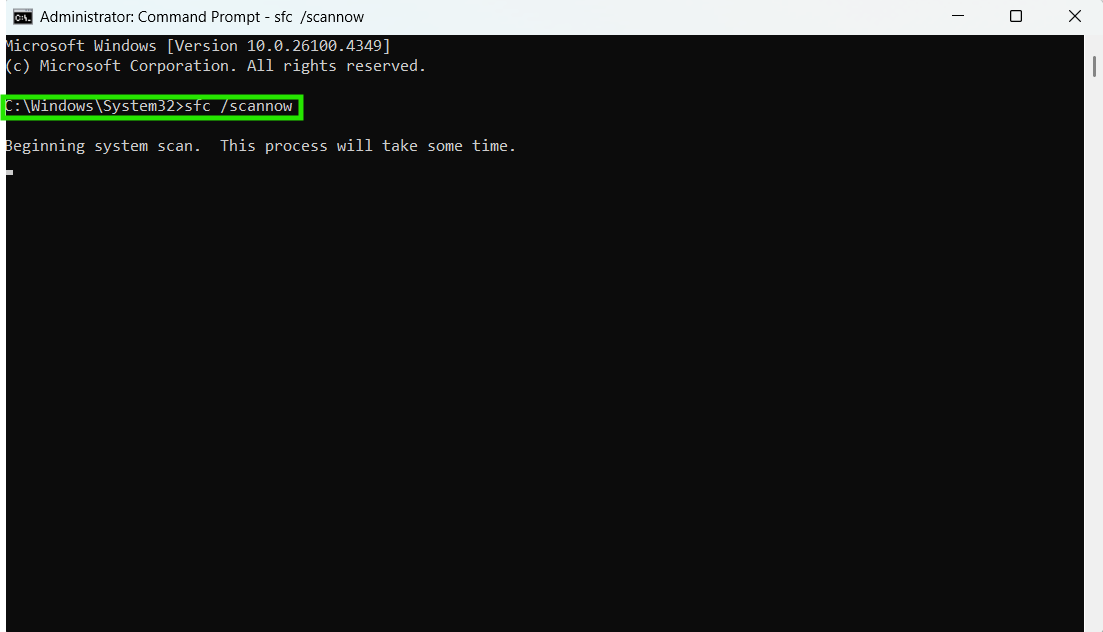
- Step 4. Once the DISM process is completed, you must execute the next command: “sfc /scannow” and press Enter to scan for corrupted system files across your computer.

- Step 5. Wait patiently for the SFC scan to finish (this can take 30+ minutes).
- Restart your computer after both processes finish successfully, and try again to update your computer through the app.
Complete Windows Update Reset
To fix corrupted cache files and misconfigured update components that are blocking the deployment of new updates, you must reset all Windows update settings to factory defaults by clearing the cache and restarting all related services. To do so, follow these steps:
NOTE: This process doesn’t remove your personal files, although keeping a current backup is still good practice before performing deeper system repairs.
- Step 1. Left-click Start and type in the search bar then right-click the icon and select
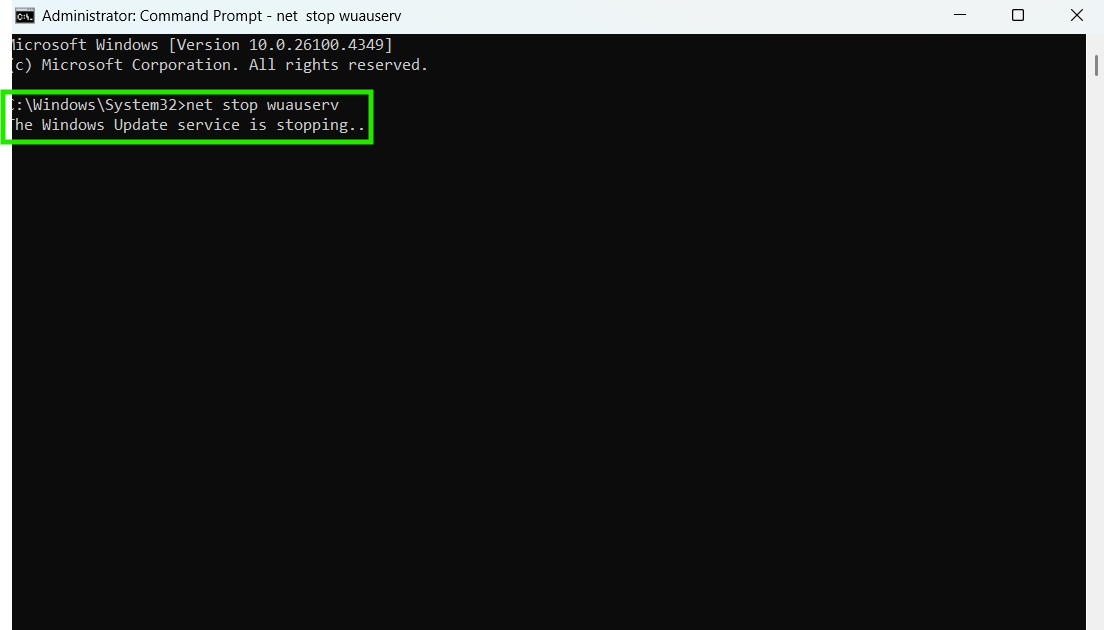
- Step 2. Stop all update services by running these commands one at a time and pressing Enter:net stop wuauservnet stop cryptSvcnet stop bitsnet stop msiserver

- Step 3. Once these services are stopped, now clear the update cache with this command:rd /s /q C:\Windows\SoftwareDistribution
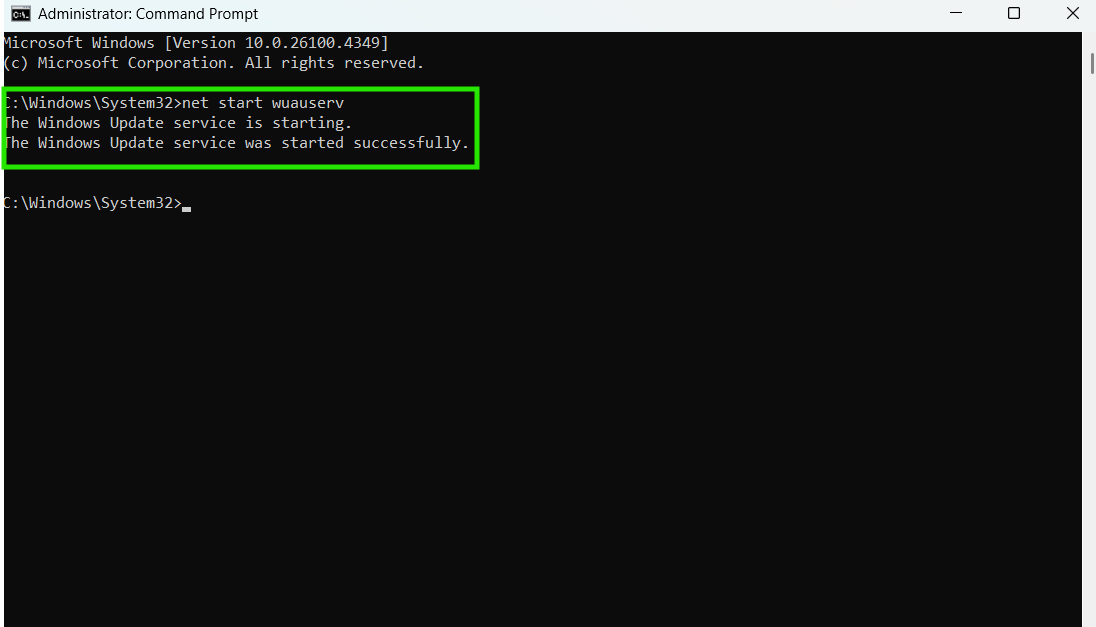
- Step 4. Restart the services we stopped earlier by executing the following commands one by one:net start wuauservnet start cryptSvcnet start bitsnet start msiserver

- Step 5. Navigate to Settings > Windows Update and click “Check for updates” to install the latest Microsoft updates.
Check Group Policy Settings (Windows 10/11 Pro/Enterprise/Education Only)
Administrative group policies are very useful in many situations; however sometimes they can become a reason for blocked or deferred Windows updates. To restore normal Windows update functionality, follow these steps:
- Step 1. Press the Windows key + R to launch the run dialog box, then type “gpedit.msc” and press Enter.
- Then you must go to Computer Configuration → Administrative Templates → Windows Components → Windows Update.
- Step 3. Review these specific policies:
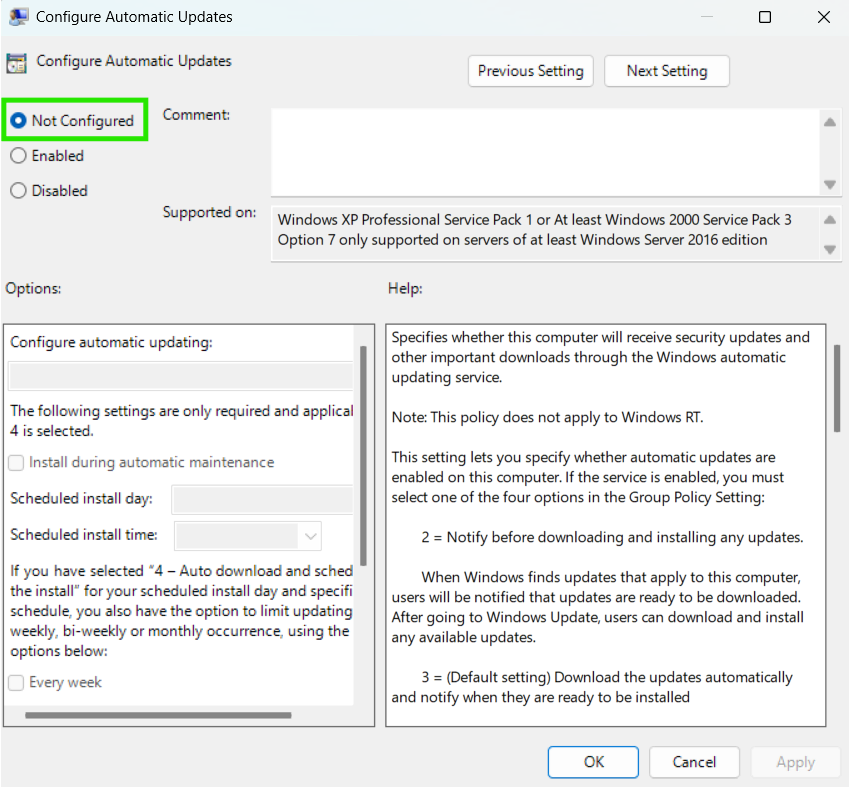
- Open the folder named “Manage end user experience,” then find “Configure Automatic Updates” (should be set to “Not configured”).

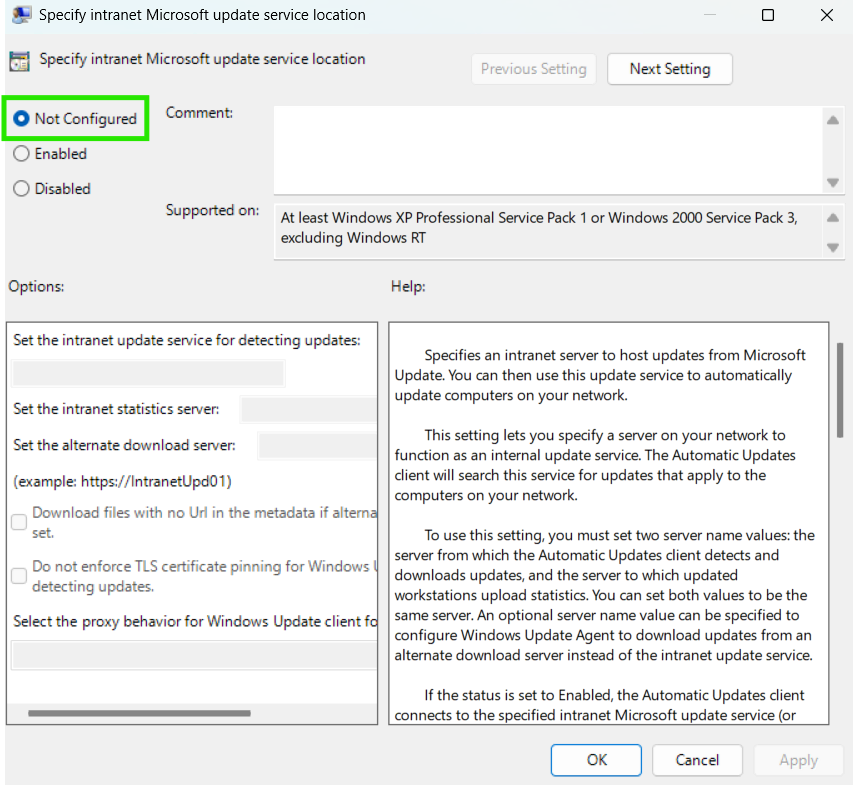
- Open the folder named “Manage updates offered from Windows Server Update Service.” Then find “Specify intranet Microsoft update service location” (should be “Not configured” unless using WSUS).

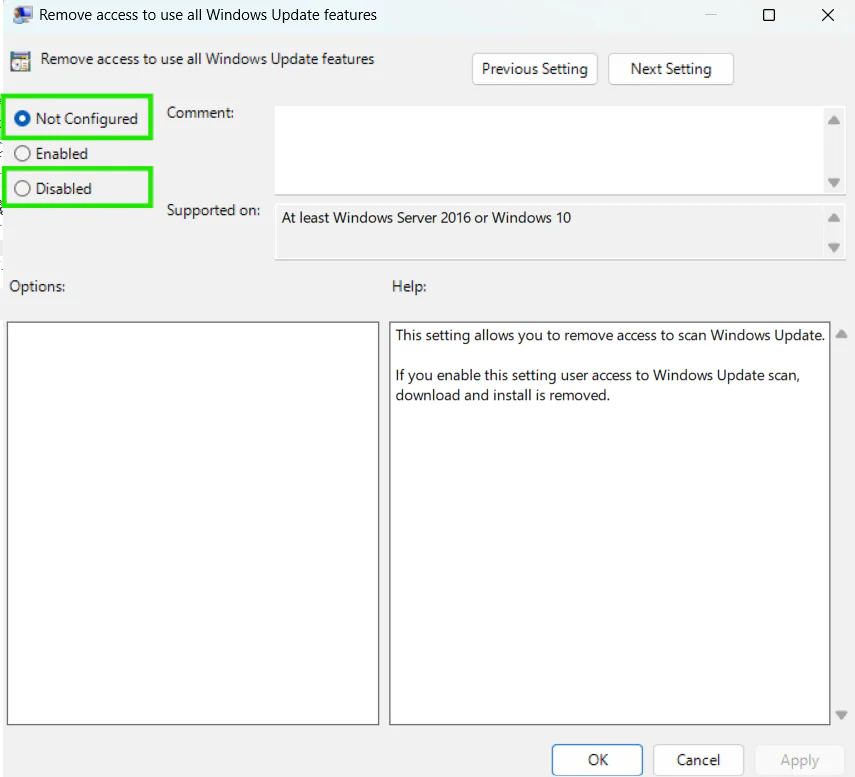
- Open the folder named “Manage end user experience” and then find “Remove access to use all Windows Update features” (should be “Disabled” or “Not configured”).

- Open the folder named “Manage end user experience,” then find “Configure Automatic Updates” (should be set to “Not configured”).
- Step 4. Double-click any enabled policies that might restrict updates.
- Step 5. Set problematic policies to “Not configured” and click OK.
- Step 6. Restart your computer for policy changes to take effect, and try again to update your computer. Note: This method only works on Windows Pro, Enterprise, or Education editions.
How to Find Missing Windows Update and Install Them with Action1
To find and install missing updates across your endpoints, you first need to install the software. It takes about five minutes to create your account and deploy the agent. After that, the platform automatically starts searching for Windows updates and lists them in the missing updates section. From there, you can deploy them manually or use automation with update rings for staged rollouts. To make things even simpler, here is a detailed step-by-step guide for you.
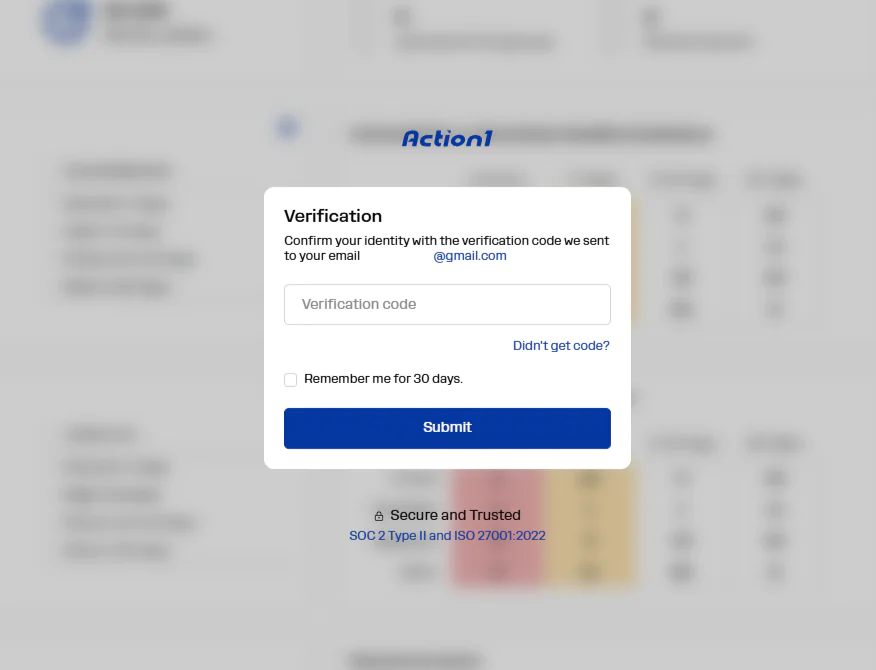
- Step 1. Create your Action1 account: Visit Action1’s website and sign up using your email address. Choose a password you will remember and provide the required information for your new account. Afterwards, you will receive a verification code by email to confirm your identity. Paste the code and click submit.


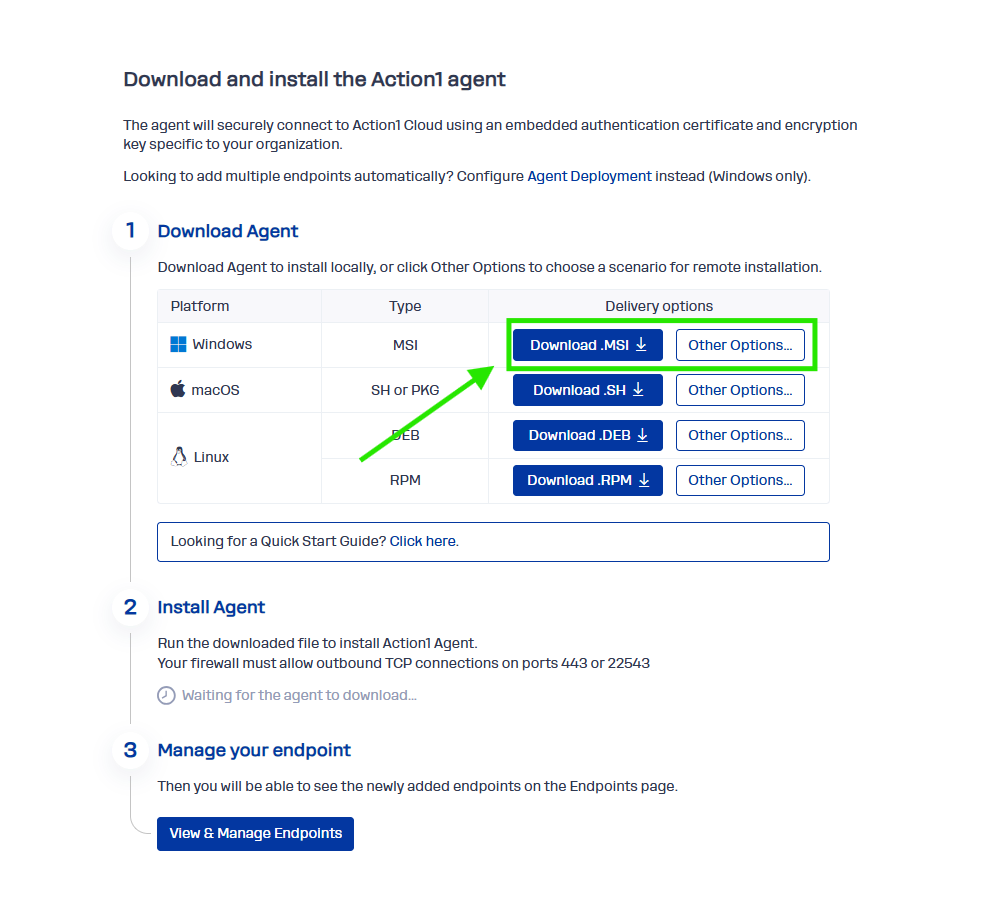
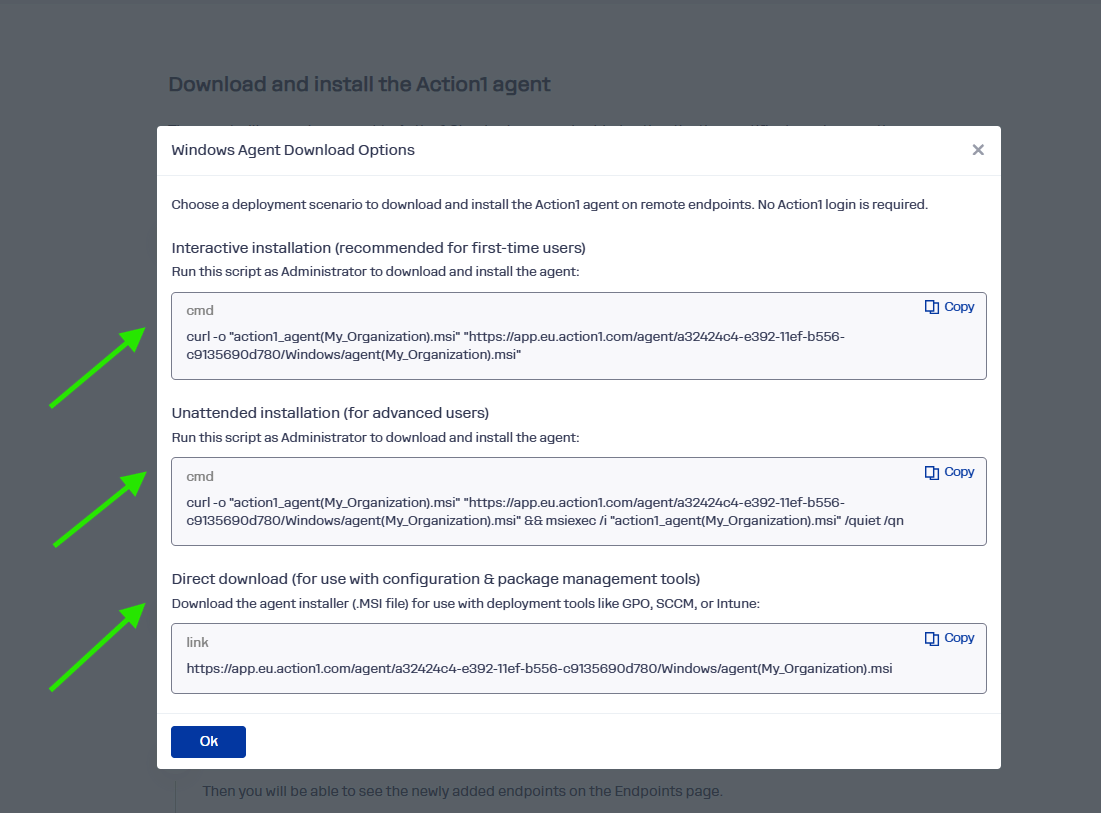
- Step 2. Install the agent on the endpoints you want to manage: You can download and install the agent on the endpoint in front of you by clicking “download.MSI,” or select “other options” if you want to deploy it to remote endpoints.
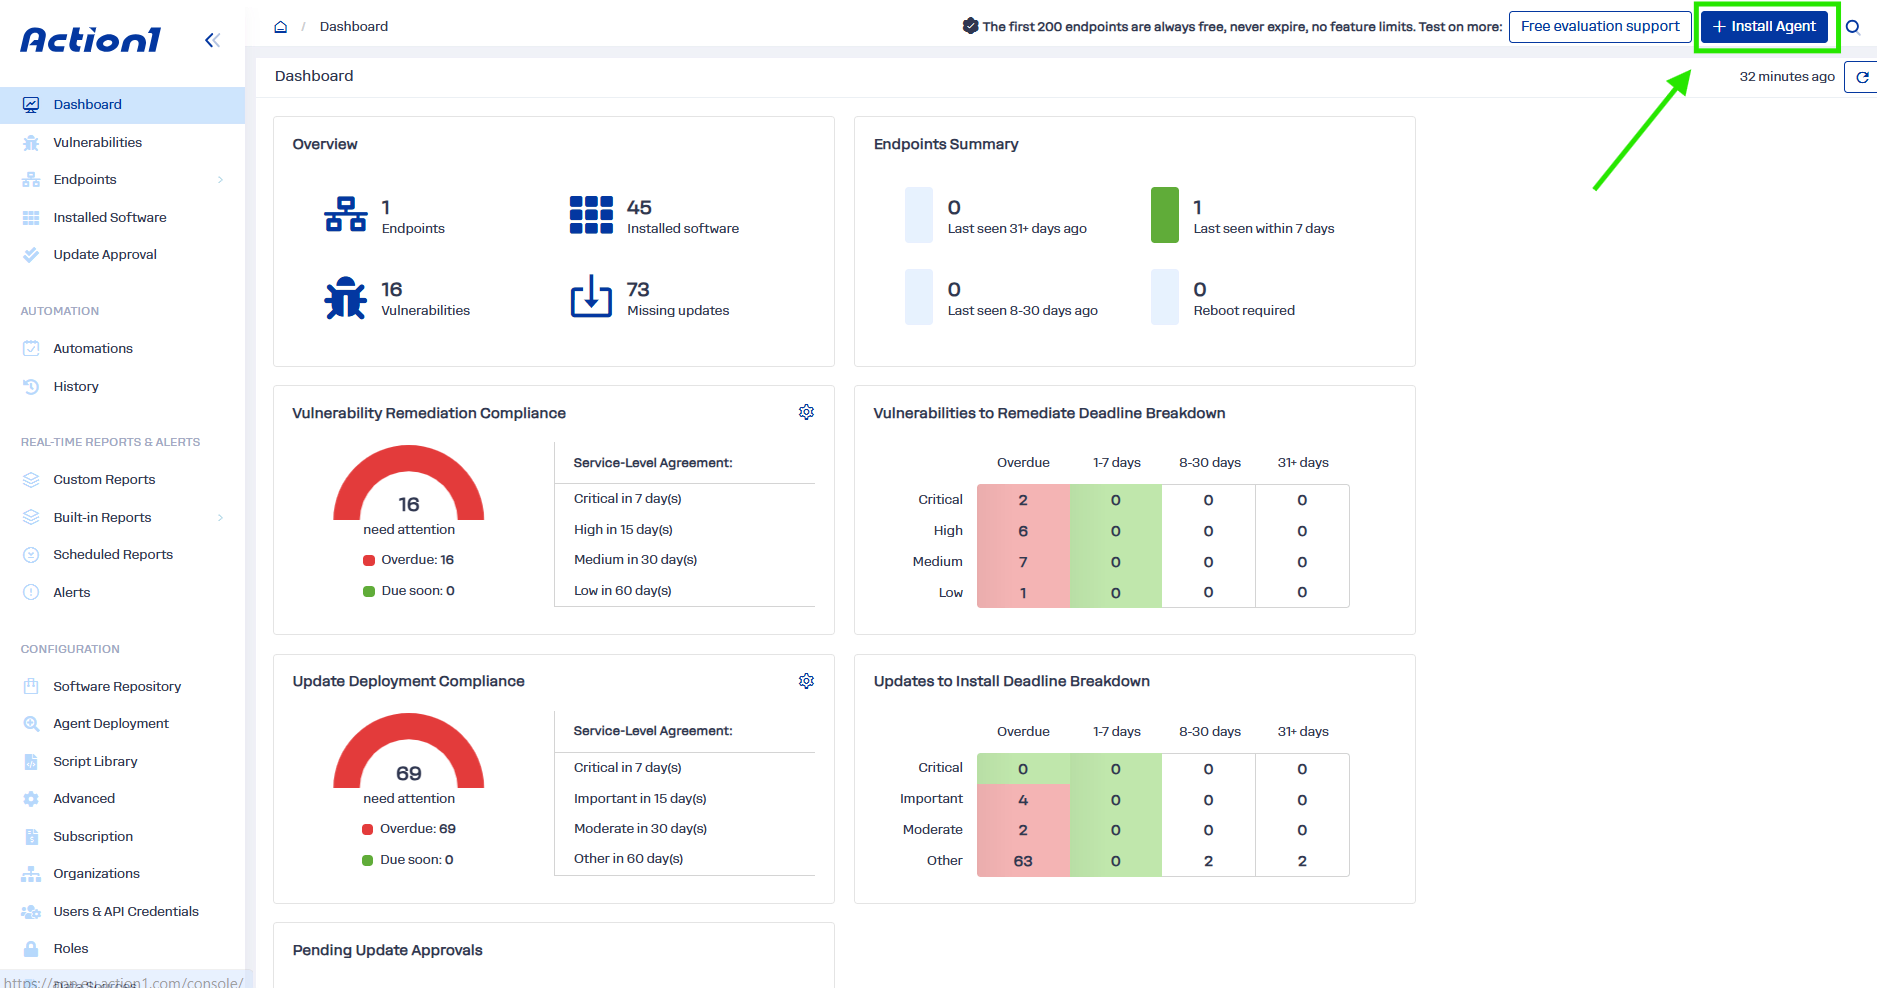
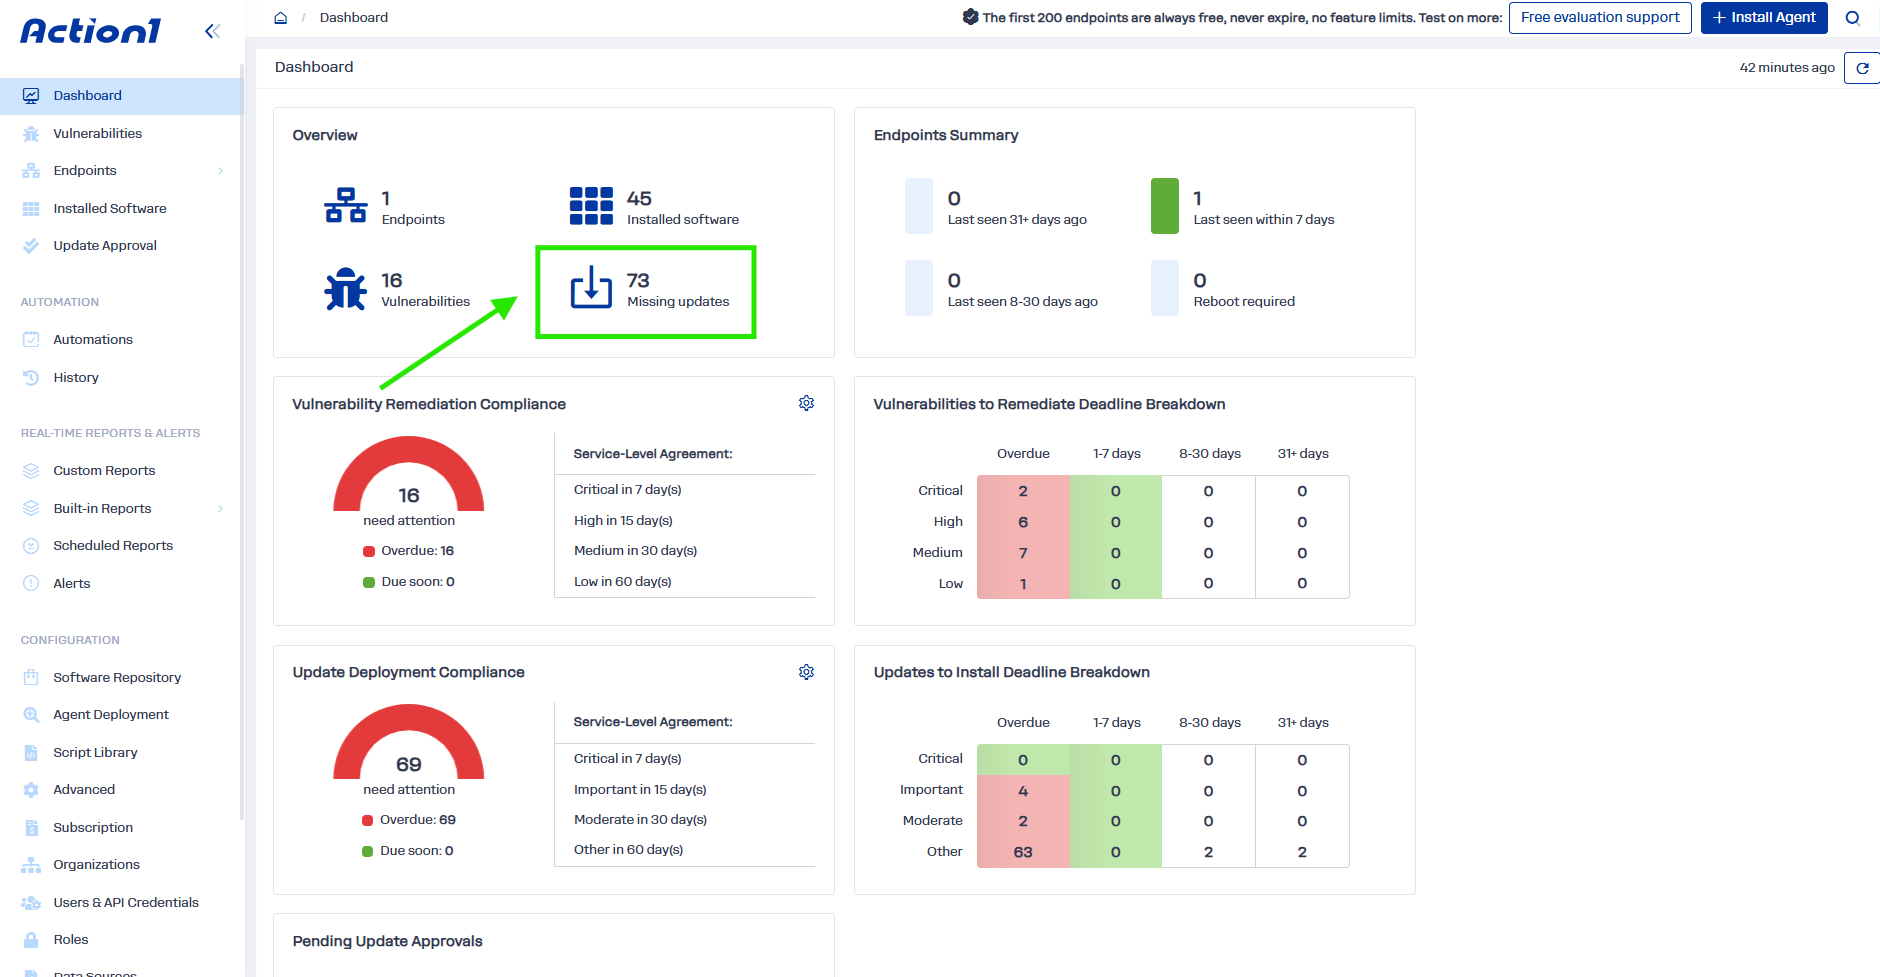
- Step 3. Let Action1 scan your endpoints: Once the agent is installed on every system you want to manage, Action1 will automatically check each Windows endpoint for missing updates. This scan takes just a few minutes. You’ll then see the number of missing updates detected on the central dashboard. Click this to view all identified but uninstalled updates for your OS and third-party apps.
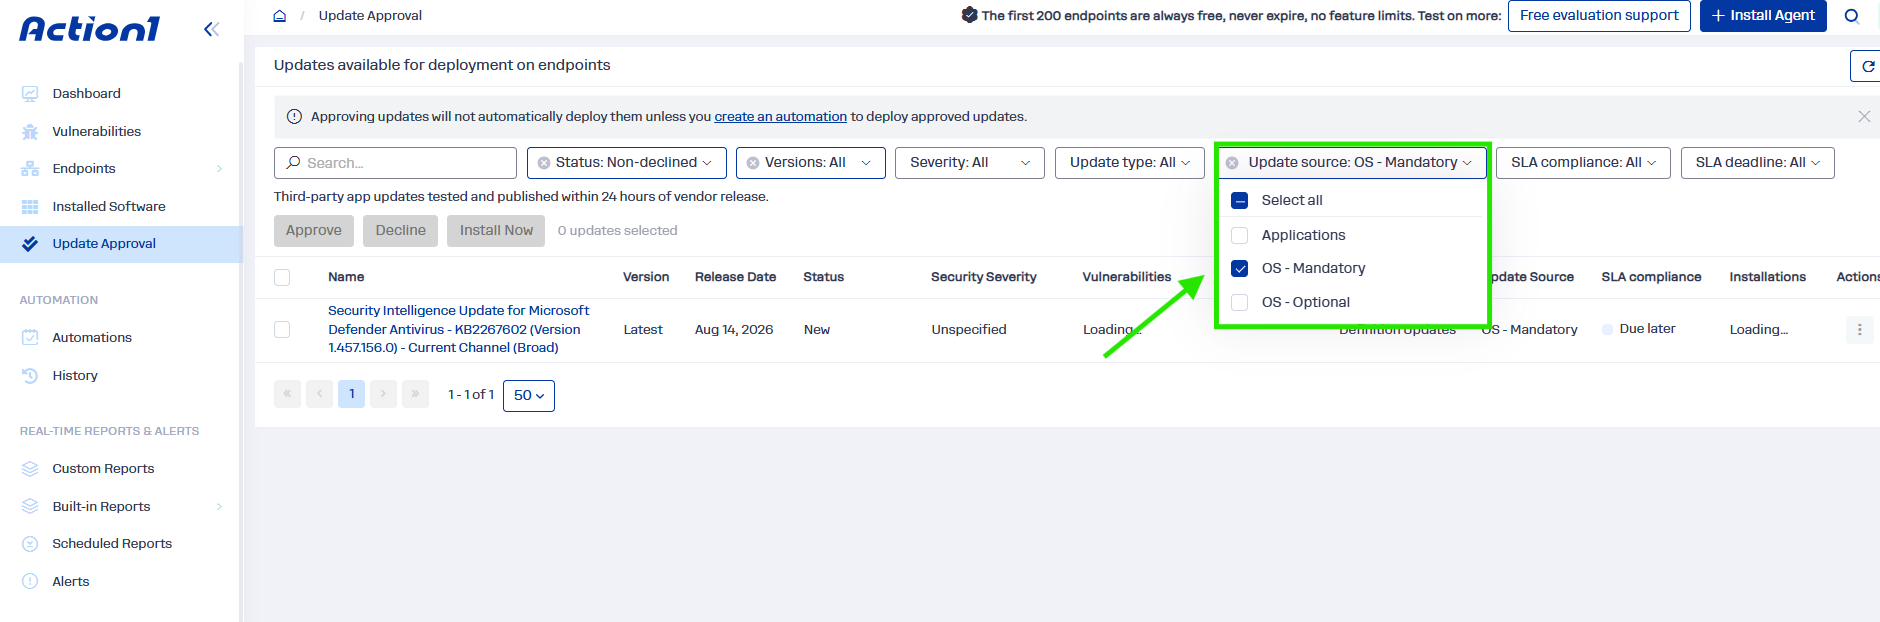
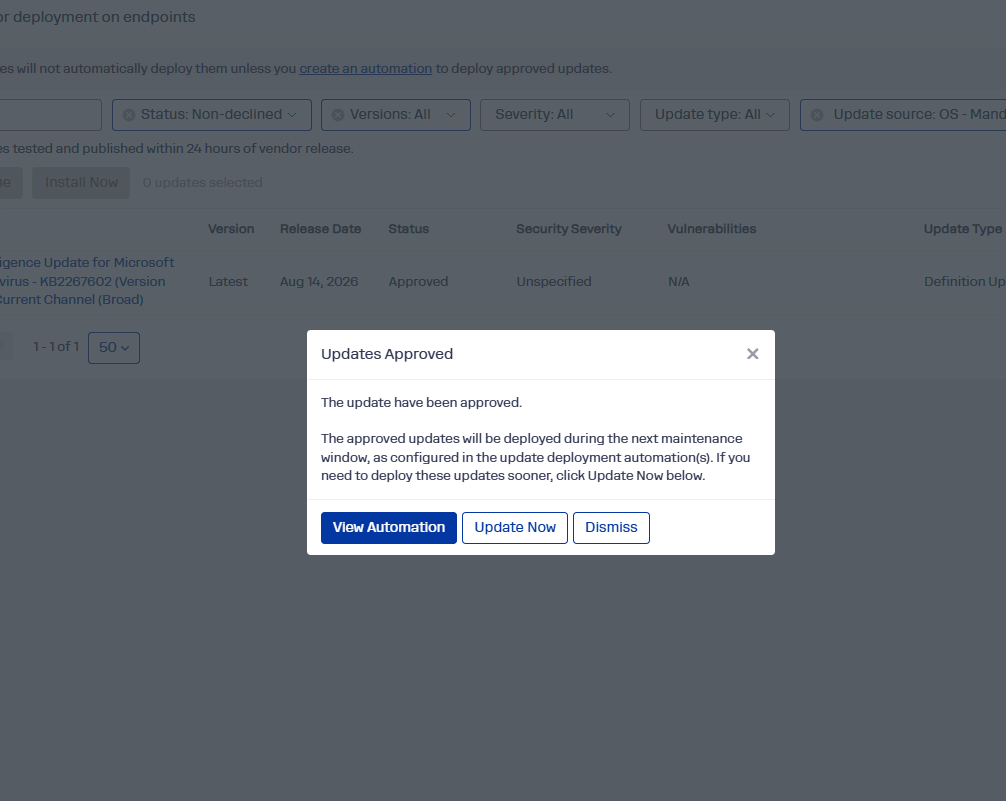
- Step 4. Apply filters to separate OS from third-party updates: At the top of the dashboard, you will see a filter named “Update source.” Click on it, then tick the box labeled “OS-Mandatory.” This will filter updates, showing only operating system updates. Then click “Approve,” and you will see options for “update now” if you want to start an immediate deployment, or view automation to create your first scheduled rollout.
- Step 5. Set up update rings for staged rollout: Instead of pushing a missing update to every endpoint at once, you can deploy it to a small test group first. Define your success criteria, and Action1 will only advance the update to wider rings once those criteria are met. This catches problems before they spread across all your endpoints. You can also control deployment timing, scope, and reboot management. For detailed information on creating update rings automation, visit: https://www.action1.com/blog/patch-management/update-rings/
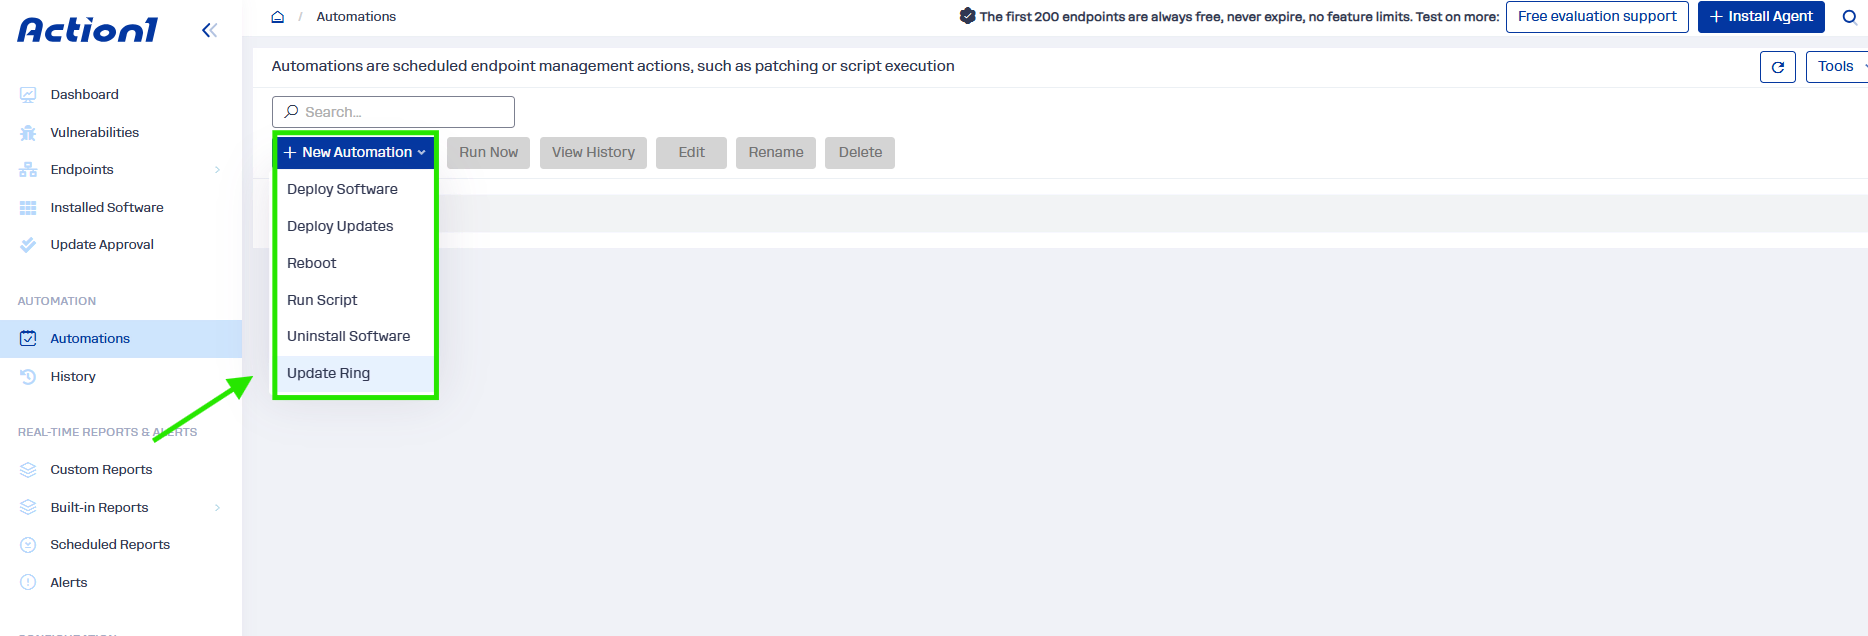
- Step 6. Confirm the update actually installed, even on devices that were offline: Once the deployment process completes, create a report or return to the dashboard to check if every single endpoint received the update successfully. If any systems are still offline, check back later to confirm they were updated as well. Action1 automatically deploys any missed updates once an offline system reconnects.
How to Avoid Missing Updates in the Future?
If you want to end once and for all the possibility of missing critical updates, you can do it with minimal effort by properly configuring your system. The following steps ensure your Windows 10/11 automatically receives and installs updates and patches without interruption and delays.
Enable Automatic Updates in Settings
To enable automatic updates on your Windows 10/11, go to Settings, then select Windows Update to access your automatic update configuration. Enable “Automatic updates” to allow your OS to download and install updates once they’re released without any manual intervention. This setting not only provides complete visibility into update schedules but also maintains system security through timely installations of the latest updates.
For those of you who want to have complete control over the process, you can access these options through Control Panel for additional configuration choices that offer flexibility over update timing and installation preferences.
Configure Group Policy Settings Properly
To avoid missing updates, review the established administrative templates to ensure no policies are blocking automatic update functionality. You can easily do this by navigating to your Computer Configuration and examining Windows Update policies that might be restricting the normal operation of the app responsible for updating your system.
Check Device Compatibility Regularly
Always check your computer’s hardware specifications against Microsoft’s minimum requirements, especially before major feature updates that might demand additional system resources. For instance, before upgrading your computer from Windows 10 to Windows 11, you must ensure that your system is capable of running and supporting the newest OS.
Avoid Pausing Updates Unnecessarily
Avoid pausing updates for whatever reason; use that option only temporarily during critical work deadlines or when you don’t want to disrupt your work process. Windows 10 and Windows 11 offer the option to pause updates for up to 35 days (5 weeks). However, we highly recommend you pause them for a maximum of 1 week to avoid exposing your system to vulnerability exploitation risks, data breaches, malware, ransomware, and other cyberthreats.
Maintain Adequate Storage Space
To avoid missing updates, ensure that your computer always has at least 10-15 GB of free storage, since insufficient space frequently causes silent update failures. A good practice is to regularly review and clean up unnecessary files and apps, or even consider upgrading storage if your device consistently runs low on available space.
Why updates aren’t installing?
Windows updates might be unable to install for several reasons, such as paused or malfunctioning Windows Update services, metered network connection, corrupted update cache files, or insufficient disk space. Moreover, firewall settings, antivirus programs, and third-party applications can interfere with the update process and block downloads. Outdated drivers also may cause Windows 10/11 updates to fail. To fix such issues, try restarting update services, clearing the cache, or manually installing updates from the Microsoft Update Catalog.
How often to check for updates?
When you enable automatic updates on Windows 10/11, the operating system checks for updates every 22 hours. However, keep in mind that it’s a good idea to manually check once a week for available updates if you’ve recently paused updates or experienced update errors.
Are missing updates dangerous?
Yes, missing updates makes your system vulnerable to cyberattacks, since software vulnerabilities remain unaddressed. Furthermore, you may also encounter bugs and performance issues. Microsoft releases updates and patches with the idea to remediate software flaws that are already being exploited in the wild. Skipping them increases the attack surface of your device(s), and you can easily become a victim of ransomware, data, or identity theft. That’s why it’s critical to keep your system up-to-date and make sure updates are deployed as soon as possible.
Summary and Final Tips
If your computer misses Windows 10 or Windows 11 updates, the best way to fix the problem is by checking for pending installations through the Settings app, running the Windows Update Troubleshooter, or reviewing which updates have been successfully installed by using the PowerShell commands we mentioned above. The reason why your computer misses Windows updates is usually caused by paused or malfunctioning Windows Update services, metered network connections, low storage space, or corrupted update cache files.
You can fix these issues through different methods like manually installing the latest KB updates directly from the Microsoft Update Catalog, restarting update-related services, running DISM and SFC scans to repair failing or broken Windows 10/11 components, or fully resetting the update module using built-in PowerShell commands. For persistent Windows corruption that survives these fixes, the Media Creation Tool gives you another recovery option by enabling you create Windows installation media. Windows Pro or Enterprise users must also review their group policies, as misconfigured policies can block automatic updates without any warning or error code.
To prevent these issues once and for all, make sure automatic updates are turned on, your device meets compatibility requirements, and your system always has enough free storage space for the latest updates and patches to install. These simple yet effective measures will help you prevent silent update failures and protect your computer from becoming an easy target for the cybercriminals.
Read also: How to Update and Repair Windows 11?
Automated Update Management with Action1
Action1 is a cloud-native, autonomous endpoint management solution that successfully discovers and remediates software vulnerabilities in minutes, helping your IT team keep on-site and remote endpoints updated and secured. Once installed, the software immediately starts monitoring every connected workstation on your network, finding existing vulnerabilities and listing available updates and patches to remediate them prioritized based on CVSS scores, severity, and their potential business impact.
Action1 supports Windows, macOS, and third-party applications, equipping your technicians with the visibility needed to gain complete control over the update management processes, thus eliminating security gaps in a timely manner.
Through the platform, you can test updates with customizable update rings that push updates and patches in phases, where you can establish success metrics and update counts to ensure only reliable and non-problematic updates move forward to your production endpoints. This minimizes the chance of experiencing unexpected downtime or other system stability issues caused by faulty updates.
To keep complete control over the entire update management process, Action1 equips you with flexible scheduling, enabling you to shape an update strategy that meets your organization’s specific needs and requirements.
On top of that, all updates come from Action1’s privately maintained secure software repository, where each update is tested and verified by our expert team for safety and reliability before distribution. This means that if you face issues with missing updates due to different problems related to the Windows Update service, they will be eliminated because all updates will be delivered through our repository. Furthermore, the built-in peer-to-peer update delivery technology speeds up patching across large networks and minimizes bandwidth consumption, even when deploying updates across thousands of endpoints simultaneously.
Since the platform is cloud-native, you can manage your workstations from anywhere in the world, directly from your browser, with no VPN needed. Action1 adheres to major security standards like SOC 2, ISO 27001:2022, TX-RAMP, CSA, CISA, CAIQ, and GDPR.
That’s not all. By using the software, you can generate detailed reports after each update cycle, helping you meet strict regulatory standards like GDPR, HIPAA, or PCI DSS, without wasting time on manual documentation. This boosts the productivity of your IT team by freeing them to concentrate on other important tasks rather than creating reports after each update deployment.
Action1 gives you access to 100+ built-in reports on patching, vulnerabilities, software and hardware inventory, and security configuration. You can also customize them easily to meet your internal or client demands.
Last but not least, perhaps the best part is that the software is free for up to 200 endpoints, forever, with no feature restrictions. Yes, that’s right. Free users get the same tools and capabilities as paying customers, making Action1 ideal for small businesses or nonprofit organizations to use the software at no cost. Larger enterprises have the option to test the software for as long as they need before implementing it throughout their entire network, taking advantage of a cost-effective pricing model that decreases per endpoint as they expand.
Simplify your IT operations and take control of your endpoints with Action1’s autonomous endpoint management platform.
→ Start managing up to 200 endpoints for free
Read also: How to Stop Windows 11 Updates?