



TL;DR
- Keeping Windows 11 updated helps protect your PC from known vulnerabilities while delivering bug fixes, compatibility improvements, performance enhancements, and new features.
- Windows 11 receives several types of updates, including security and quality updates, annual feature updates, optional non-security previews, drivers, Microsoft Defender definitions, and servicing updates.
- To check for Windows 11 updates, go to Settings > Windows Update. Windows will either display available updates or indicate that the device is up to date.
- To manually update Windows 11, select Check for updates, download and install the available updates, and restart the computer when required.
- Windows 11 can automatically receive the latest updates through Windows Update. The Advanced options menu also provides controls for Microsoft product updates and restart notifications.
- Administrators can force an update scan from the command line when the normal Windows Update interface isn’t working, including through
UsoClient.exe StartScanor the Windows Update Agent COM API where appropriate. - Windows 11 updates can be temporarily paused through Windows Update settings, but delaying security updates for too long increases exposure to known vulnerabilities.
- Problematic Windows 11 updates can be uninstalled when necessary, including through Settings by opening Windows Update > Update history > Uninstall updates and selecting the relevant KB.
- Before updating, save open work and keep laptops connected to power. Restarts may be required to complete installation, particularly for cumulative and feature updates.
- For organizations managing many Windows 11 devices, centralized patch management is more scalable than updating PCs individually. Action1 can automate Windows 11 update deployment across managed endpoints, support targeted rollout groups, schedule deployments, and provide centralized update management.
If you want your computer to perform at its best, then carrying out regular updates for Windows 11 is mandatory. Even high-performance systems can experience degraded functionality without proper updates, as these releases contain crucial software improvements that enhance your system speed and stability.
Regular updates strengthen your security posture by addressing critical vulnerabilities and preventing potential exploitation by cybercriminals. Additionally, keeping your operating system current provides you with access to the latest Microsoft features and capabilities.
In this article, we will explore why updates are crucial, how to check your Windows 11 version, and various methods to keep your system current, including manual updates and automated solutions.
Why is it Important to Update Your Windows 11?
Have you ever wondered why updating your Windows 11 is so important? Keeping your operating system up to date should not be a choice but a necessity. But why? The answer is quite simple: updates do much more than just introduce new features that many users may even find unnecessary at times. Updates are responsible for keeping your PC secure, stable, and efficient.
As most of us are aware, cyber threats are growing in number and becoming more destructive and harder to detect every day. They are multiplying at the speed of light, and outdated software is a prerequisite for becoming the next cybercriminals’ victim. According to Action1’s 2026 Software Vulnerability Ratings Report, total disclosed vulnerabilities rose 92 percent in 2025 compared to 2024, with critical and high-severity issues each more than doubling. Every one of those vulnerabilities is a chance for an attacker to get in, and updates are what take that chance away.
Windows updates can prevent such attacks, of course not all of them, but they significantly minimize the chances of experiencing a cyberattack by addressing software flaws that could otherwise be exploited by hackers, leading to unpleasant consequences. These security updates are of utmost importance because they protect not only your system but also your personal data and financial information, preventing identity theft.
Skipping a security update or delaying its installation is always a bad decision. It is like leaving your house’s front door wide open when you are absent and hoping that nobody will walk in and rob you. The same applies to security updates, so the next time Microsoft releases on “Patch Tuesday” (the second Tuesday of the month) an update addressing newly discovered vulnerabilities, do not miss it or delay its installation even by a minute. That way, you can make sure you have done everything possible to protect yourself and your device.
Along with security updates, Microsoft releases updates that fix system bugs, introduce new features, or improve the overall performance of your PC. These are as important as the updates that address software vulnerabilities. For instance, recent Windows 11 updates have significantly improved system startup times, reduced memory usage during multitasking, and boosted SSD drive performance. These updates ensure that your PC runs at its optimal speed and efficiency, with the main goal of preventing slowdowns and crashes that can interrupt your work or entertainment at the most inconvenient moment.
So, why risk missing out? Updating Windows 11 is a small effort with big rewards. It keeps your system secure, running smoothly, and ready for whatever comes next. The next time that update notification pops up, do not ignore it. Install it, especially if it is marked as a security update.
What are the Benefits of Updating Windows 11?
Updating Windows 11 with the latest updates brings many benefits to your computer, with security being the most important. Performance improvements, bug fixes, and the introduction of new features are equally significant. Let’s take a closer look at how keeping your OS up to date improves your device and the essential benefits it brings to you.
Better Security
Updating Windows 11 improves your security. Security updates are released by Microsoft with the main purpose of protecting your system by addressing known software vulnerabilities that pose significant risks to your PC. The tech giant specifically designs these updates to safeguard you against various types of malware, newly discovered ransomware, and other cyberattacks.
Performance Improvements
Updating Windows 11 gives your device a performance boost. Have you ever noticed your device slowing down for no obvious reason? Your operating system may be the cause. For that reason, Microsoft releases updates that often come with optimizations to enhance your system’s speed and responsiveness. Whether it is faster startup times, better resource management, or smoother multitasking capabilities, these updates ensure your device operates at its best.
Device Compatibility
Staying updated means your computer works with the latest apps, drivers, and devices. Outdated systems sometimes cause frustrating compatibility problems, like when you buy a new printer and it refuses to work. Windows updates help solve these issues. As technology moves forward, updates make sure your Windows 11 keeps up, so you can stay productive without unnecessary interruptions.
Access to New Features
Microsoft introduces new features and tools regularly through updates. By keeping Windows 11 current, you get early access to new capabilities and productivity enhancements. Updating ensures you are not missing out on useful features that can make your work and daily tasks easier.
Bug Fixes
No software is perfect, and bugs can be really annoying, especially when they stop your favorite app from working. Bug fix updates directly tackle these problems, increasing your system’s stability. This means fewer crashes, fewer errors, and a smoother day-to-day experience.
Whether you use your PC for work, gaming, or creative projects, keeping Windows 11 updated brings real benefits. Updates help you avoid security risks, maintain top performance, enjoy new features, and keep everything running smoothly.
What Types of Windows 11 Updates are Available?
There are six types of Windows 11 updates:
- Security and quality updates: These are cumulative updates that Microsoft releases on “Patch Tuesday” to address vulnerabilities and fix bugs. They improve your endpoint’s security posture and boost performance. These updates may also include driver upgrades.
- Feature updates: These either upgrade your Windows version to the latest one, such as moving from 24H2 to 25H2, or bring new features and user interface changes. Microsoft releases Windows 11 feature updates once per year, typically in the second half of the calendar year, and they need the most free space of any update type to install.
- Optional non-security preview updates: These are early previews of next month’s fixes. They are released on the fourth Tuesday of the month, but they don’t install automatically like the ones from “Patch Tuesday.” You need to go into settings and manually opt in through Advanced options if you want to test them before the official rollout.
- Driver updates: These keep your graphics card, GPU, printer, mouse, keyboard, network adapters, and other hardware working properly. Windows Update offers these updates only if the manufacturer publishes them for that channel. In most cases, you install them directly from the manufacturer’s website, a USB drive, or a disk.
- Definition updates: These refresh Microsoft Defender’s threat intelligence, or simply put, the actual database it uses to recognize malware and other cyber threats. These are the most frequently released updates, sometimes multiple times per day, since a new definition set is released whenever fresher data becomes available.
- Servicing stack updates: These update the tool responsible for delivering and applying all other updates. Keeping this component current is essential for making sure everything else works properly. Since February 2021, Microsoft has combined the servicing stack updates with the latest cumulative updates.
How to Check if You Have the Latest Version of Windows 11?
To check your current version and confirm it’s the latest one available, follow these steps:
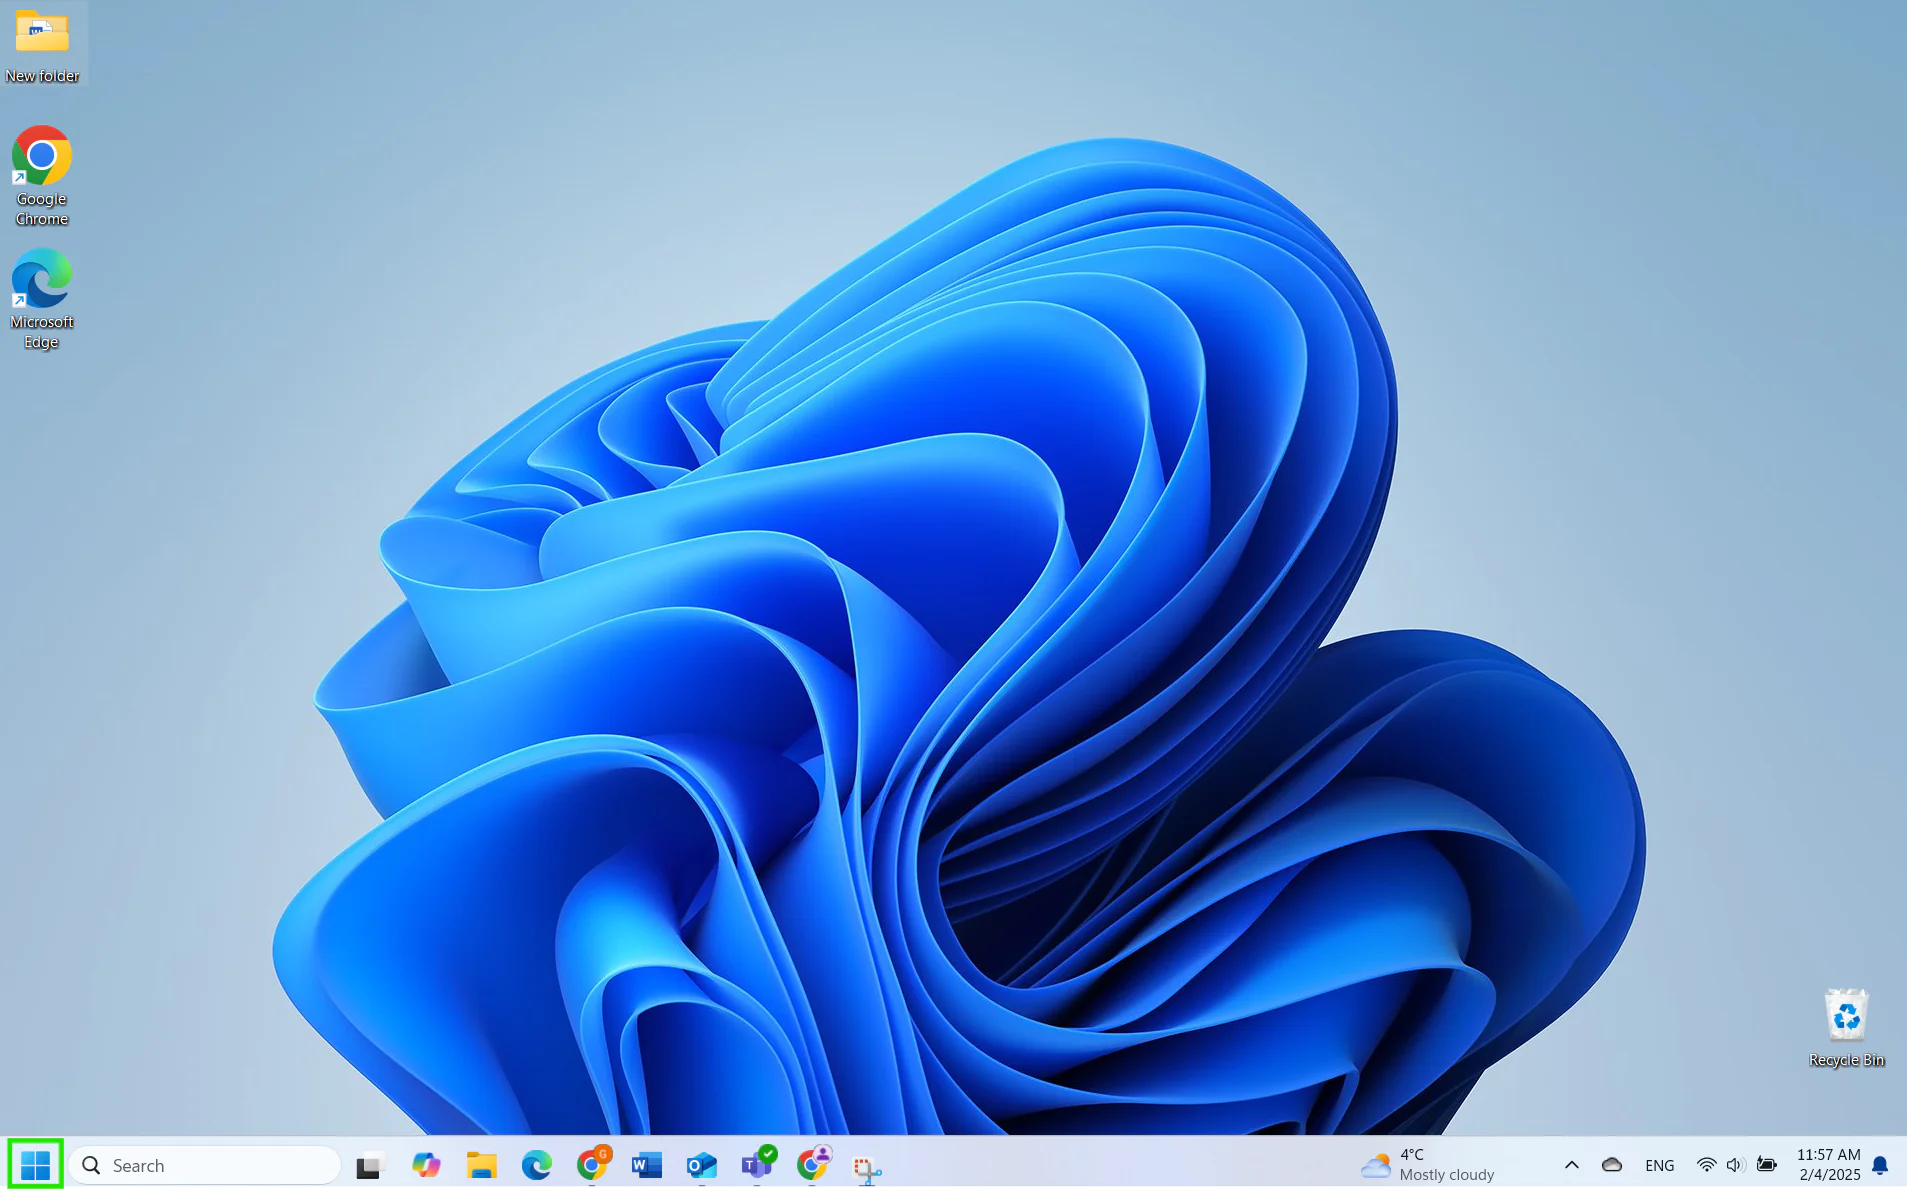
Step 1. Select the Windows Start Icon, which is located at the bottom of your screen.
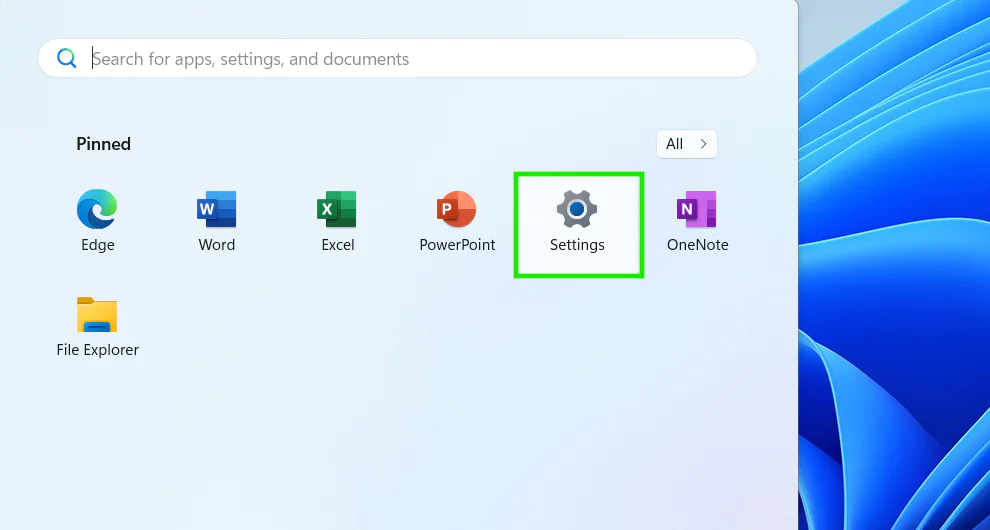
Step 2. Select the settings icon in the menu. Alternatively, you can type “Settings” in the search bar and press enter.
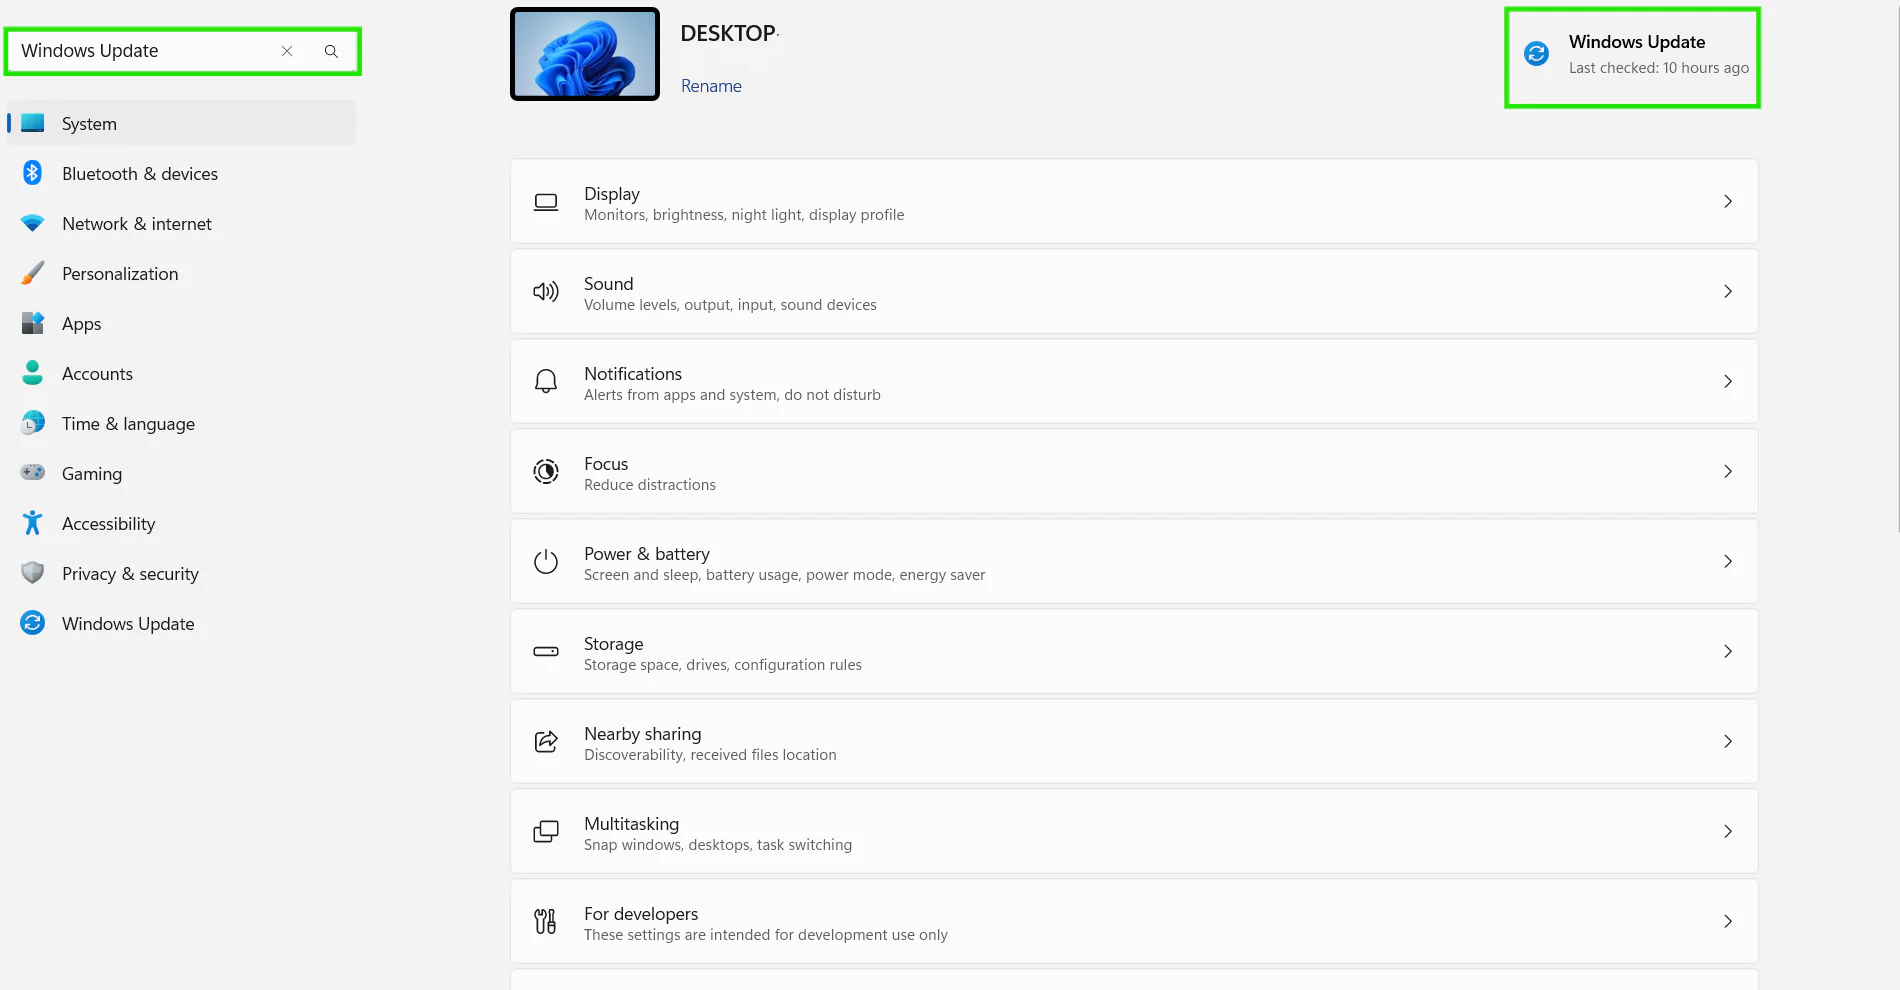
Step 3. Select the Windows Update section at the top right corner of your screen.
- You can also type “Windows Update” in the search bar to find it.
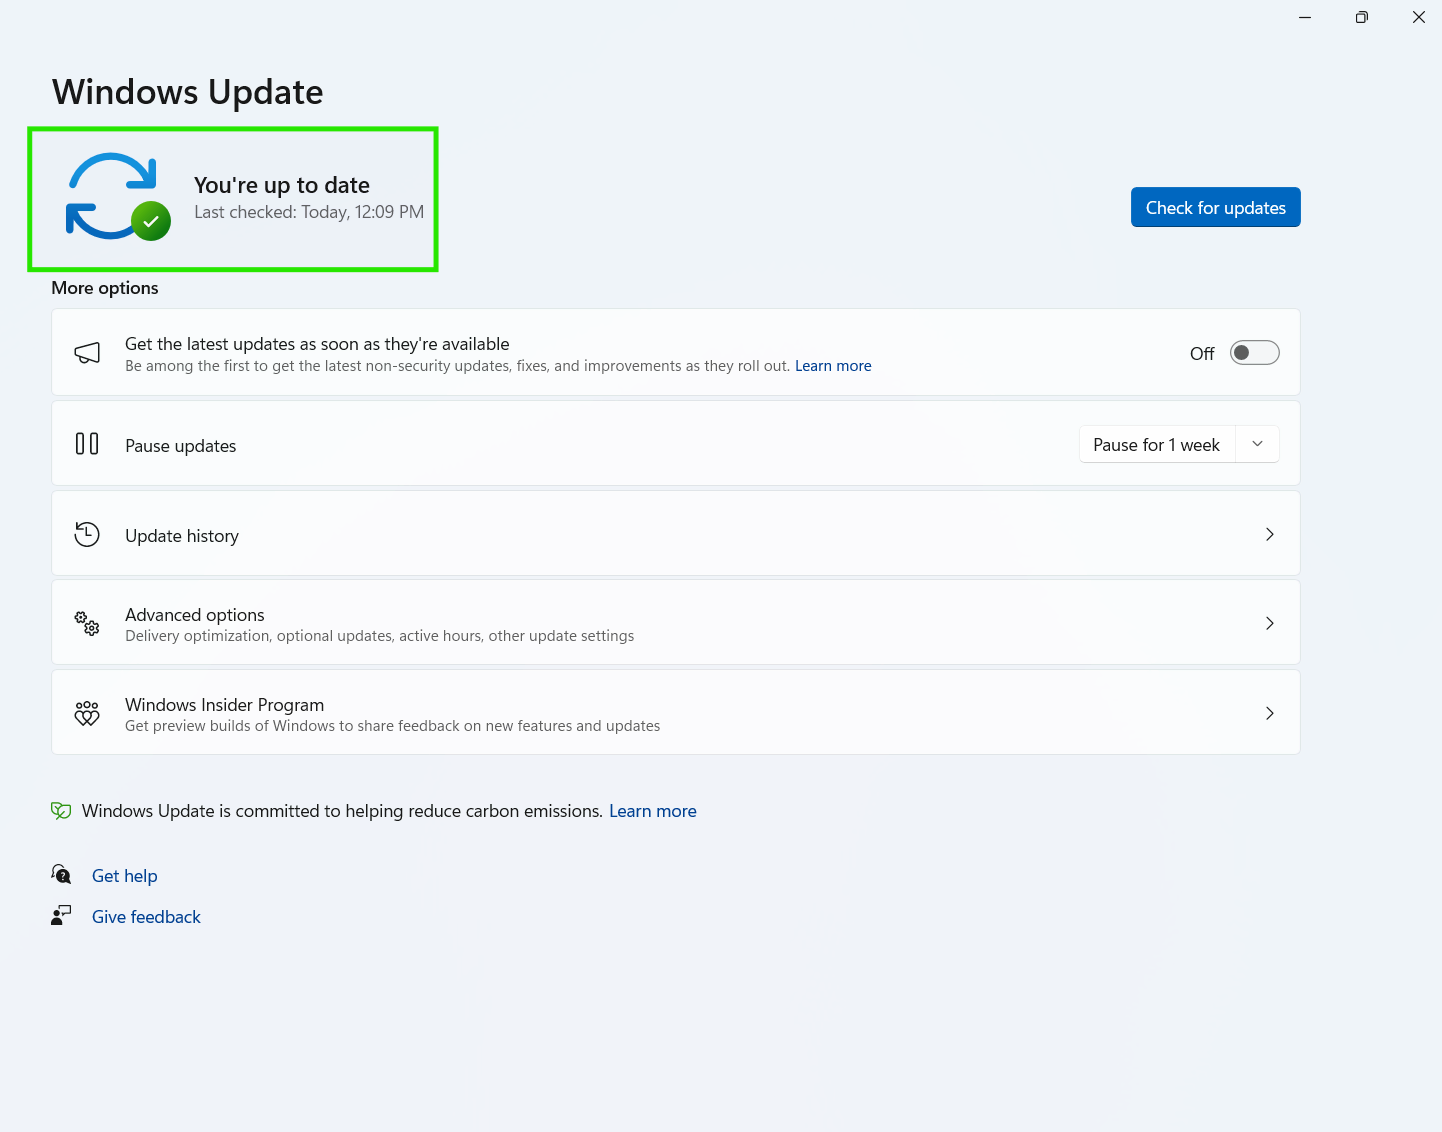
Step 4. Once in the Windows Update section, you will see if there are any updates available to Download and Install. Otherwise, you will see a message saying, “You’re up to date.”
How to Update Windows 11 With Action1 at Scale?
Action1 is an infinitely scalable, highly secure, unified cross-OS and third-party patching cloud-native platform that can be configured in just 5 minutes. It delivers exactly what your organization needs to fully automate Windows 11 update installations. Experience autonomous endpoint management for up to 200 endpoints completely free, forever, with zero hidden costs.
Ready to streamline your Windows 11 update process? Follow these simple steps to harness Action1’s powerful automation capabilities across your entire organization.
Step 1. Log in or sign up for Action1 and set up your account.
Step 2. After logging into your existing account or completing new account registration, navigate to “Software Repository” in the sidebar and select “Windows 11 Feature Update.”
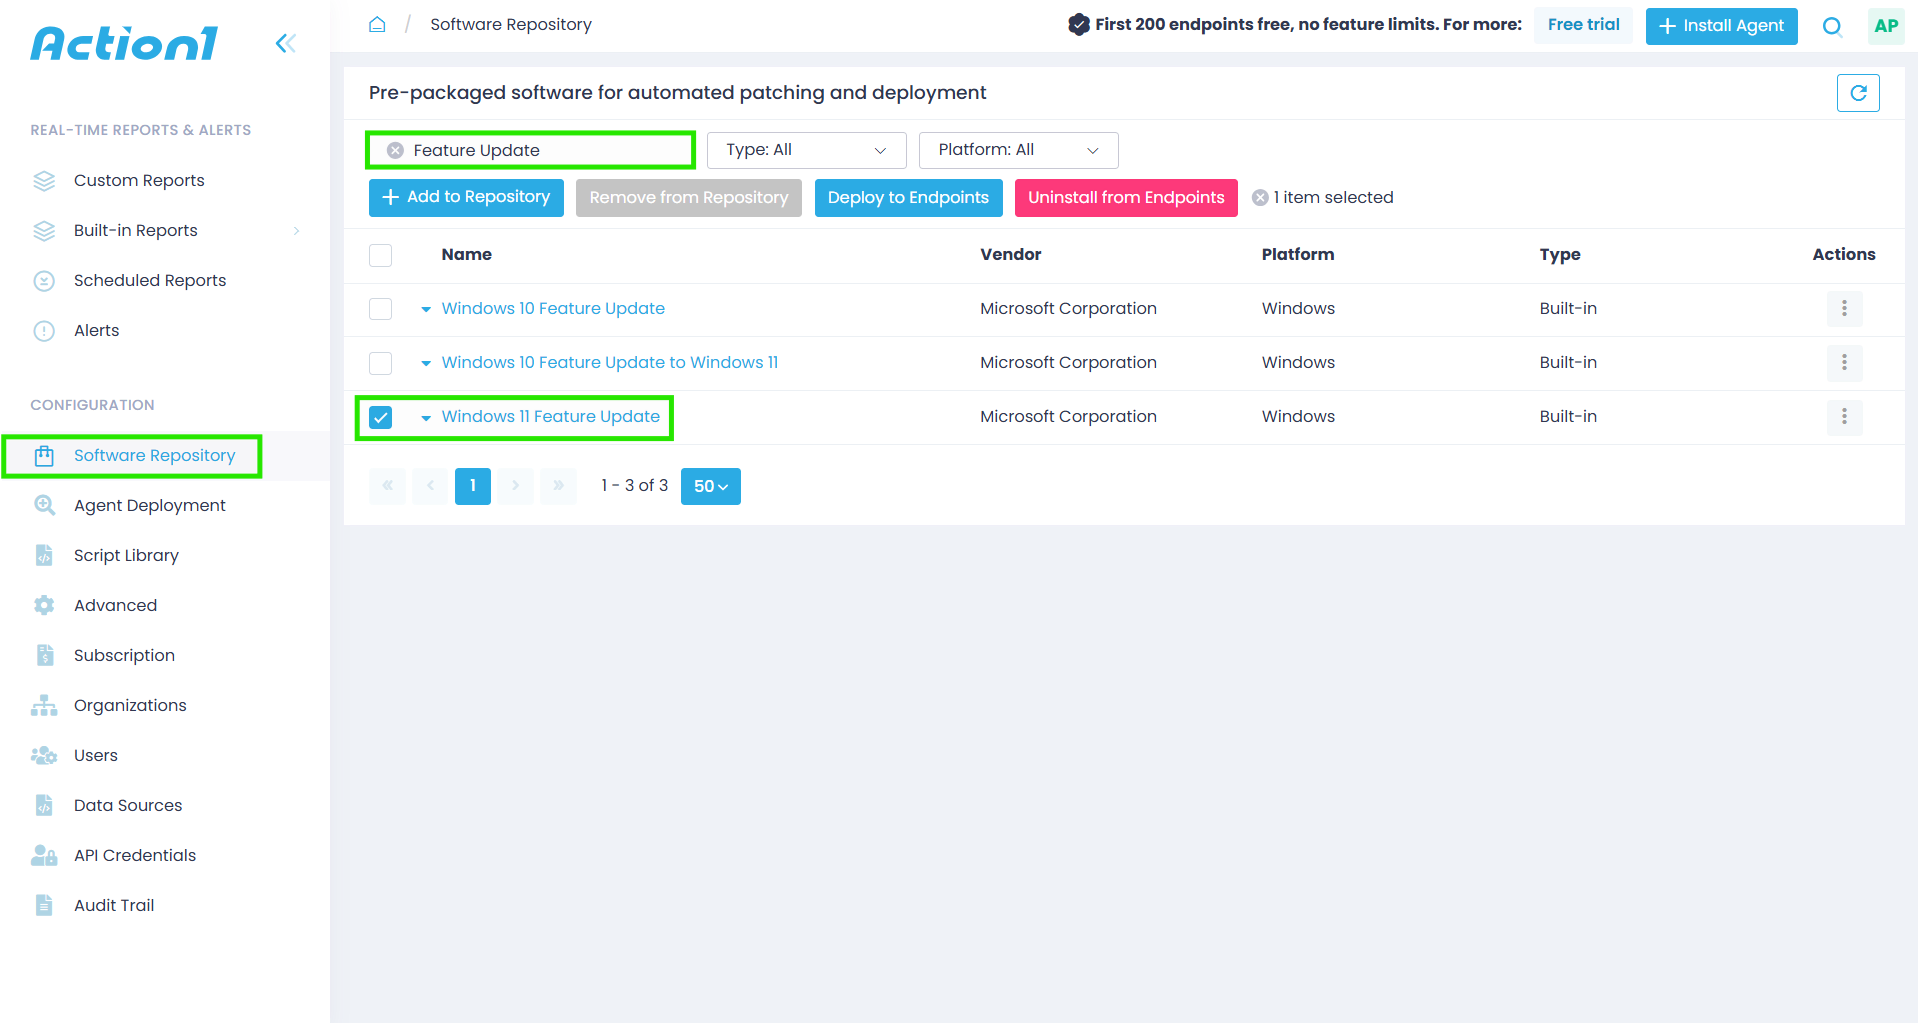
Step 3. Next, click on “Deploy to Endpoints.”
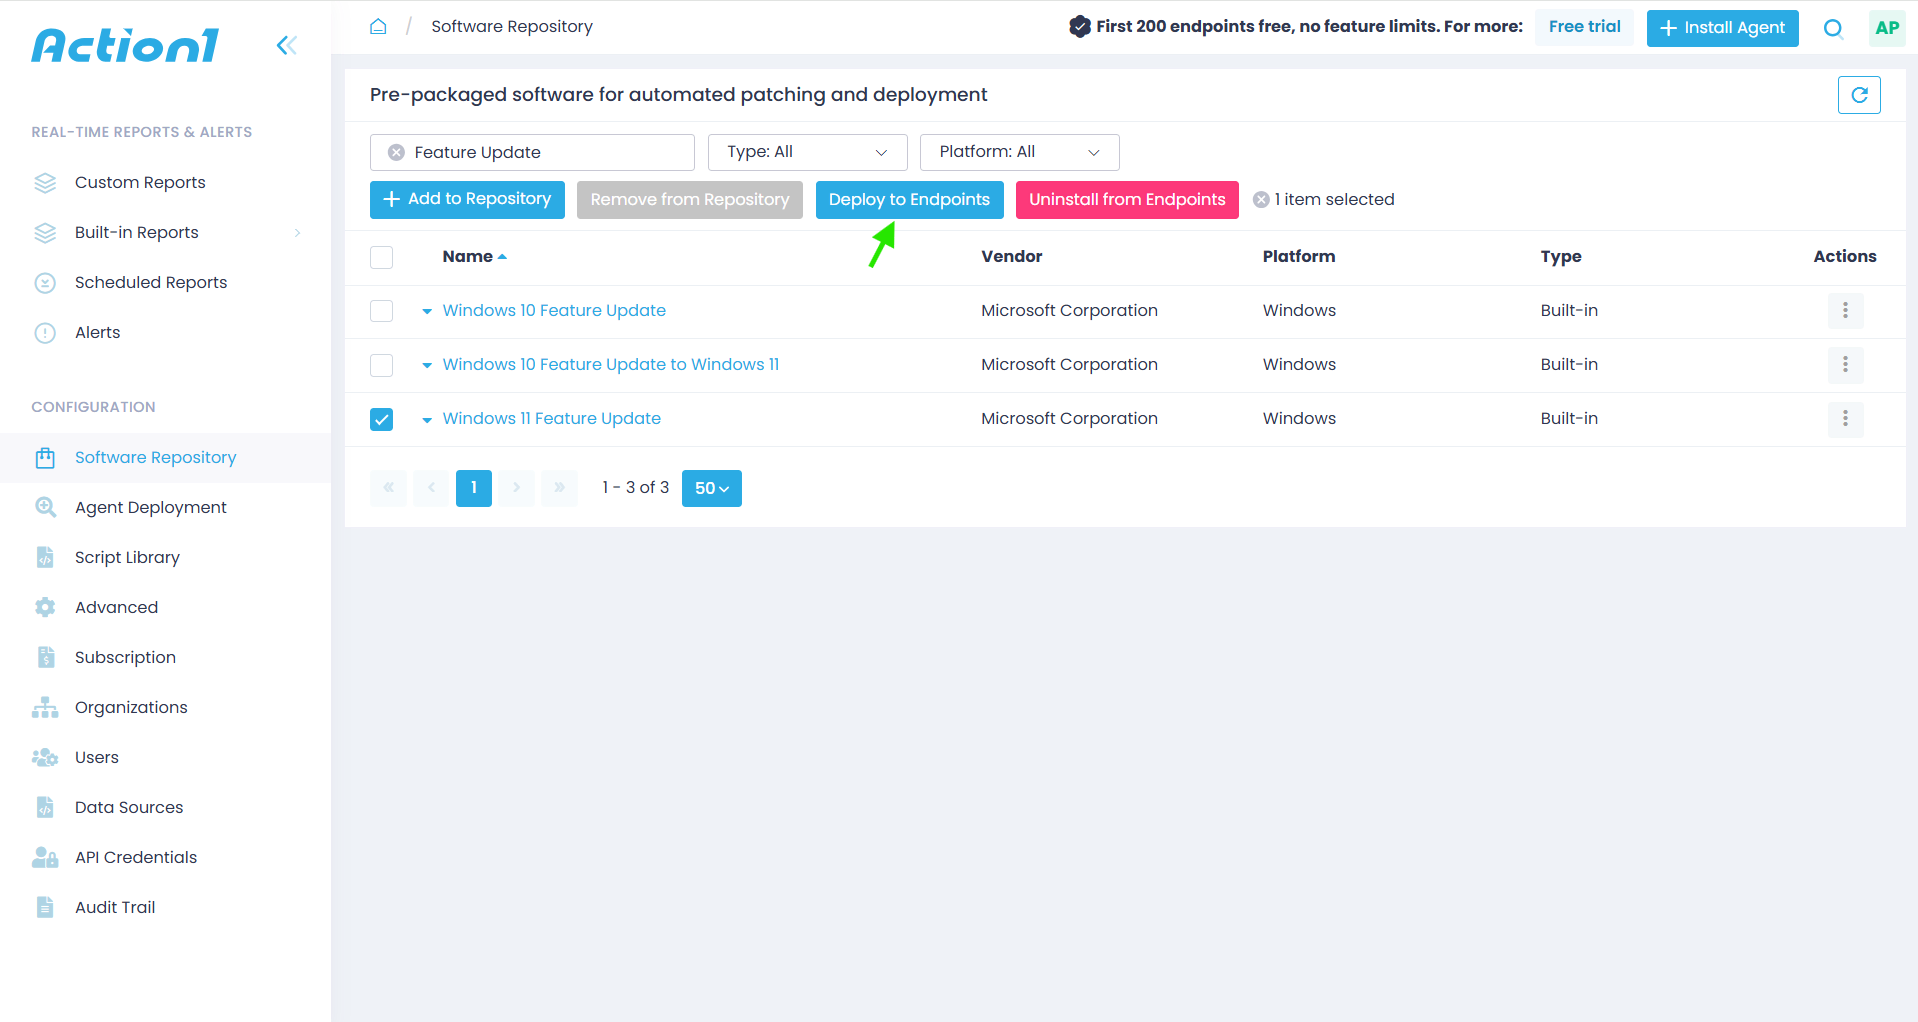
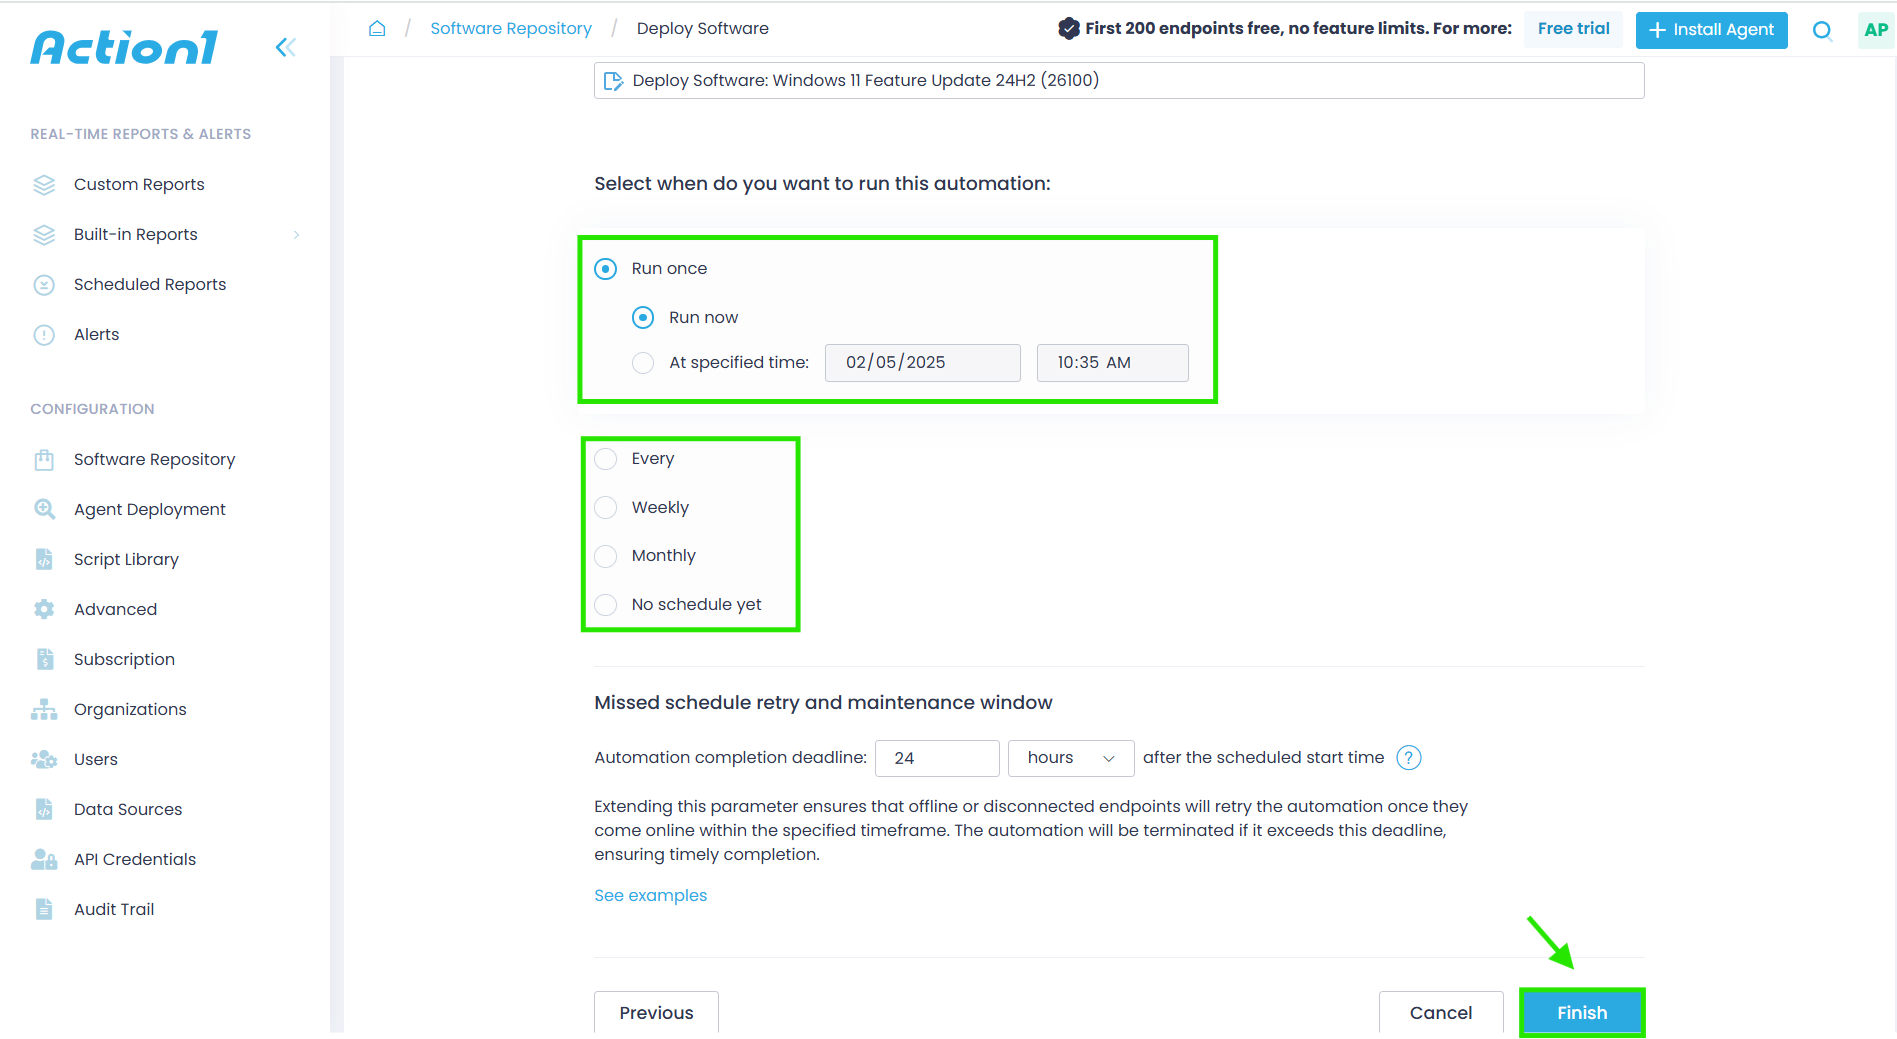
Step 4. Go through the deploy software wizard and run the update.
- Select your deployment scope by choosing between enterprise-wide implementation or a targeted group rollout. This strategic approach enables thorough testing of Windows updates in a controlled environment before full network deployment.
- The platform also offers flexible scheduling options to accommodate your operational requirements.
How to Manually Update Windows 11?
You can install Windows updates manually without much difficulty, but for your convenience, we’ve created a detailed step-by-step process to follow:
Step 1. Select the Start Menu (Windows icon) in the bottom-left corner of your screen. Afterwards, select “Settings” (gear icon) from the menu that appears. If you don’t see the icon, you can just type “Settings” in the search bar and then press enter.
Step 2. Within Settings, select Windows Update to access the update interface. Alternatively, type “Windows Update” in the Windows search bar for direct access.
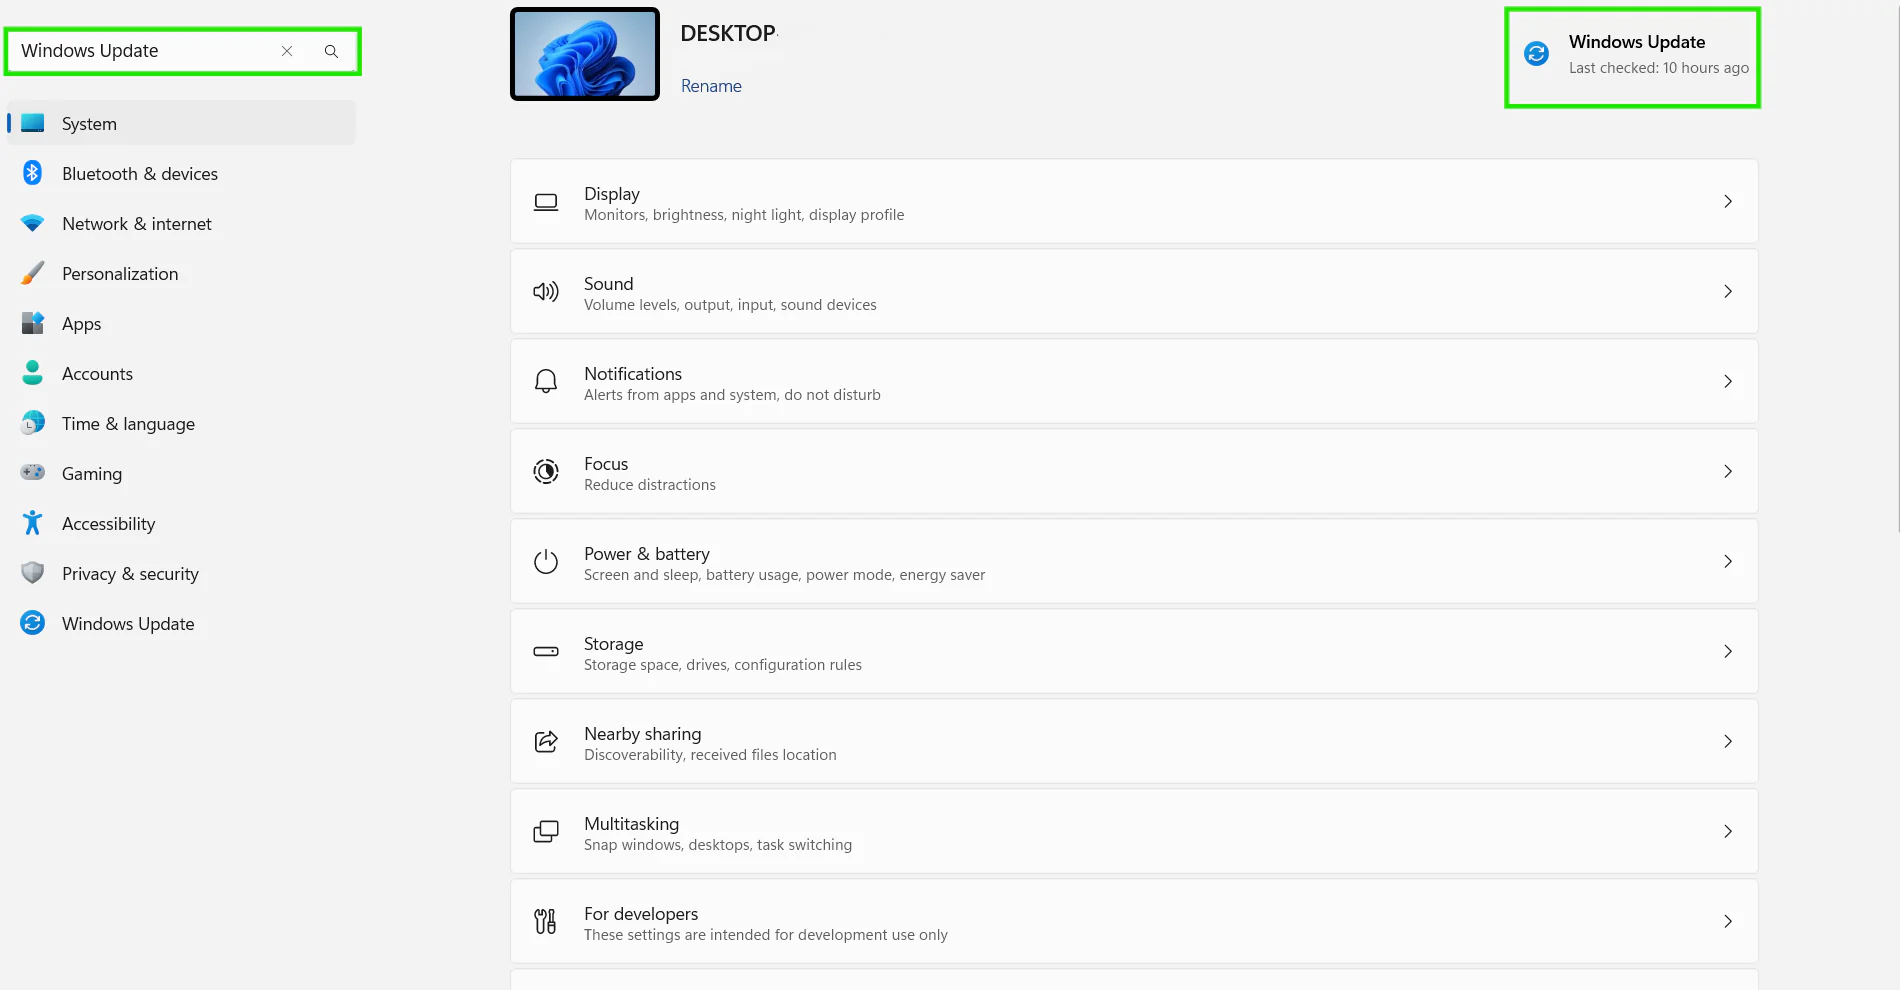
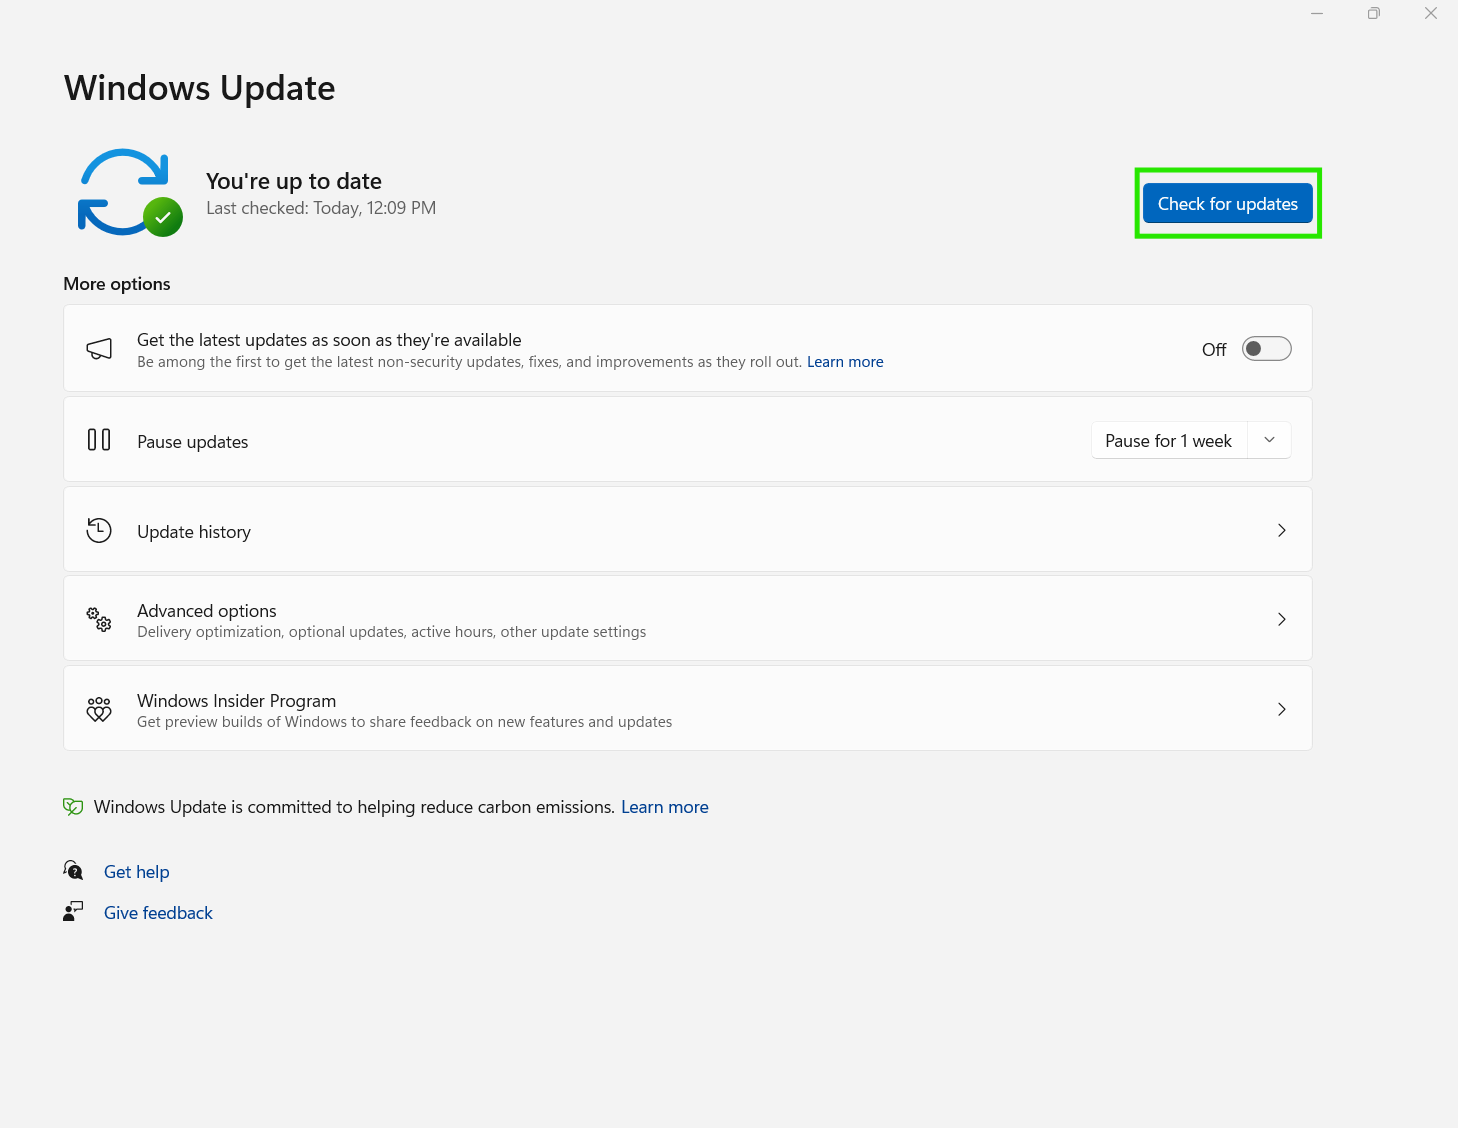
Step 3. In the Windows Update section, select Check for updates. The system will scan for available updates.
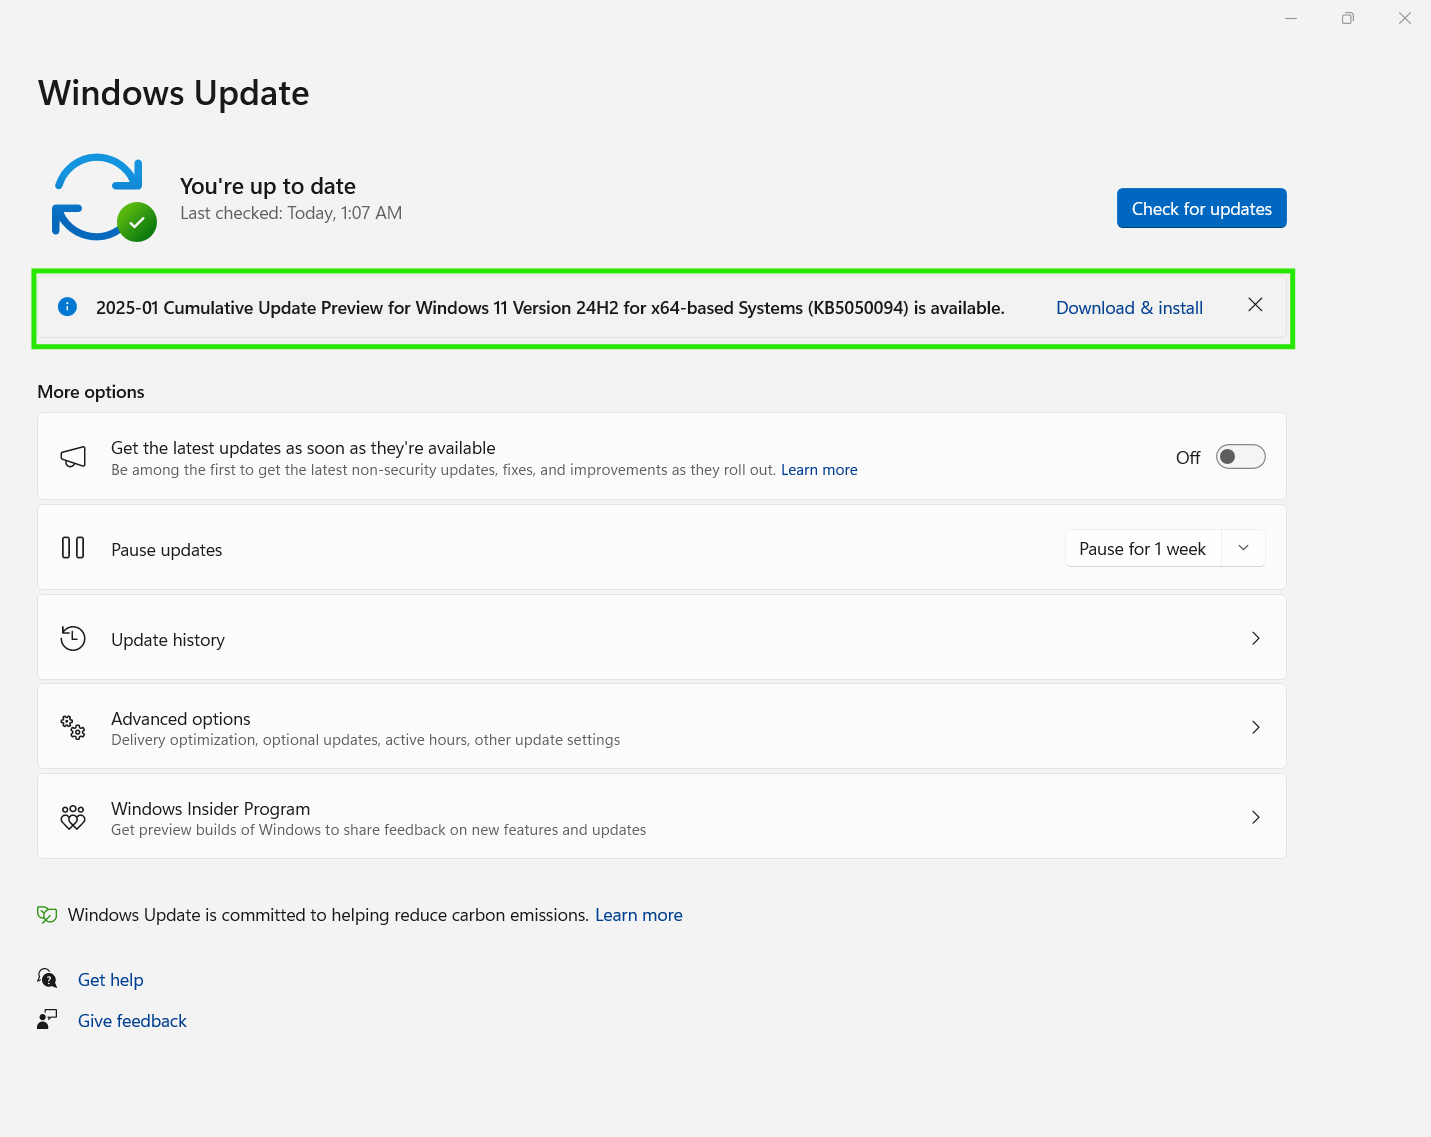
Step 4. If multiple updates are found, you’ll see a list of every single one. Click on “Download and install” to start the installation process. The time required depends on the size of the updates and your internet speed.
NOTE: Best practices for updating include saving your work and connecting to power if you are using a laptop. This way, you can be sure there will be no data loss and no shutdown in the middle of the update installation.
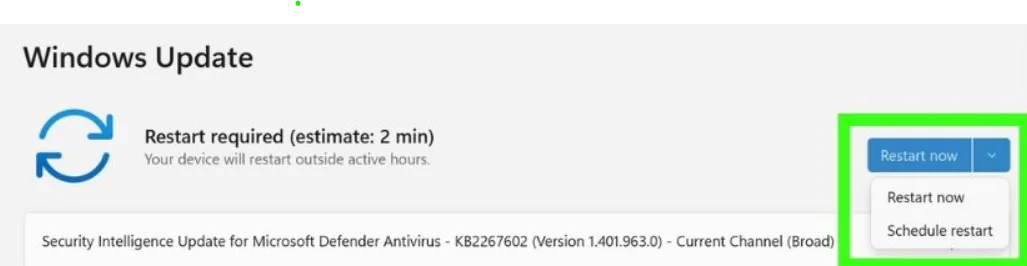
Step 5. Once the downloaded updates finish installing, you may be prompted to restart your computer. Click on “Restart now” to complete the installation process.
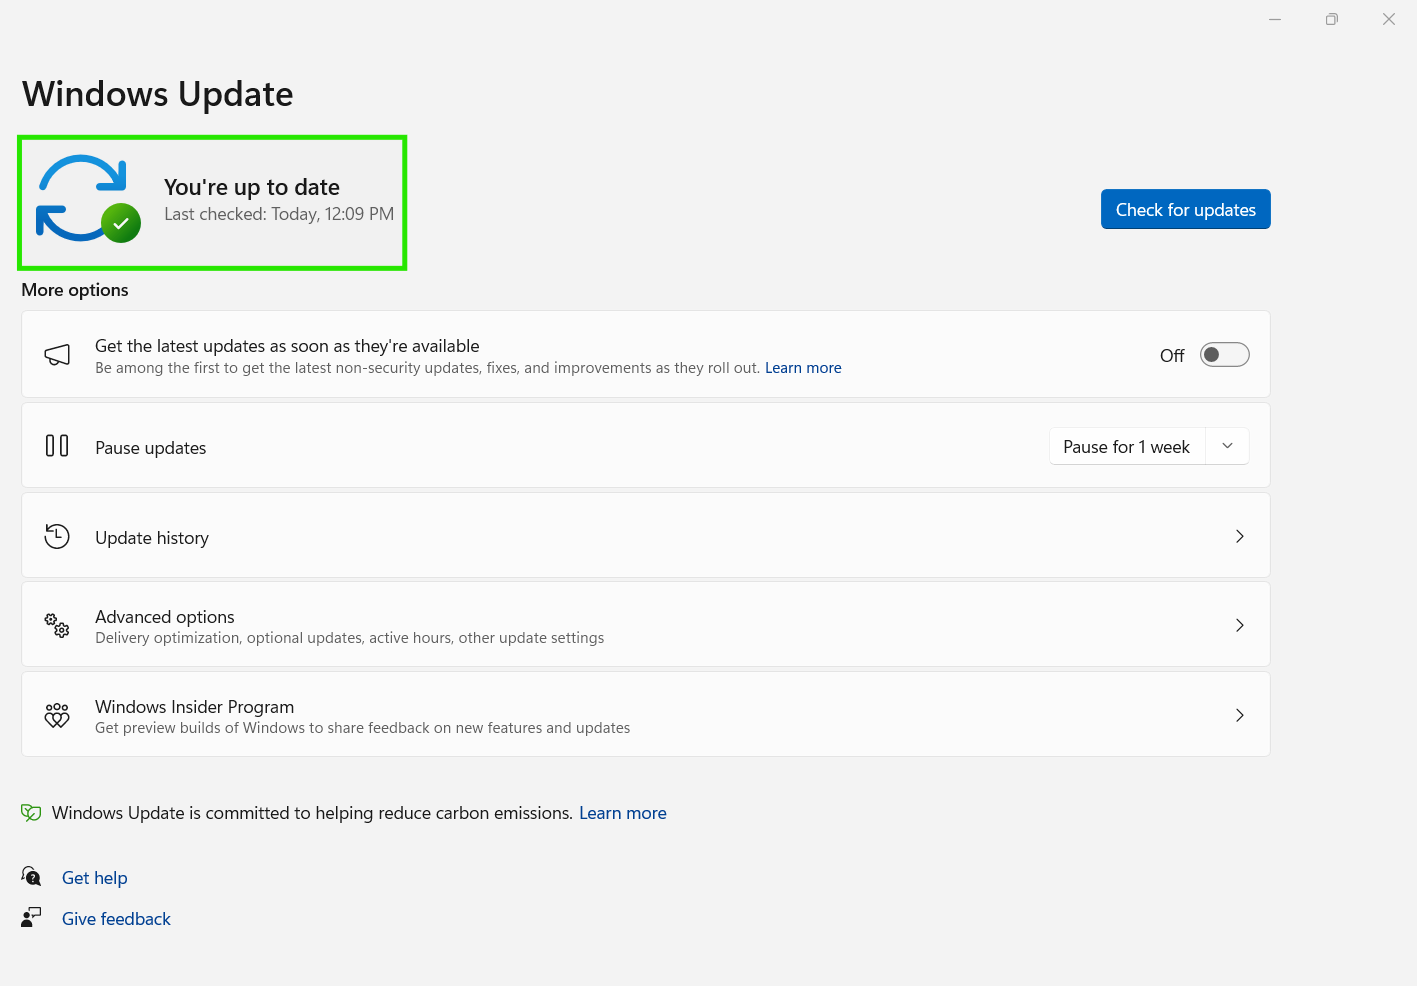
Step 6. Once your computer restarts, you can verify that the update was successful by going back to Settings > Windows Update. After a successful update, you will see a message saying, “You’re up to date.”
How to Enable Automatic Updates in Windows 11?
Enabling automatic updates in Windows 11 is critical since it will keep your system up to date without manually starting these processes. To do so, just follow our step-by-step guide:
Step 1. Launch Settings by pressing “Windows + I.”
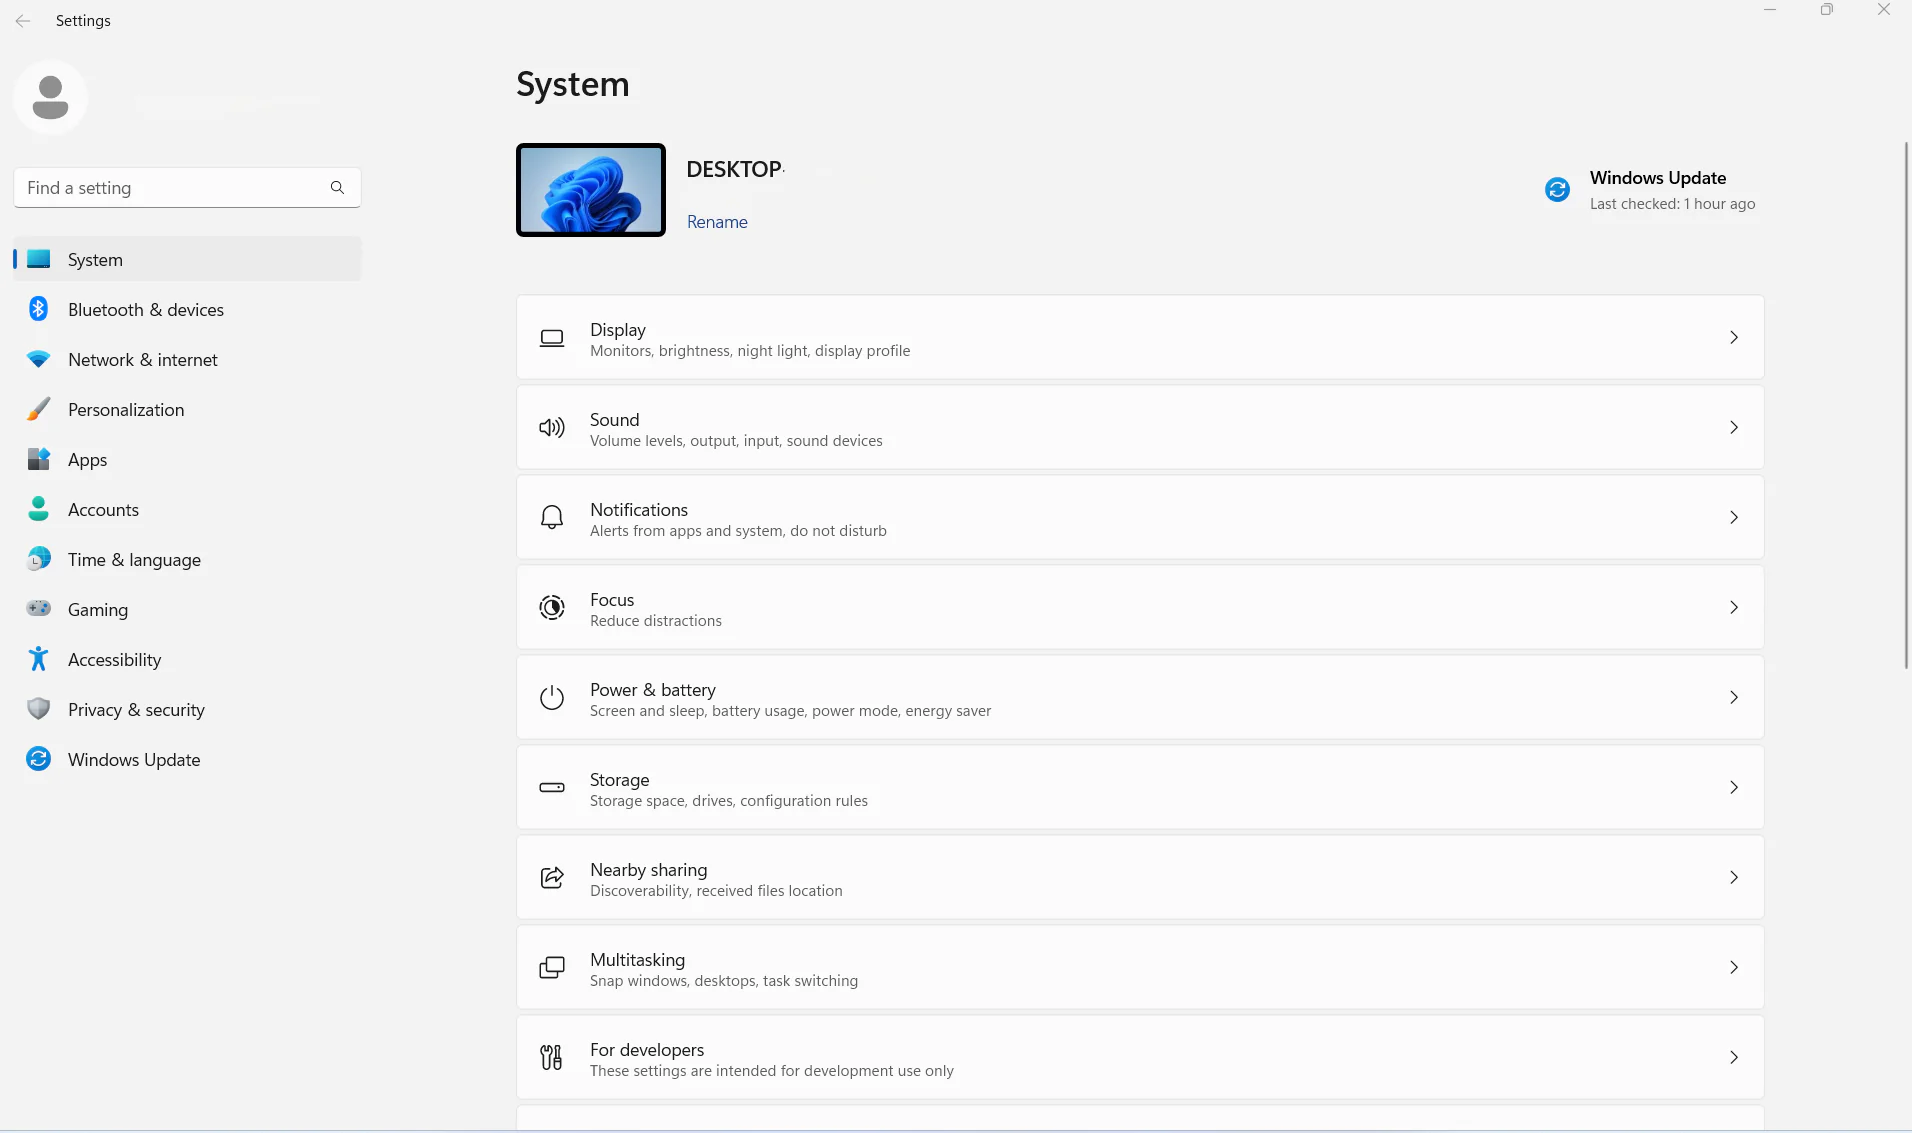
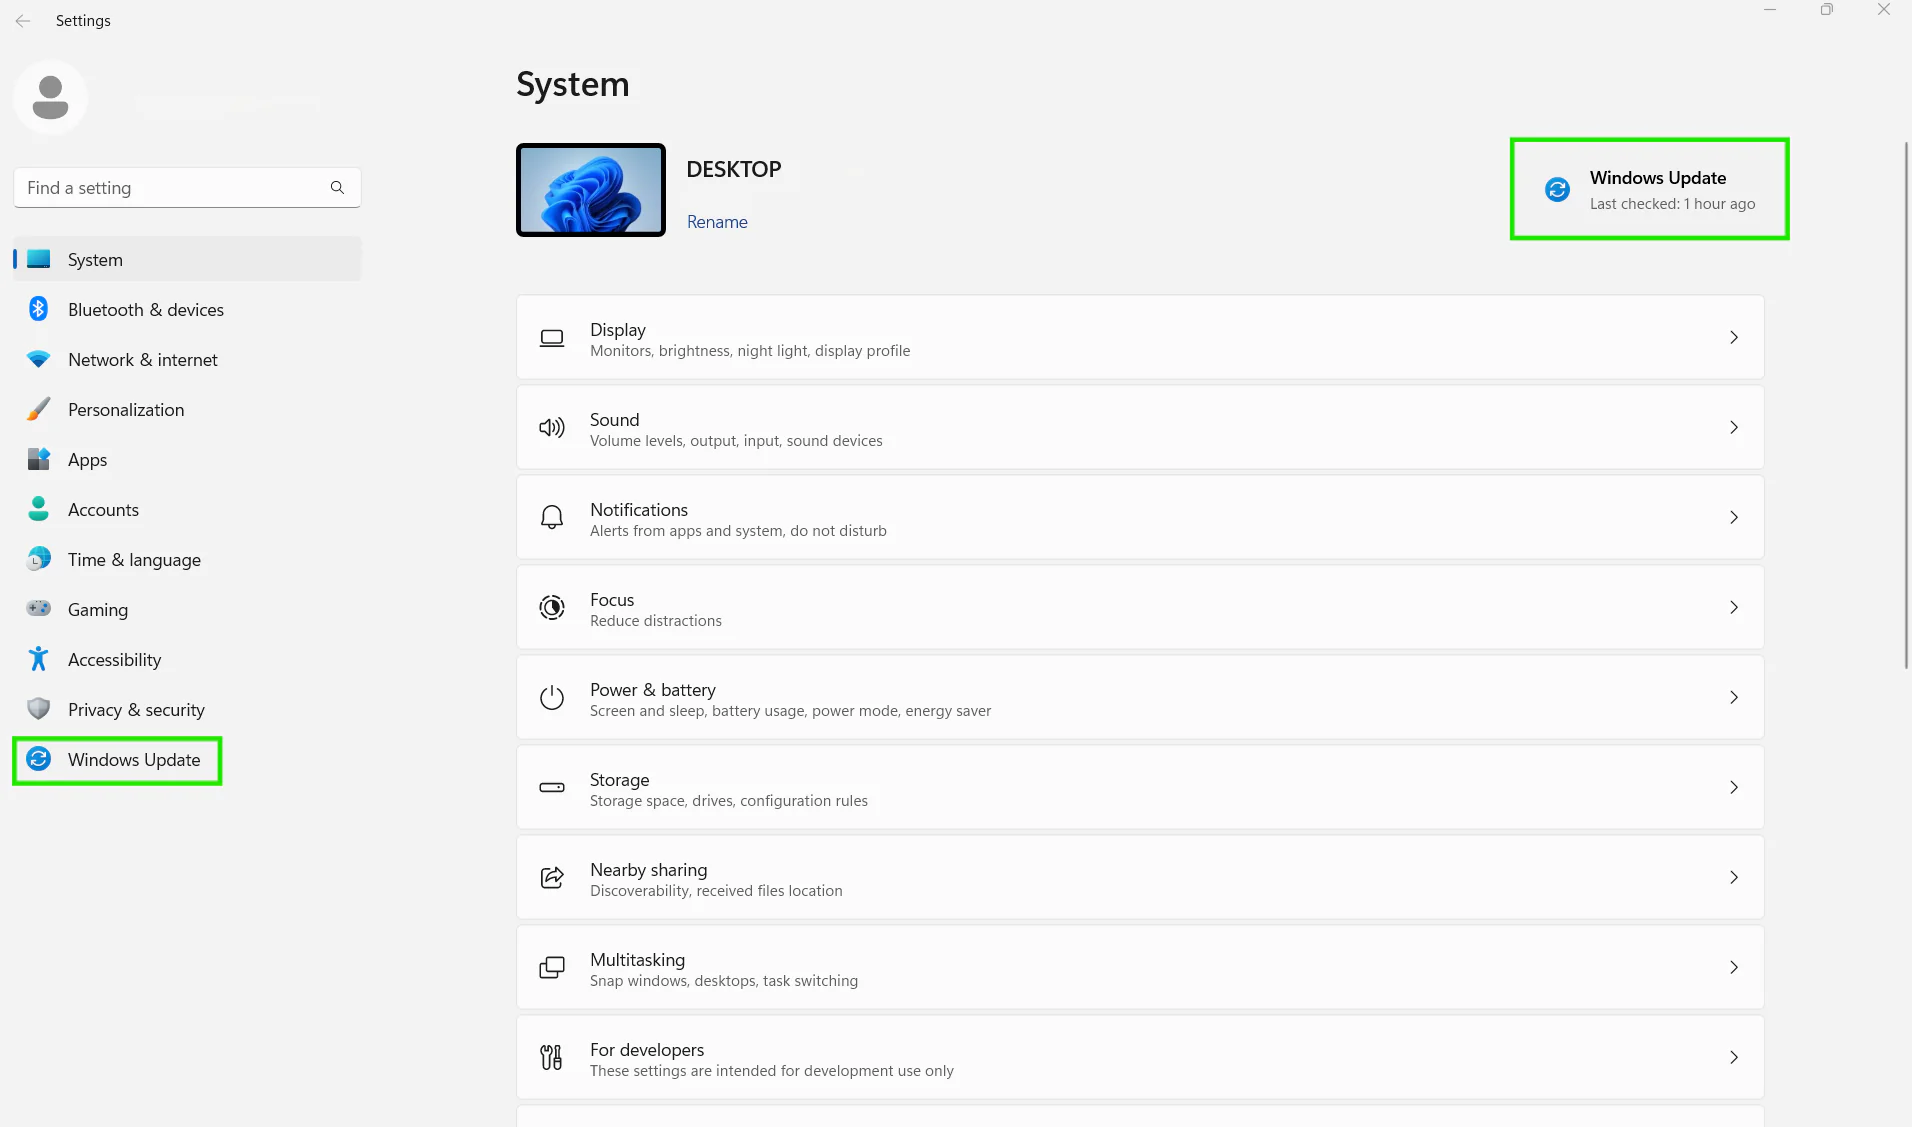
Step 2. Navigate to the “Windows Update” section.
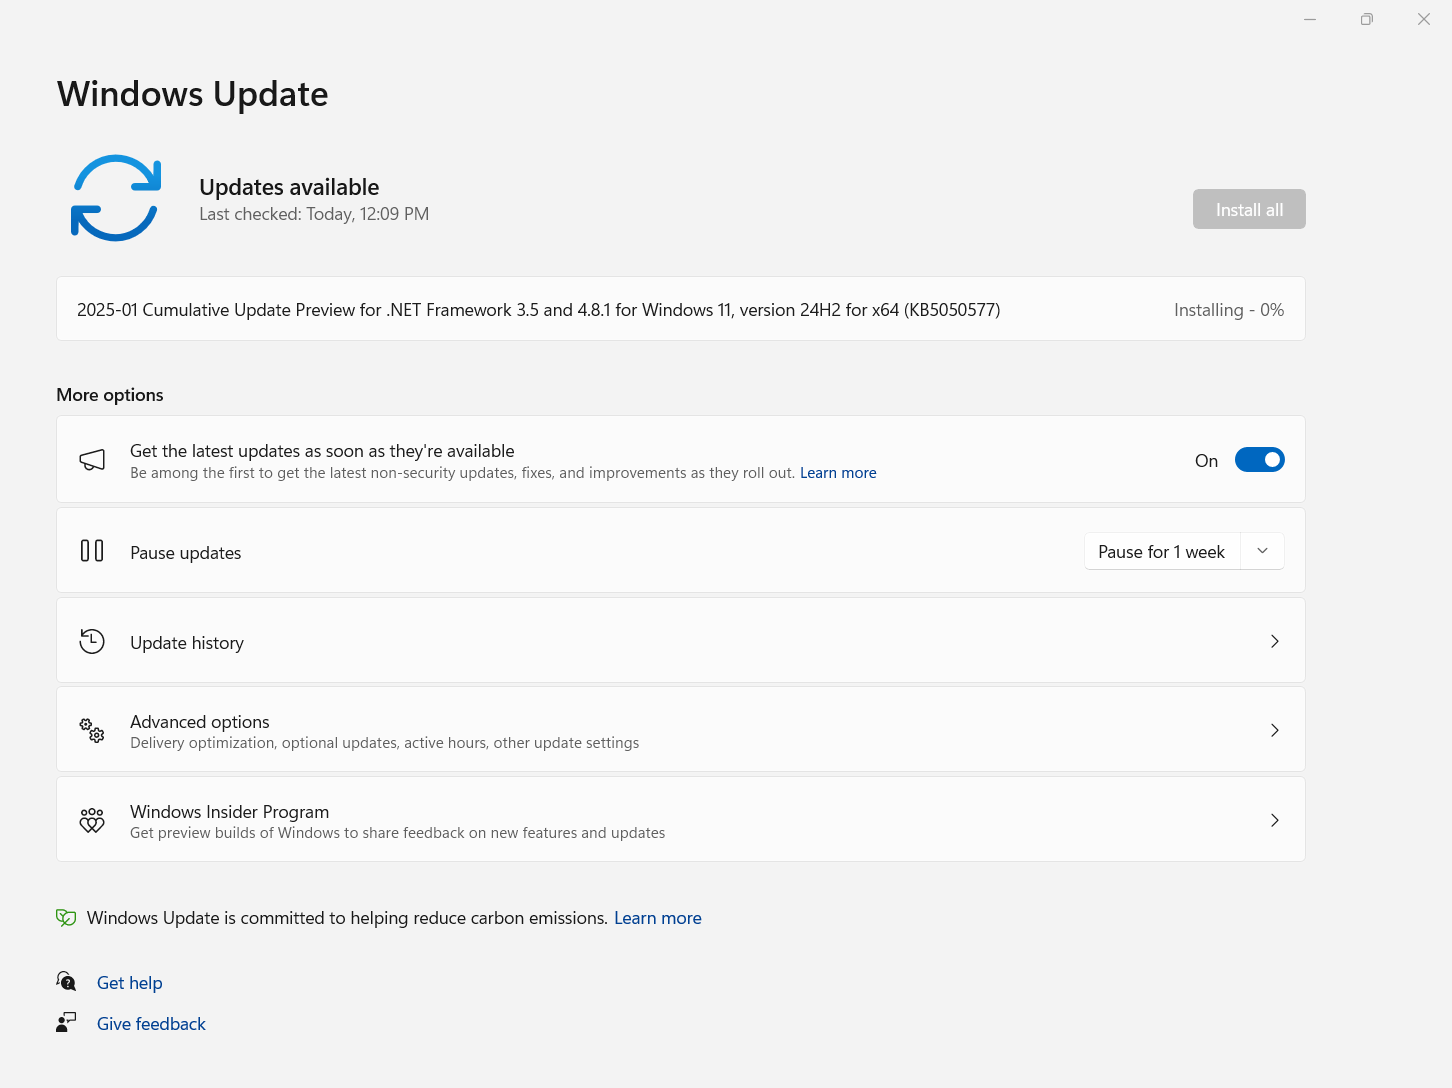
Step 3. Enable the option: “Get the latest updates as soon as they are available.”
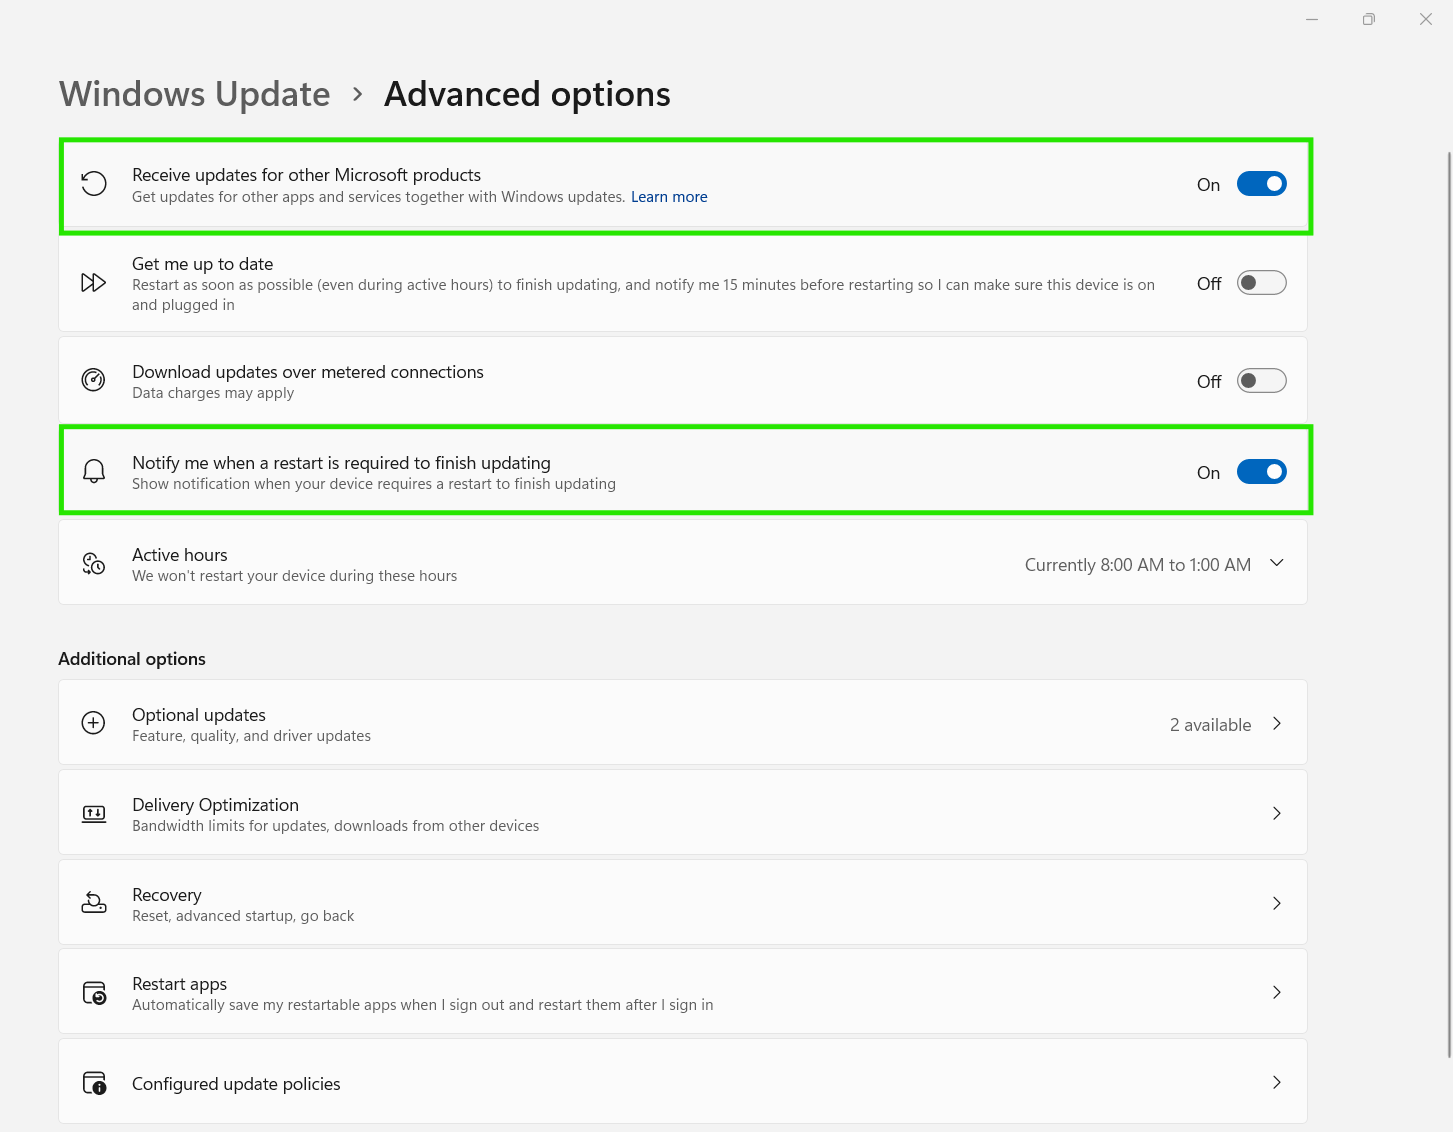
Step 4. Navigate to “Advanced options.”
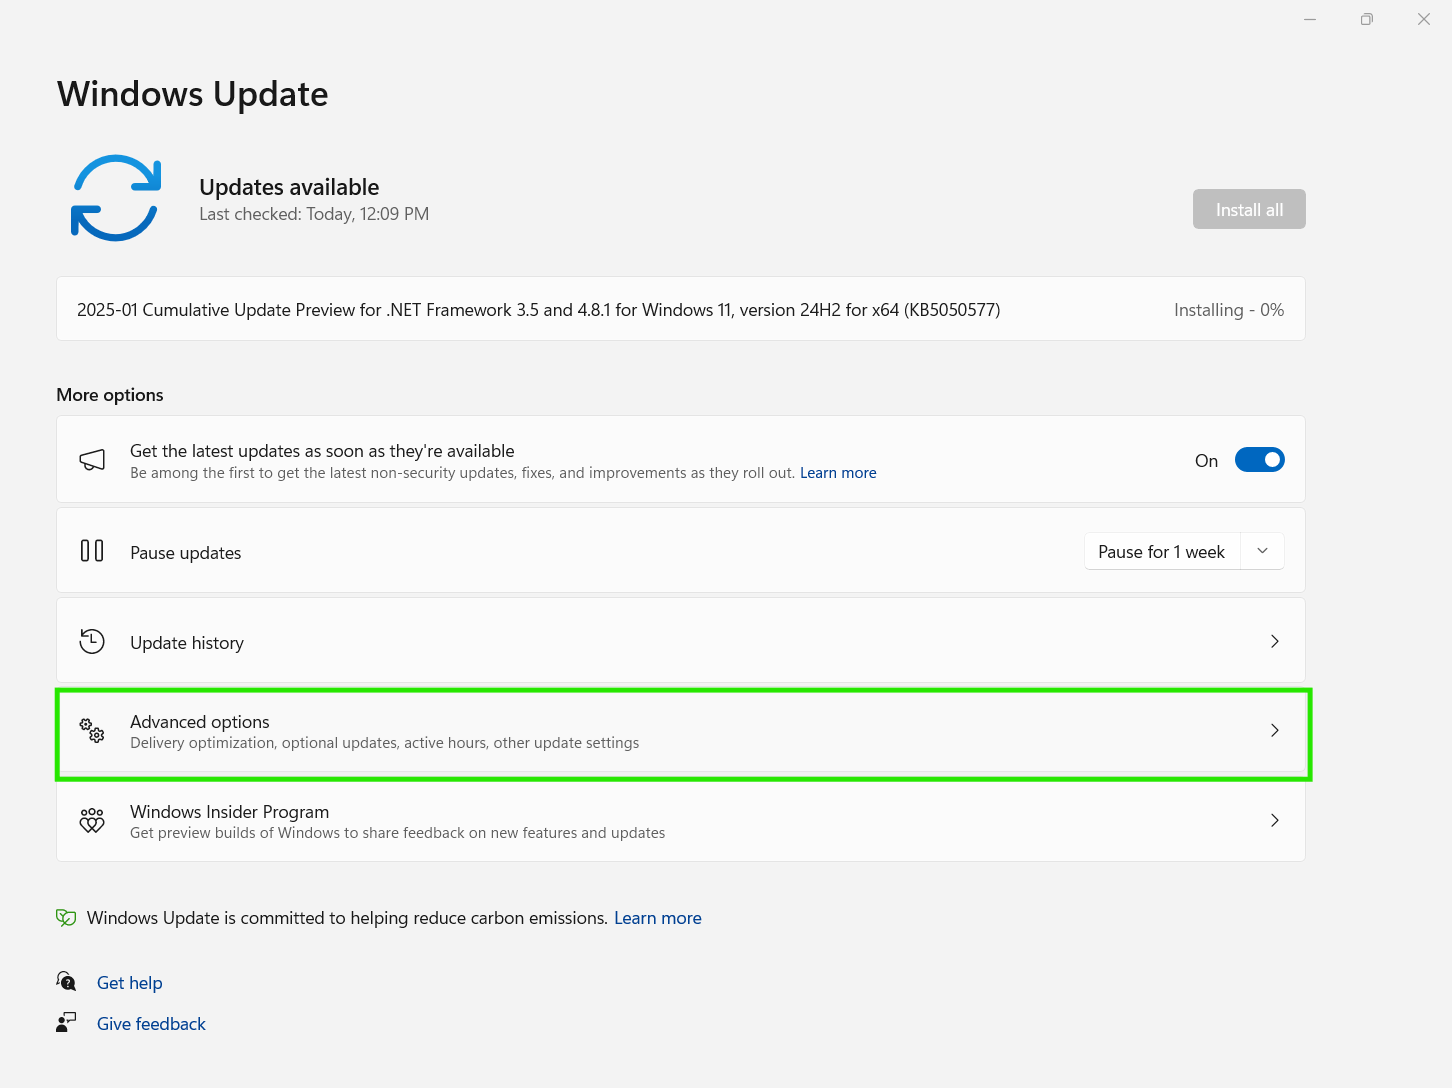
Step 5. In the “Advanced options,” enable the first and the fourth functions from the menu.
- The first one will enable the option to receive updates for other Microsoft products, together with Windows Updates.
- By enabling the fourth function from the list, you will receive notifications when your device requires a restart to finish the update process.
How to Force a Windows 11 Update?
If you need to force Windows 11 updates, you can do it through the command line using a series of specific system commands. This approach is particularly valuable when you cannot run Windows Update normally through the standard interface or when you need to install security patches immediately.
Here is how to execute this process effectively using the Command Prompt.
Step 1. Open the Windows Command Prompt as Administrator:
- Right-click the Start button.
- Select “Terminal (Admin),” then type cmd and press Enter to switch to a Command Prompt session, or search for “Command Prompt” directly in the Start menu and run it as administrator.
Step 2. Enter these commands to stop Windows Update services:
- net stop wuauserv
- net stop bits
Step 3. Remove old update files:
- rd /s /q %systemroot%\SoftwareDistribution
- md %systemroot%\SoftwareDistribution
Step 4. Restart the update services:
- net start wuauserv
- net start bits
Step 5. Force Windows Update check:
- UsoClient.exe StartScan
To successfully complete the process, follow these instructions:
- Run each command in order and wait for each to complete. If UsoClient.exe returns an error, your device may be on a build where this command has also been phased out, in that case, use PowerShell’s (New-Object -ComObject Microsoft.Update.AutoUpdate).DetectNow()
- Make sure you are running Command Prompt as Administrator.
- Keep your device plugged in during the update process.
- If you get access denied errors, verify you are using Admin privileges.
After running these commands, Windows will check for and begin installing available updates. You can check the progress in Windows Update settings (Windows key + I → Windows Update).
How to Pause or Delay Windows 11 Updates?
Many people are concerned that the latest updates to Microsoft Windows 11 might introduce issues to the system instead of improvements. In fact, this tends to happen on rare occasions, but most updates will not harm your system. They will do exactly the opposite: improve its performance and stability.
Microsoft releases yearly updates and monthly security patches (Patch Tuesday, every second Tuesday of the month). The main purpose of these updates is to ensure you receive new functionalities, address security vulnerabilities, and enhance the overall performance of your devices. However, system updates occasionally introduce unexpected complications, leading to operational disruptions and performance issues. Unfortunately, major updates can also break your system’s functionality instead of improving it.
Here’s how to pause Windows 11 updates by following these simple steps:
Step 1. Launch Settings by pressing “Windows key + I.”
Step 2. Navigate to the “Windows Update” section.
Step 3. In the menu, look for the “Pause Updates” option. Configure the update pause duration according to your requirements, noting the maximum deferral period of five weeks.
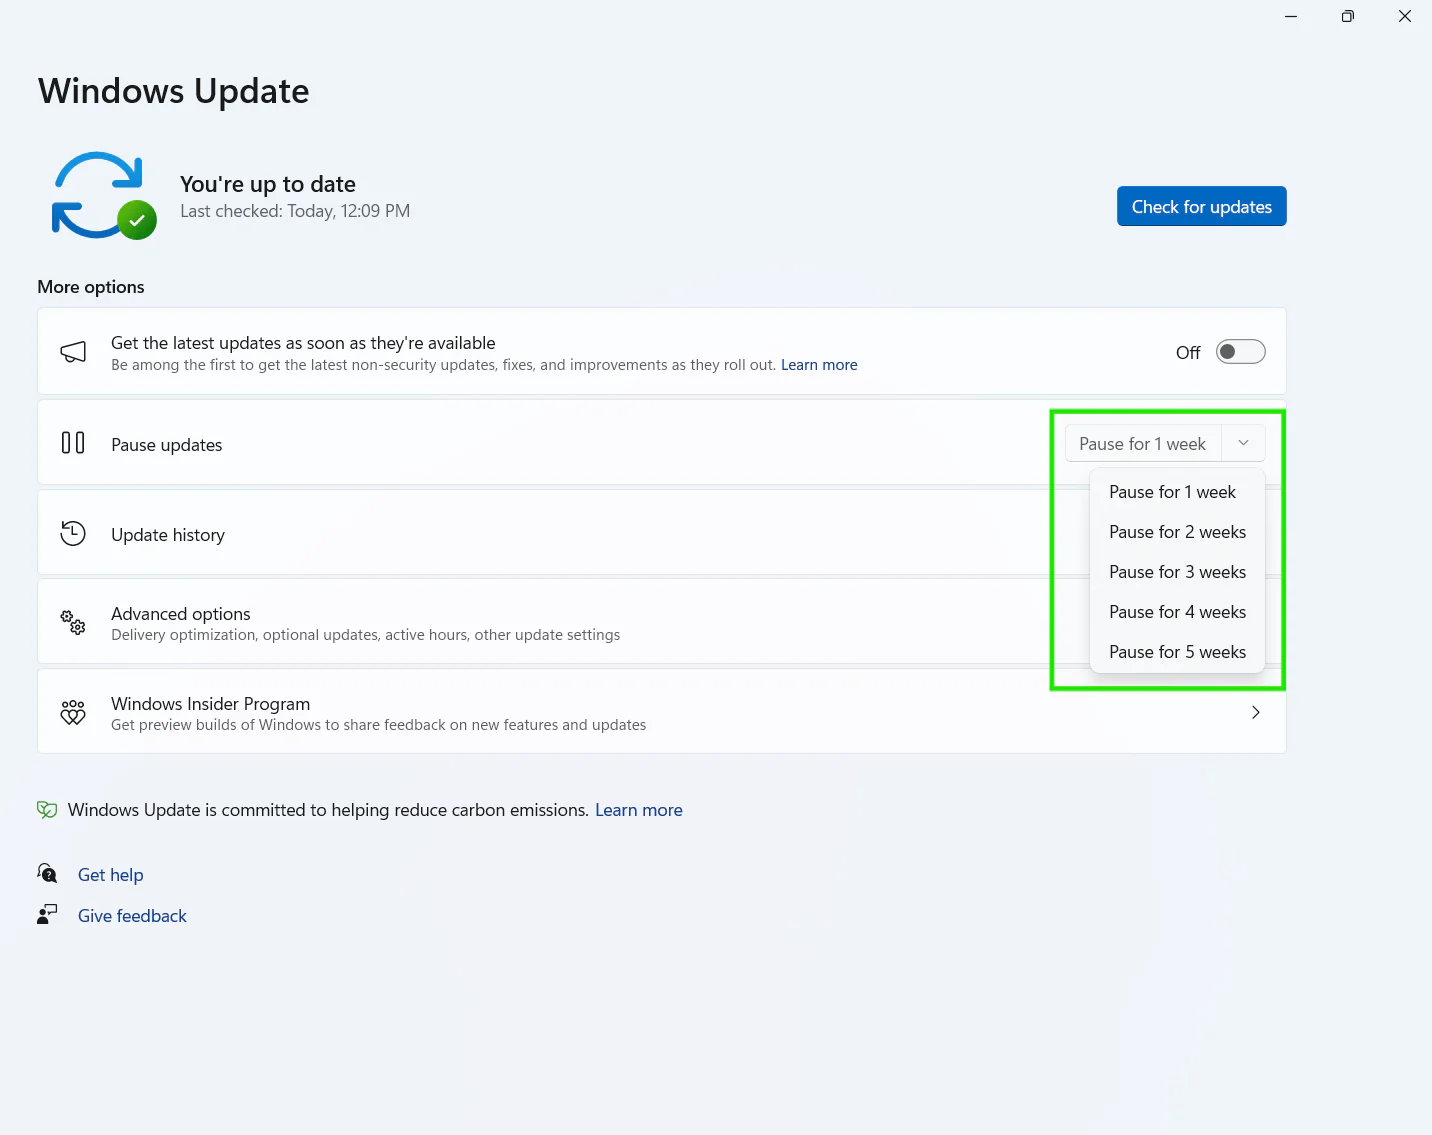
Be aware that if you delay installing Windows 11 updates, you expose your system to significant security risks. By postponing critical security updates, your device becomes increasingly vulnerable to cyberattacks as cybercriminals actively exploit known software vulnerabilities that these updates are designed to address.
How to Uninstall Problematic Windows 11 Update?
You can uninstall a problematic Windows 11 update directly from Settings, or through other methods like Command Prompt, the Windows Recovery Environment, or with Action1. Below, you’ll find a detailed step-by-step guide for each method.
Uninstall from Settings
You can uninstall a problematic Windows 11 update from Settings, but your PC must boot properly to use this method.
Step 1. Press Windows + I to open Settings, then go to Windows Update.
Step 2. Click Update history, then scroll down and select Uninstall updates.
Step 3. Find the update by its KB number, or just look at the most recent installation and click Uninstall next to it.
Step 4. Click Yes to confirm, wait for the process to complete, and then restart your computer.
Uninstall via Command Prompt
Command Prompt lets you uninstall an update with a single command. The process is quick and straightforward.
Step 1. To open Command Prompt as an administrator, search for it in the Start menu, then right-click the result and select “Run as administrator.”
Step 2. Then type the following command:
wusa /uninstall /kb:KBNUMBER (for example, /kb:5054156).
Step 3. Confirm the prompt when it appears, then restart your PC once it finishes.
Uninstall from Windows Recovery Environment, or WinRE.
You can uninstall a Windows 11 update from the recovery environment if your system does not boot at all.
Step 1. Turn on your computer. When the Windows logo appears, force your PC to shut down by pressing the power button. Repeat this process two to four times. This will trigger Windows Repair Mode.
Step 2. When the Automatic Repair screen appears, click Advanced options, then click Troubleshoot, and then click Advanced options again. Next, select Uninstall Updates.
Step 3. Choose between Uninstall the latest quality update and Uninstall the latest feature update. Most of the time, you should select Uninstall the latest quality update, unless you know Windows was installing a feature update.
Step 4. Click Uninstall the quality update. Wait for the process to finish, then click Done.
Step 5. Click Continue to exit the repair menu and proceed to boot into Windows 11.
Uninstall with Action1
Step 1. Log in or sign up for Action1 and set up your account.
Step 2. Go to the “Endpoints” section.
Step 3. Select one or all of your endpoints, then click on Run Script.
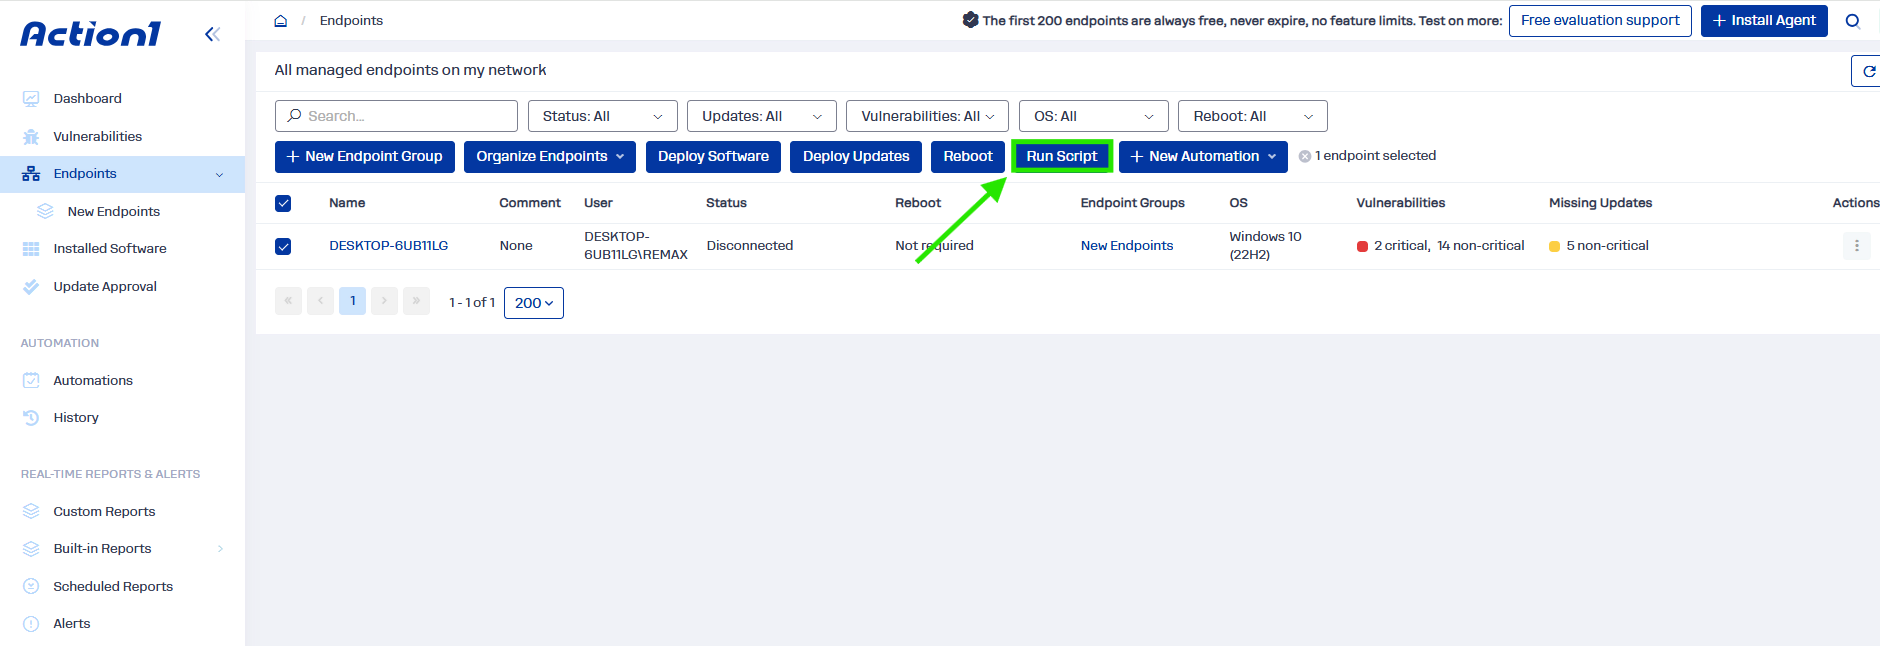
Step 4. Complete a quick verification process, which is a security measure to prevent malicious misuse of Action1. Click on Verify Now and follow the instructions.
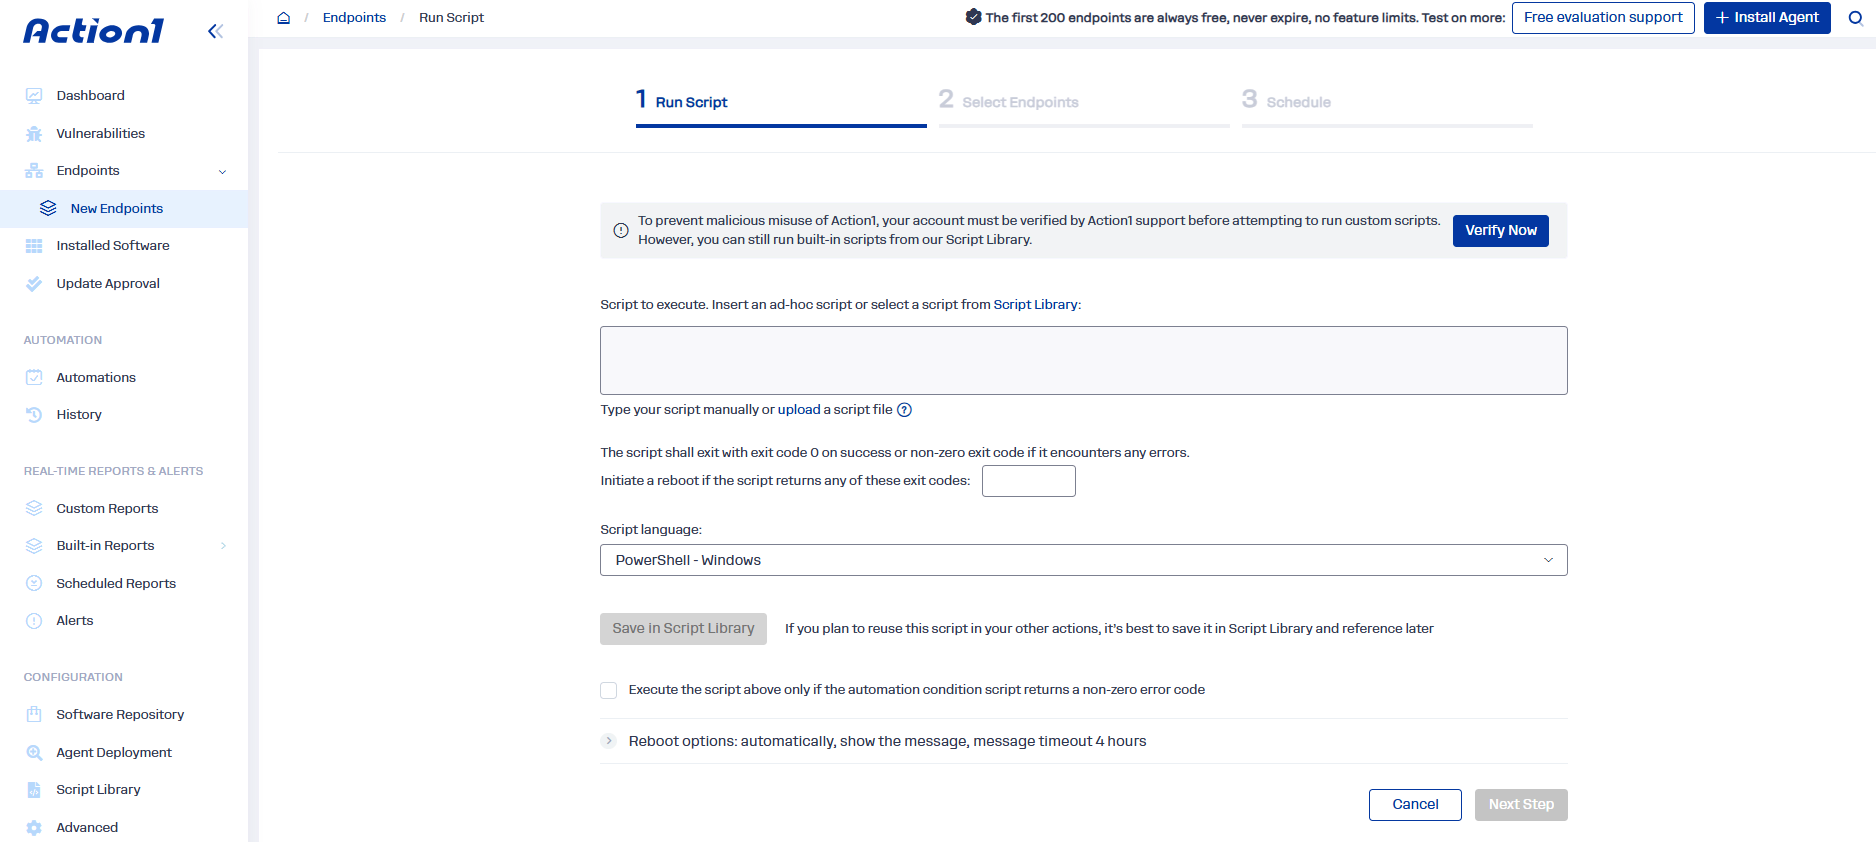
Step 5. In the field labeled “Script to execute,” type:
wusa.exe /uninstall /kb:505423 or wusa /uninstall /kb:505423
(make sure to enter the exact KB number of the update). Then select the script language as PowerShell – Windows.
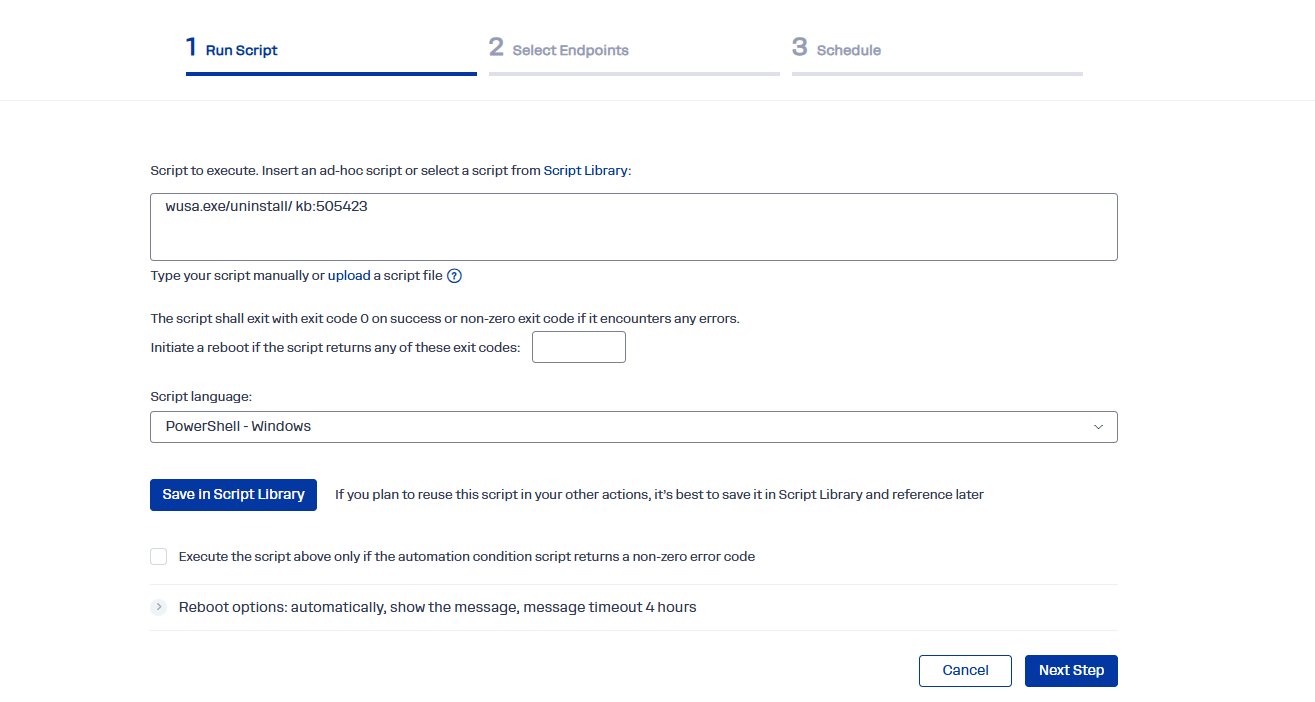
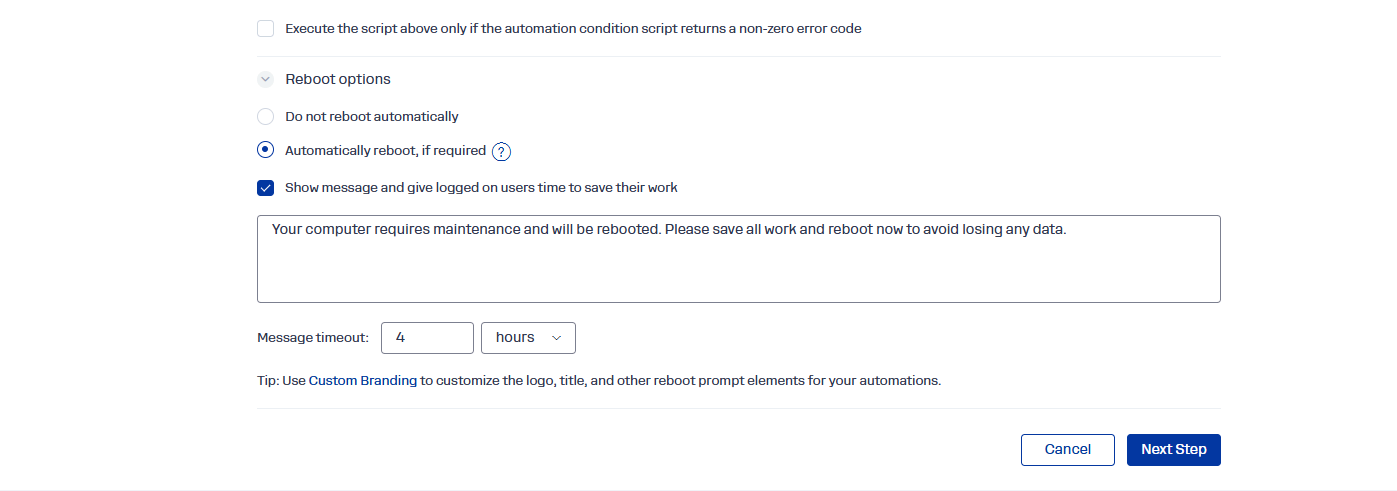
Step 6. Choose whether you want an immediate or delayed reboot, then click Next Step.
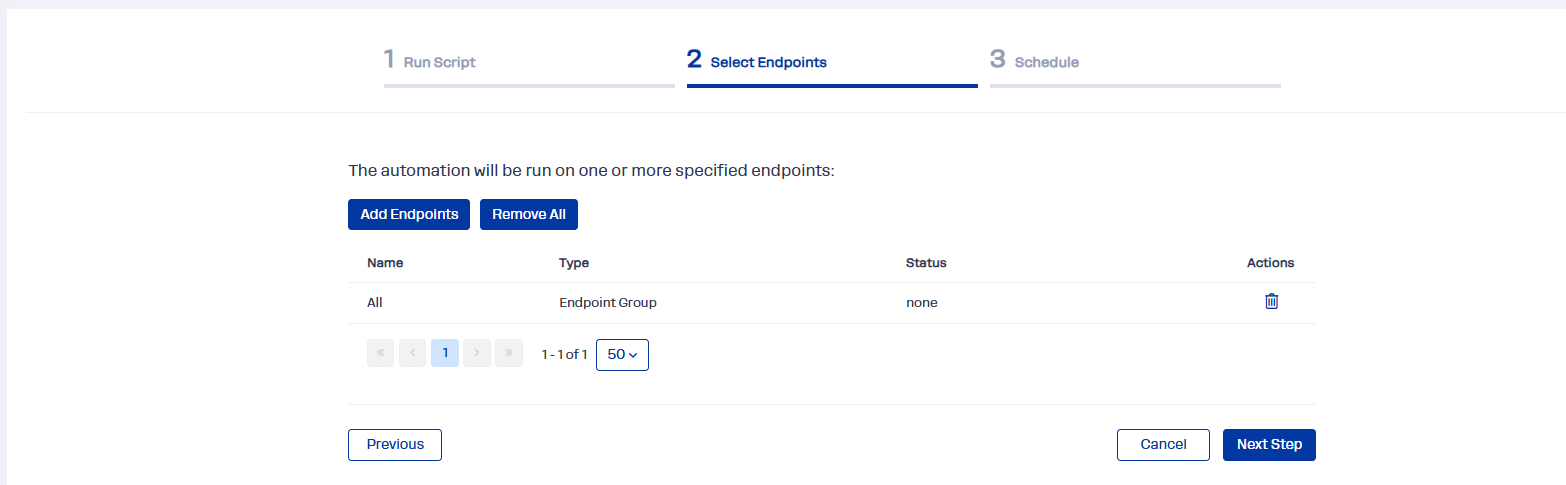
Step 7. Decide if the script should be applied to just one machine or as many as you need. Click Next Step.
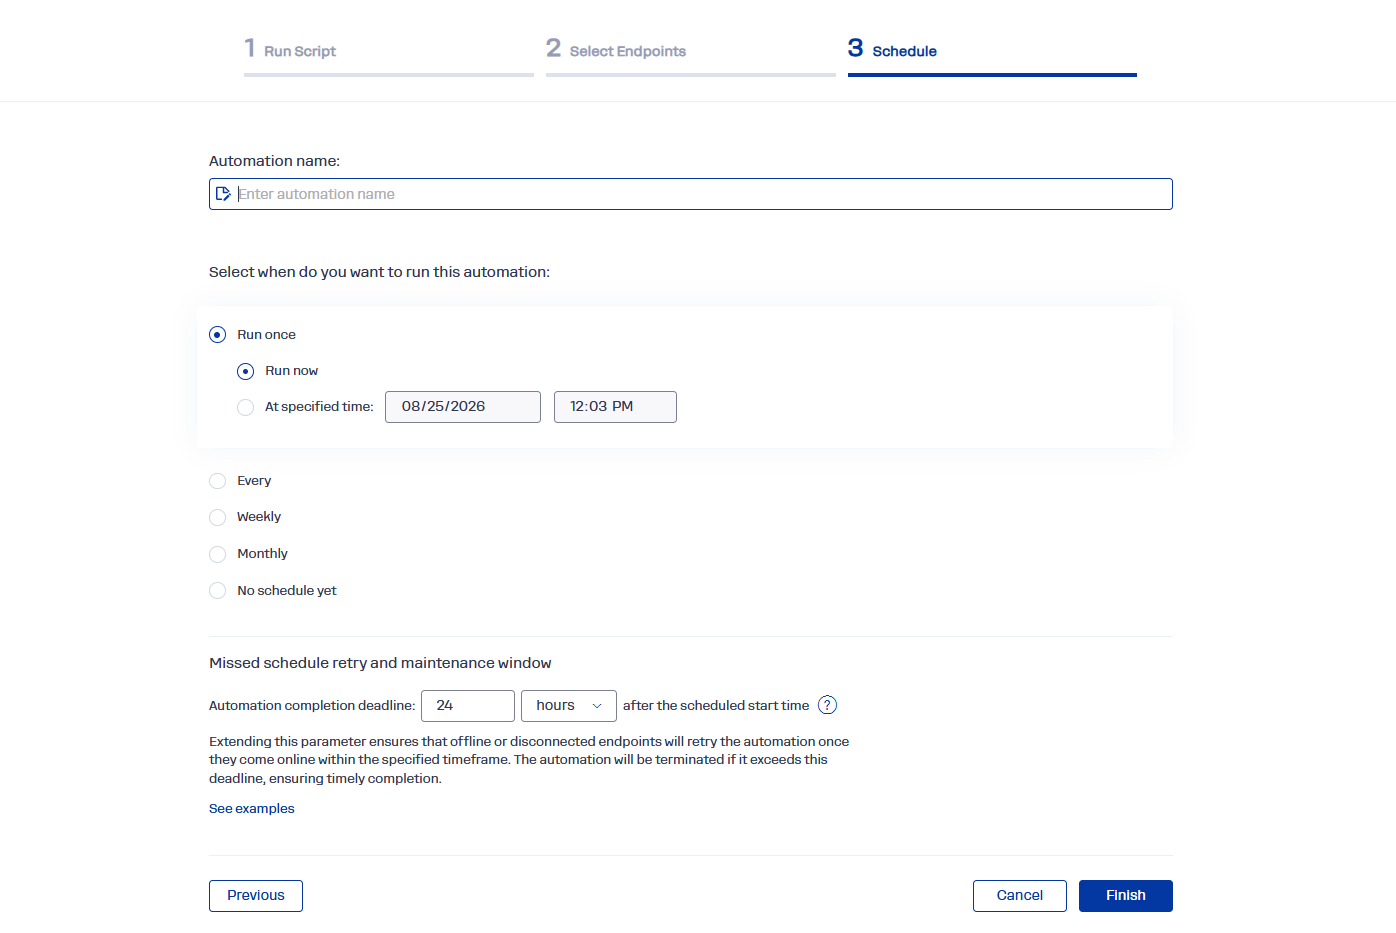
Step 8. Schedule the script automation to run now or at your preferred time, then click Finish.
FAQs
Why is My Windows 11 Not Updating?
There are several factors that can cause issues to update your Windows 11 properly. First, check your internet connection stability, because a weak or intermittent connection can be the reason to disrupt the update process. Next, check if you have enough storage space. Microsoft recommends keeping at least 20GB free, since feature updates alone can need 11GB or more.
If problems persist, your next step is to run a “Windows Update Troubleshooter” to identify and resolve common issues. In cases of severe update problems, performing a clean install of Windows 11 might be necessary. This should be your last option after trying everything else. Remember to back up your entire database before attempting any major system changes.
How Long Does a Windows 11 Update Take?
Windows 11 update duration varies depending on several factors, such as your internet speed, system specifications, and the update size. Feature updates may take 30 to 90 minutes. Smaller security updates usually complete within 10 to 30 minutes. The update process involves downloading, installing, and configuring the updates, followed by necessary system restarts.
Can I Skip a Windows 11 Update?
Yes, you can skip or delay Windows 11 updates, but it is not recommended for security and performance reasons. The operating system allows you to pause updates temporarily, but this should only be done for strategic reasons (like avoiding workflow disruptions) rather than as a routine practice.
Security updates must be installed as soon as possible because they protect your system from vulnerability exploitation. Feature updates can be delayed for longer periods since they introduce new features or system improvements. However, we recommend installing all Windows updates once released because they maintain your system’s integrity and compatibility with newer applications and services.
How do I Check the Windows 11 Update History?
You can check your Windows 11 update history by following these simple steps:
- Step 1: Navigate to Settings, or just press “Windows key + I.”
- Step 2: Go to the Windows Update section.
- Step 3: Open “Update history” to view the list with all installed updates, including security patches and feature updates.
This section will provide you with detailed information, including installation dates and update types. The update history helps you track system changes and can be particularly useful when diagnosing performance issues or verifying successful update installations.
A Few Final Words on Updates
Installing Windows 11 updates is not a hard task when you know what you are doing. These updates keep our systems protected, running smoothly, and introduce new features and tools that improve our user experience and make daily tasks easier. Today, there are plenty of options for installing updates, but even so, it is not rare to face a failed deployment, a missing patch, or an update that causes more problems than it solves.
That is why we created this guide. It walks you through different approaches for checking your OS version, updating manually or automatically, forcing an update when the interface will not cooperate, and undoing an update that went wrong. For a single PC, that is really all you need. For an IT team managing hundreds or even thousands of endpoints, Action1 takes the process and runs it automatically across your entire network. No device gets left behind without a badge saying your Windows is up to date.
Somewhere in your network is a device you have not thought about in weeks. Action1 has. Sign up free for your first 200 endpoints, or watch the demo first, and see for yourself how easily you can install Windows 11 updates on schedule with no manual effort.