
Wake-on-LAN (WoL) is a network standard that allows you to remotely connect a computer, whether it is asleep, sleep, or even completely disconnected. It works by receiving the so-called “magic packet”, which is sent from the WoL client.
It also does not matter what operating system the computer will boot into (Windows, Mac, Ubuntu, etc.), you can use Wake-on-LAN to turn on any computer that receives a magic packet. The computer hardware must support Wake-on-LAN with a compatible BIOS and network interface card, so not every computer can automatically use Wake-on-LAN.
Let’s Start with the Bios Setup
The first thing you need to do to enable WoL is to set up the BIOS correctly so that the software can listen for incoming wake up requests.
Each manufacturer will have unique steps, so what you see below cannot accurately describe your installation. If these instructions do not help, find out your BIOS manufacturer and check their website for a user guide on how to enter the BIOS and find the WoL function.
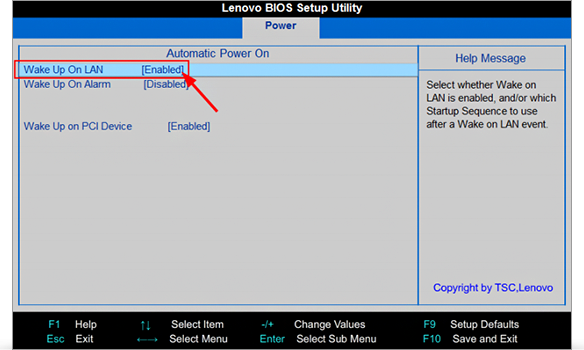
- Enter the BIOS instead of booting into your operating system.
- Find a section that relates to power options, for example, Power Management. This may be in the Advanced section. Other manufacturers may call it Resume On LAN, for example, on a Mac. On most BIOS screens, there is a help section on the side that describes what each setting does when it is turned on. It is possible that the name of the WoL parameter in your computer’s BIOS is unclear.
- Once you find the WoL setting, you can most likely press Enter to immediately switch it or show a small menu that allows you to turn it on and off, as well as turn it on and off.
- Save the changes. This is not the same on every computer, but on many F10 keys it will persist and exit the BIOS. The bottom of the BIOS screen should give some instructions on saving and exiting.
Installing Wol in the Windows Operating System
Windows Wake-on-LAN is configured through the device manager. Here you can configure several settings:
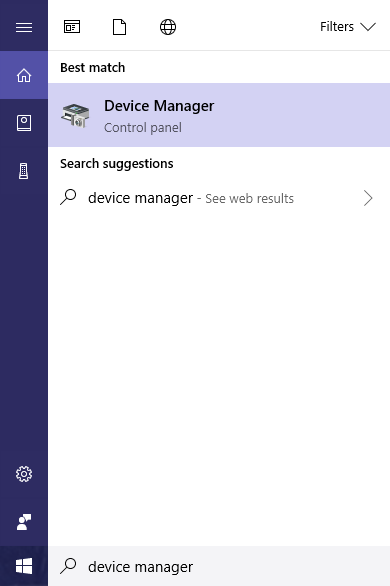
- Open the device manager.
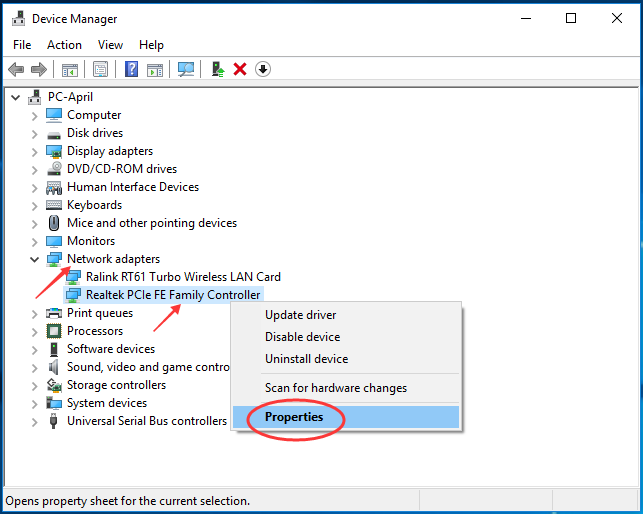
- Find and open the Network Adapters section. You can ignore any Bluetooth connections and virtual adapters. Double-click (or double-click) Network adapters, or select the small + or next to it to expand this section.
- Right-click or touch and hold the adapter belonging to the active Internet connection. Examples of what you can see are Realtek PCIe GBE Family Controller or Intel Network Connection, but it depends on your computer.
- Select “Properties”.
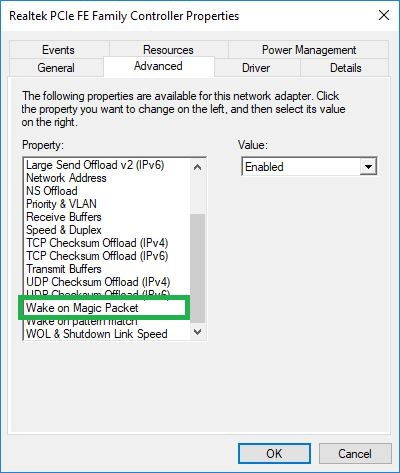
- Open the Advanced tab.
- In the “Properties” section, click or select “Wake Up By Magic Package.” If you cannot find it, go to step 8; Wake-on-LAN can still work.
- Go to the menu value on the right and select “Enabled”.
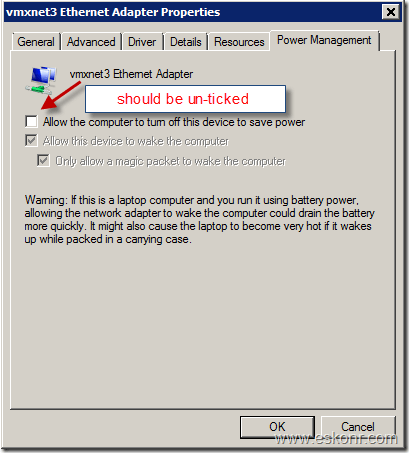
- Open the Power Management tab. It can be called Power, depending on your version of Windows or a network card.
- Make sure these two options are on: allow this device to wake the computer and allow only the magic packet to wake the computer. Instead, these settings may be under the Wake-on-LAN section and be a single setting called the Wake on Magic Packet. If you do not see these settings, or they are inactive, try updating the network adapter device drivers; but remember that it is possible that your network card simply does not support WoL. This is most likely true for wireless network interface cards (NIC).

- Click or tap OK to save the changes and exit this window. You can also close the device manager.
How to Use Wake-on-lan Feature
Now that the computer is fully configured to use Wake-on-LAN, you need a program that can send the magic packet that is required to start the run. TeamViewer is one example of a free remote access tool that supports Wake-on-LAN. Since TeamViewer is designed specifically for remote access, its WoL feature is convenient for those times when you need to your computer when idle, but forgot to turn it on before you left.
TeamViewer can use Wake-on-LAN in two ways. One of them is through the public IP address of the network, and the other is through another TeamViewer account on the same network (provided that this other computer is turned on). This allows you to wake up the computer without configuring the router ports (more on this below), since another local computer where TeamViewer is installed can relay the WoL request internally.
Another great Wake-on-LAN tool is Depicus, and it works from different places. You can use your WoL function through your website without downloading anything, but they also have a GUI and command line tool available for both Windows (free of charge) and macOS, as well as for mobile applications Wake-on-LAN for Android and iOS.
Some other free Wake-on-LAN apps include Wake On LAN for Android and RemoteBoot WOL for iOS. WakeOnLan is another free WoL tool for macOS, and Windows users can also choose the Wake On Lan Magic packages.
Troubleshoot Wake-up Problems over LAN
If you followed the steps above, it turned out that your device supports Wake-on-LAN without any problems, but when you try to turn on the computer it still does not work, you may also need to turn it on through the router. To do this, you need to log in to your router to make some changes.
A magic packet that runs on a computer is usually sent as a UDP datagram over port 7 or 9. If this is the case with the program that you use to send a packet, and you try to do it from outside the network, you need to open these ports on router and redirect requests to every IP address on the network.
Redirecting WoL magic packets to a specific client IP address will be meaningless, as the computer with the power off does not have an active IP address. However, since port forwarding requires a specific IP address, you must ensure that the port (s) are redirected to the so-called broadcast address so that it gets to each client computer. This address is in *. *. *.
For example, if you specify the IP address of your router as 192.168.1.1, use the address 192.168.1.255 as the forwarding port. If this is 192.168.2.1, you should use 192.168.2.255. The same is true for other addresses, such as 10.0.0.2, which will use the IP address 10.0.0.255 as the forwarding address.
You might also want to consider signing up for a Dynamic DNS (DDNS) service, such as No-IP. Thus, even if the IP address associated with the WoL network changes, DNS will update to reflect this change and still allow you to wake the computer. DDNS service is really useful only when you turn on the computer from outside the network, for example, from your phone when you are not at home.
Consider using Action1 to Use Wake-on-LAN if:
- You need to perform an action on multiple computers simultaneously.
- You have remote employees with computers not connected to your corporate network.
Action1 is a cloud-based platform for patch management, software distribution, remote desktop, software/hardware inventory, and endpoint management.


