



TL;DR
- Remove-Printer is a PowerShell cmdlet in the PrintManagement module that removes printer queues from local or remote Windows computers.
- You can remove a printer either by name or by piping a printer object from Get-Printer, with the object-based method being more reliable for mapped network printers and UNC paths.
- Mapped network printers can cause parsing issues when passed directly to
-Name, especially with backslashes in UNC paths, so usingGet-Printer ... | Remove-Printeris the safer pattern. - For troubleshooting mapped printers,
Get-CimInstance -ClassName Win32_Printercan help identify exact printer names and distinguish local, shared, and network printers. - Bulk printer cleanup can be performed with
Get-Printer | Remove-Printer, while filters likeWhere-Object { $_.Name -notmatch "PDF|XPS|Fax" }help preserve virtual printers. - Always use
-WhatIfbefore bulk changes, especially across production machines, to preview exactly which printers would be removed before executing the command. - Remote printer removal can be handled with
Invoke-Command,-ComputerName, or CIM sessions, allowing administrators to manage multiple endpoints without logging into each machine individually. - A stale printer entry in Control Panel does not always mean removal failed; if
Get-Printerreturns nothing, restarting the Print Spooler can clear the cached UI entry. - Group Policy cannot always remove legacy or manually mapped printers, which makes PowerShell useful during print server migrations and cleanup projects.
- Key parameters include
-Name,-InputObject,-ComputerName,-CimSession,-AsJob,-ThrottleLimit,-PassThru,-WhatIf, and-Confirm, giving administrators flexibility for both interactive and scripted printer management.
Remove-Printer is a PowerShell cmdlet that lets you remove a printer queue from a Windows computer. It ships in PowerShell’s PrintManagement module on every supported version of Windows and Windows Server. You can run it at a prompt, embed it in a logon script, or push it through remote management tooling.
This guide covers three printer removal scenarios:
- First, you’ll learn how to remove a single printer by its name or printer object, a task that administrators perform regularly.
- Next, we’ll cover removing a mapped network printer with a network-style name, i.e., a printer that is identified by a UNC (Universal Naming Convention) path. This is where many administrators run into confusing error messages: strings about invalid characters, blank prompts, and printers that resist the command (i.e., they disappear from PowerShell but stubbornly remain in Control Panel). As a result, mapped network printer removal scenarios generate the most activity on community forums.
- Finally, we’ll look at bulk removal, whether you need to remove every printer from a machine, or every printer except your PDF and virtual printers, on one computer or an entire fleet at once.
By the end, you will have working commands for each case and one essential safety habit: always use -WhatIf to perform a dry run before making bulk changes. This step prevents a bulk printer removal script from turning into a fleet-wide outage.
What Remove-Printer Does?
Remove-Printer removes a printer from the local computer, or from a specified remote computer when you add -ComputerName. You can identify the printer in two ways:
- By passing the printer’s exact name as a string to the -Name parameter, or
- By piping a printer object from Get-Printer into Remove-Printer.
The -Name parameter accepts wildcard characters in both Get-Printer and Remove-Printer. For example:
- Remove-Printer -Name “HP*” removes every local printer whose name starts with HP.
- Get-Printer -Name “HP*” | Remove-Printer first retrieves every printer whose name starts with HP and then removes each one.
The Remove-Printer cmdlet also runs inside a PowerShell remoting session, making it easy to remove printers from remote endpoints.
You may be surprised to know that Remove-Printer does not require administrator credentials to run. Any user who can see a printer in their own session can remove it. That’s why scripts that call Remove-Printer deserve the same level of care as any other user-run automation.
Syntax
Remove-Printer has two parameter sets: one for removing by name, one for removing by piped object.
# Query (cdxml) (Default) — remove by name
Remove-Printer [-Name] <String[]> [-ComputerName <String>] [-CimSession <CimSession[]>]
[-ThrottleLimit <Int32>] [-AsJob] [-PassThru] [-WhatIf] [-Confirm]
# InputObject (cdxml) – remove by piped printer object
Remove-Printer -InputObject <CimInstance[]> [-CimSession <CimSession[]>]
[-ThrottleLimit <Int32>] [-AsJob] [-PassThru] [-WhatIf] [-Confirm]
How to Remove a Single Printer?
You have two ways to remove one printer: by name, or by object.
- Use the name-based syntax when you know the exact printer name and it does not contain any special characters.
- Use the object-based syntax, piping a Get-Printer result into Remove-Printer, when the printer name contains backslashes, commas, or other characters that the -Name parameter can’t parse correctly. This is especially common with mapped printers.
The object-based approach is also more reliable in scripts because it lets you verify that the printer exists before you try to remove it.
Example 1 — remove a printer by name
Remove-Printer -Name “Microsoft XPS Document Writer”
This removes the printer named “Microsoft XPS Document Writer” from the local computer.
Example 2 — remove a printer using a Get-Printer object
$Printer = Get-Printer -Name “Microsoft XPS Document Writer”
Remove-Printer -InputObject $Printer
The first line retrieves the printer object and stores it in $Printer. The second line removes it. This two-step pattern is the safer option, especially if the printer name contains a backslash.
How to Remove a Mapped Network Printer?
Mapped network printers get their name from a UNC path, something like \\PRINTSERVER\HRPrinter. This is where users get stuck, based on real troubleshooting threads. The backslash is the problem here. Run Remove-Printer -Name “\\PRINTSERVER\HRPrinter” and you will hit one of these issues:
- An error stating that printer names may not contain “,” or “\” characters. This occurs because the underlying CIM (Common Information Model) provider interprets the printer name as a query filter instead of a literal string.
- A blank interactive prompt reading Name[0]:, which appears when the -Name parameter doesn’t bind correctly due to UNC formatting. This causes PowerShell to fall back, prompting you to enter the required parameter interactively.
- The command completes without throwing an error message, yet the printer remains installed on the system.
You may come across older guidance that removes printers by calling the .Delete() method on the Win32_Printer WMI class using the legacy Get-WmiObject cmdlet:
Get-WmiObject -Class Win32_Printer |
Where-Object { $_.Name -eq ‘\\PRINTSERVER\HRPrinter’ } |
ForEach-Object { $_.Delete() }
This approach will fail with a generic error: Exception calling “Delete” with “0” argument(s): “Generic failure”.
These errors may look different but they stem from the same root cause. The -Name parameter cannot reliably handle UNC paths. The recommended solution is to retrieve the printer object first and pass it to Remove-Printer.
Detecting the printer with WMI
A good starting point is to confirm the printer’s exact name and properties. While Get-Printer is built on the modern MSFT_Printer CIM class, it’s better to query the legacy Win32_Printer class with Get-CimInstance when troubleshooting mapped connections. This legacy class exposes the Network and Shared properties, making it easier to distinguish mapped printers from local ones.
Get-CimInstance -ClassName Win32_Printer -Filter “Name LIKE ‘%PRINTSERVER%'” |
Select-Object Name, Network, Shared, PortName
The LIKE operator searches for partial matches. In this example, %PRINTSERVER% matches any printer whose name contains PRINTSERVER, regardless of what comes before or after it.
The Working Fix
Once you have confirmed the exact printer name, remove it with -InputObject instead of -Name. You can do that either by piping the object directly or by storing it in a variable first:
# Option A: Direct Pipeline
Get-Printer -Name “\\PRINTSERVER\HRPrinter” | Remove-Printer
# Option B: Variable Assignment
$printer = Get-Printer -Name “\\PRINTSERVER\HRPrinter”
Remove-Printer -InputObject $printer
Although Get-Printer -Name “\\PRINTSERVER\HRPrinter” can successfully locate the printer, passing the same UNC path directly to Remove-Printer -Name may fail. Using -InputObject avoids that limitation because Remove-Printer receives a fully formed CIM object (CimInstance) instead of parsing the UNC path itself.
When you pass the object directly via -InputObject, PowerShell bypasses WMI/CIM string parsing entirely. This eliminates backslash parsing errors and silent failures, such as those listed above, when handling UNC paths, making it the most reliable pattern for removing mapped network printers.
|
Callout: -InputObject and the “ghost entry” in Control Panel Removing a printer with -InputObject clears it from Get-Printer output and from application print dialogs, but it can leave a stale entry in Control Panel > Printers & scanners. In most cases, this is a display-cache issue, not a failed removal. To verify removal, run: Get-Printer -Name “PrinterName” -ErrorAction SilentlyContinue If it returns nothing, the printer is gone at the system level even though Control Panel has not refreshed. Restart the print spooler service (Restart-Service Spooler) to clear the stale entry. Restart-Service Spooler |
How to Remove All Printers on a Machine or Fleet (Bulk Removal)?
If you want to remove every printer from a machine, such as during a migration to a new print service or testing a clean rollout, run the following on that machine:
Get-Printer | Remove-Printer
Get-Printer returns every printer object on the machine, and Remove-Printer accepts that output straight from the pipeline, removing every printer queue on the computer:
The problem is, this also removes printers you may want to keep, such as PDF, fax, and other virtual printers. To preserve those printers, filter the list with Where-Object before passing it to Remove-Printer:
Get-Printer | Where-Object { $_.Name -notmatch “PDF|XPS|Fax” } | Remove-Printer
This removes every printer (such as shared and TCP/IP printers) while leaving PDF, fax, and other virtual printers in place. Adjust the values for -notmatch to match whatever printers you want to keep.
Preview Printer Removal with -WhatIf
Before running a command that removes printers in bulk from multiple production machines at once, use -WhatIf first to see what would be removed without actually removing it:
Get-Printer | Where-Object { $_.Name -notmatch “PDF|XPS|Fax” } | Remove-Printer -WhatIf
When you’re removing printers in bulk from dozens or even hundreds of production machines, this extra check is worth it. As PowerShell creator Jeff Snover once put it, scripting against production systems is “like programming with hand grenades.” Preview the results with -WhatIf helps ensure that you remove only the printers you intend to.
Removing Printers from Multiple Computers
To run the same cleanup on multiple computers, wrap the command in Invoke-Command and provide a list of computer names:
$Computers = “PC01”, “PC02”, “PC03”
Invoke-Command -ComputerName $Computers -ScriptBlock {
Get-Printer | Where-Object { $_.Name -notmatch “PDF|XPS|Fax” } | Remove-Printer
}
Invoke-Command runs the script block on each target computer, where Get-Printer retrieves the locally installed printers and Remove-Printer removes every printer except those whose names match PDF, XPS, or Fax.
Again, test the command with -WhatIf on a small group of machines before running it on your entire fleet.
|
When Group Policy Can’t Remove Printers Group Policy can remove printer connections, but only if it created them in the first place. If users mapped printers manually, or the printers came from an old print server that’s no longer managed by Group Policy, a GPO will not reliably remove them. This is a common issue during print server migrations or cleanup projects. Administrators frequently discuss it on IT forums: printers stay mapped on client machines even after the original GPO has been removed or the print server has been decommissioned, with no GPO-based way to remove them. This is precisely the case Get-Printer | Remove-Printer addresses. Whether you run it remotely with Invoke-Command or as part of a logon script, it removes printer connections that Group Policy doesn’t manage any more. |
Choosing the Right Command
Use this table as a quick reference for the four cases covered in this guide.
| Scenario | Command |
| Single printer (Local / simple name) | Remove-Printer -Name “Printer Name” |
| Single printer (Mapped / UNC path) |
Get-Printer -Name “PrinterName” | Remove-Printer Always use the pipeline/object pattern for network printers to bypass WMI string-parsing errors. |
| Bulk (All printers on a machine) | Get-Printer | Remove-Printer |
| Bulk (Physical/mapped printers only; preserve virtual printers) | Get-Printer | Where-Object { $_.Name -notmatch “PDF|XPS|Fax” } | Remove-Printer |
Parameters
Remove-Printer supports a small set of parameters for selecting printers, running commands remotely, and safely previewing changes.
| Parameter | Type | Purpose |
| -Name | String[] |
Specifies the exact name of the printer to remove. Accepts an array of strings and wildcards. Printer names containing backslashes (as in case of UNC/mapped-printer names) throw a CIM parser error; use -InputObject instead. |
| -InputObject | CimInstance[] | Specifies a printer object (piped from Get-Printer) to remove. Accepts pipeline input by value. Recommended choice for mapped network printers or UNC paths. See Callout: for additional information. |
| -ComputerName | String | Specifies the name of the target computer from where the printer will be removed. |
| -CimSession | CimSession[] | Runs the cmdlet in one or more remote CIM sessions. Useful for managing printers on remote computers through CIM. See about_CimSession for details. |
| -AsJob | SwitchParameter | Runs the cmdlet as a background job. Useful for large bulk removals because your PowerShell session remains responsive while the job runs. |
| -ThrottleLimit | Int32 | Caps the number of concurrent CIM operations. Primarily useful when managing many remote computers or CIM sessions at the same time. |
| -PassThru | SwitchParameter | Returns an object representing the removed printer. By default, Remove-Printer produces no output, so use -PassThru when you need to log or verify the printers that were removed. |
| -WhatIf | SwitchParameter | Shows which printers would be removed without actually removing them. Treat it as a mandatory safety step before bulk or scripted removal. |
| -Confirm | SwitchParameter | Prompts for confirmation before running the cmdlet. Pairs with -WhatIf for safe interactive use. Set it to $false to suppress prompts in unattended scripts. |
Remove-Printer also supports some common parameters such as -Verbose, -Debug, and -ErrorAction. For the complete list, see about_CommonParameters.
Inputs and Outputs
Remove-Printer accepts input either as a printer name (String) through the -Name parameter or as a printer object (CimInstance) through the -InputObject parameter. Prefer passing a printer object from Get-Printer, especially for mapped network printers and UNC paths.
By default, Remove-Printer does not produce any output. If you specify -PassThru, the cmdlet returns the removed printer as a CimInstance, which you can use for logging, verification, or passing to other commands.
How to Remove Printer with PowerShell with Action1?
Firstly, create an Action1 account to start using the solution for free on 200 endpoints.
After logging into the Action1 dashboard, in the Navigation pane (the left column), select Managed Endpoints and mark the device to install the printer.
Then click on the More Actions button and select the Run Command option
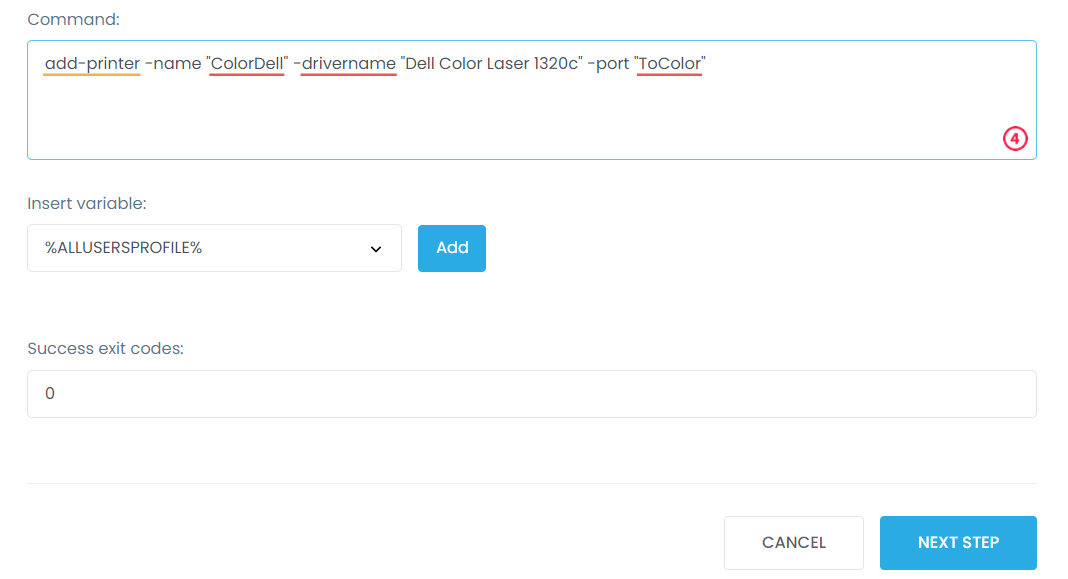
In the window that opens, enter the command add-printer -name “ColorDell” -drivername “Dell Color Laser 1320c” -port “ToColor” to add a new printer.
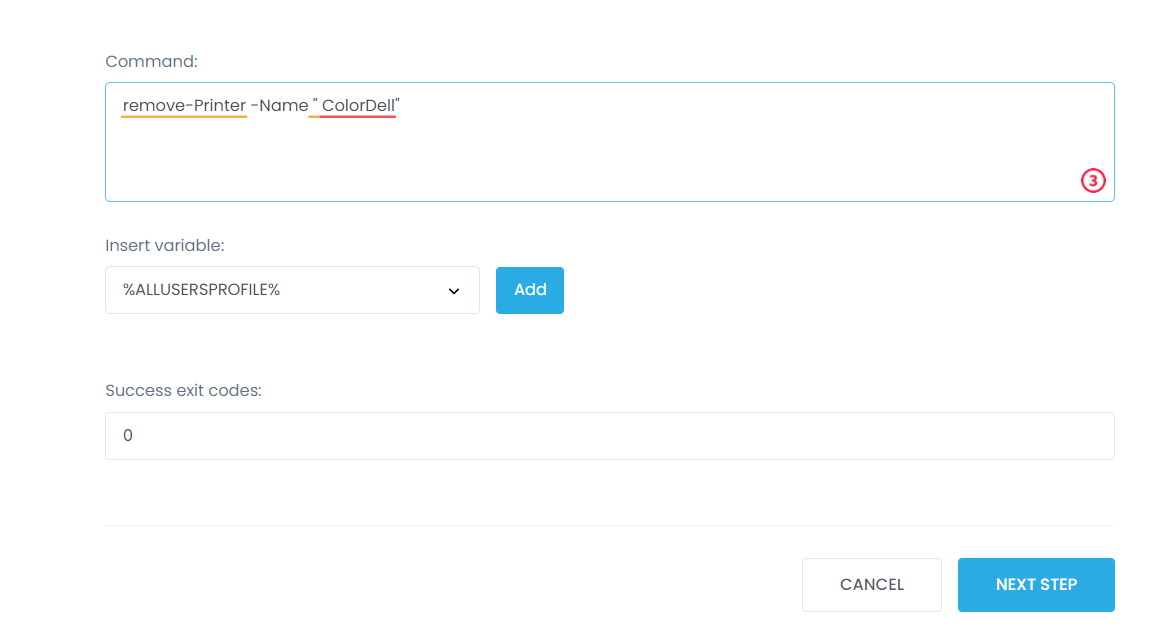
In case you need to delete the printer use this command remove-Printer -Name ” ColorDell”
After clicking the Next Step button, you need to select the endpoints for which you are going to install or remove printer. To do this, click Add Endpoints and select the desired endpoint.
Click Next Step and in the next step you can schedule the execution time of your command. Then click Finish.
What Is The Best Endpoint Management Tool?
Staying competitive in the market is always a challenge, and loud words don’t do wonders for scaling up your business. But actions do! Understanding what is endpoint management and how to make the right choice for you is first essential step to optimizing your organization’s cybersecurity practices.
With Action1’s cloud-based endpoint management solution, your IT department will be keeping endpoints’ security in check, and timely warning about potential threats and interventions.
Among the many principal features available through the Action1 centralized dashboard are:
- patch management
- software deployment
- remote desktop
- remote support
- IT asset management
- endpoint security
- endpoint management
- network monitoring
Read the TechRadar review of our product or be the judge — try it out for free on 200 endpoints.