



TL;DR
- The Windows 11 Installation Assistant is designed for manually upgrading a compatible PC to Windows 11 or installing a newer Windows 11 feature release without waiting for the automatic Windows Update rollout.
- Before using the Installation Assistant, verify both the tool requirements and Windows 11 hardware requirements. The PC needs a compatible 64-bit processor, at least 4 GB of RAM, 64 GB of storage, UEFI/Secure Boot capability, and TPM 2.0, among other requirements.
- The Installation Assistant itself requires an x64-based system and does not support ARM-based PCs. ARM devices should use the appropriate Windows Update or ARM64 ISO installation path instead.
- Use the Installation Assistant for an in-place upgrade on an existing PC. For clean installations, new drives, unbootable systems, or reusable installation media, use the Media Creation Tool or a Windows 11 ISO instead.
- A bootable USB or DVD is better suited to clean installations and multi-machine setups, while an ISO is useful for virtual machines, offline installations, and users who want to mount or create their own installation media.
- Verify a downloaded Windows 11 ISO before installation by calculating its SHA256 hash with PowerShell’s
Get-FileHashand comparing it with Microsoft’s published hash. - Common Windows 11 Installation Assistant failures can result from insufficient storage, permissions, incompatible hardware or drivers, and corrupted installation files. SFC and DISM can help repair underlying Windows corruption when other troubleshooting steps fail.
- For IT teams, manually running the Installation Assistant doesn’t scale well. Larger deployments are generally better managed through Windows Update for Business, Microsoft Intune, Microsoft Configuration Manager, an RMM platform, or another centralized endpoint-management solution.
- Action1 can centrally assess Windows 11 hardware compatibility and deploy feature upgrades to managed endpoints with targeting, scheduling, reboot controls, and deployment monitoring.
- The Installation Assistant remains a practical choice for one or two PCs; centralized deployment is better for managed fleets. Neither approach replaces bootable media or ISO files when a clean installation or recovery workflow is required.
If you’ve used Windows 10, you probably remember the Windows 10 Update Assistant. It was Microsoft’s official tool for manually downloading and installing the latest Windows feature update on a compatible PC rather than waiting for it to arrive automatically through Windows Update.
Naturally, many people search for a Windows 11 Update Assistant expecting the same tool. The confusion starts when Microsoft’s own support page for Windows Update Assistant (Windows 11) redirects you to the Download Windows 11 page, where no tool by that name exists. Instead, Microsoft now offers the Windows 11 Installation Assistant.
Key point: A standalone ‘Windows 11 Update Assistant’ doesn’t actually exist under that name. Microsoft has rebranded and expanded its functionality into the Windows 11 Installation Assistant.
What is the Installation Assistant?
The Windows 11 Installation Assistant is primarily built for upgrading a Windows 10 PC to Windows 11. Microsoft describes it as “the best option for installing Windows 11 on the device you’re currently using”. You can also use it to manually upgrade older Windows 11 builds to the newest Windows 11 version when Windows Update hasn’t delivered it yet.
Microsoft provides three paths to perform a fresh Windows 11 installation or in-place upgrade:
- Windows 11 Installation Assistant: An automated setup wizard that performs an in-place upgrade on your current PC without wiping your files or apps (no media required).
- Media Creation Tool: Creates a bootable USB flash drive or DVD to install Windows 11 on your current PC or a different machine.
- Windows 11 Disk Image (ISO): A raw disk image file used for advanced deployments, clean installations, setting up virtual machines, or creating your own bootable media.
This guide covers all three, but the main focus is the tool you mean when you search for “Windows 11 Update Assistant”.
What is an in-place upgrade?
It is the process of installing a newer version of Windows OS over an existing installation without wiping the drive. This allows you to keep all your personal files, programs, and settings intact. It covers:
- Cross-OS upgrades (Windows 10 → Windows 11)
- Feature updates (Windows 11 → Newer Windows 11 build, for example, 23H2/24H2 → 25H2)
Microsoft’s Learn Q&A pages confirm that if Windows Update has not yet offered the latest release, the Installation Assistant, installation media, and ISO are supported ways to trigger the upgrade immediately.
Tool Comparison: Which Download Do You Actually Need?
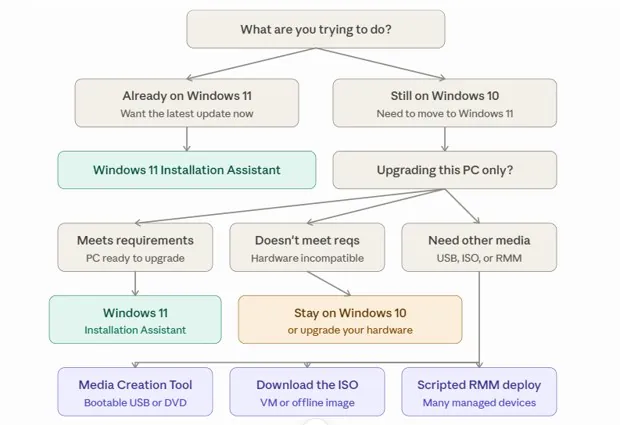
If you’re not sure which tool you need, the following table and the decision flowchart later in this guide will point you to the right one.
| Tool | Purpose | Best For | Requirements |
| Windows 11 Installation Assistant | In-place OS upgrade or manual feature update (no bootable media required). |
• Upgrading your current Windows 10 PC to Windows 11 • Forcing an immediate feature update (say, 23H2 to 24H2) on Windows 11 without waiting for Windows Update |
• Windows 10 version 2004 or later • 9 GB free disk space • x64 processors only (no ARM support) |
| Windows 11 Media Creation Tool | Builds a bootable USB drive or DVD you can use to install Windows 11 on this PC or another one. |
• Performing a reinstall or clean install of Windows 11 on a new or used PC • Upgrading multiple PCs using a single USB drive • Repairing a non-booting system |
• 8 GB+ blank USB or DVD • Internet connection • x64 processors only (no ARM) |
| Windows 11 ISO (disk image) | Raw disk image file for custom setups, bootable installation media (USB, DVD) creation, or mounting. |
• Setting up Virtual Machines (Hyper-V, VirtualBox) • Advanced/offline deployments • Creating customized bootable drives with tools like Rufus |
• 8 GB+ storage for file download • x64 processor (separate ARM64 ISO available) |
To download the Installation Assistant, installation media creation tool, or ISO file, visit Download Windows 11.
Prerequisites & System Requirements for the Installation Assistant
Before running the Windows 11 Installation Assistant, verify two distinct sets of prerequisites:
- Whether your PC meets the requirements to run the tool itself
- Whether your machine clears Windows 11’s baseline hardware check
Requirements for the Installation Assistant Tool
To run the Assistant on your current machine, make sure your system meets the following software requirements:
| OS Version | Windows 10 version 2004 or later (if upgrading from Windows 10) or an existing Windows 11 build (when upgrading to a newer version) |
| Licensing | A valid Windows 10 or Windows 11 license |
| Storage | At least 9 GB of free disk space to download and unpack the setup files |
| Network | A stable internet connection |
| Architecture | 64-bit (x64) processor only |
The Installation Assistant does not support ARM-based PCs (such as Surface Pro X or Snapdragon-powered laptops). If you own an ARM device, do not attempt to run this tool; it will simply refuse to run. Instead, wait for Windows Update to deliver the release automatically, or download the dedicated ARM64 ISO from Microsoft.
Minimum Hardware Requirements for Windows 11
Your hardware must meet Microsoft’s official system specifications to run Windows 11.
| Processor | 1 GHz or faster, 2 or more cores, 64-bit processor, and on Microsoft’s approved CPU list |
| RAM | 4 GB minimum |
| Storage | 64 GB or larger available storage space |
| System Firmware | UEFI with Secure Boot capability |
| TPM | Trusted Platform Module (TPM) version 2.0 |
| Graphics Card | Compatible with DirectX 12 or later with WDDM 2.0 drive |
| Display | High definition (720p) display, greater than 9 inches diagonally, 8 bits per color channel |
| Internet & Account | Internet connectivity and a Microsoft account required for setup |
Windows 10 reached the end of support on October 14, 2025. Devices still running it no longer receive regular security patches or vulnerability updates unless enrolled in the Extended Security Updates (ESU) program. This makes an upgrade to Windows 11 a security priority.
When to Use the Assistant vs. Waiting for Automatic Update?
Here’s the thing:
- If your device hasn’t received the latest Windows 11 feature update automatically and you’d rather install it manually instead of waiting, run the Installation Assistant.
- If you only need routine quality updates (the smaller, more frequent patches that fix bugs and close security holes), use Windows Update in Settings.
Running the assistant doesn’t bypass any compatibility checks; it just skips the wait. Microsoft staggers major feature update rollouts over weeks or months to catch potential bugs on a small number of devices before a general release. Running the assistant early just means your machine joins that wave sooner.
If you want to defer major updates rather than install them immediately, use enterprise or group policy Windows servicing options.
How to Check Your Current Windows Version?
To verify your current Windows version and build:
- Press the Windows key, type winver, and press Enter.
- A small window opens showing your Windows OS edition, version number, and build.
Based on what you see, here is your next step:
- If it shows Windows 10, version 2004 or later: You are eligible to run the Installation Assistant to upgrade to Windows 11.
- If it shows an older Windows 10 build: You must update through Windows Update first to meet the prerequisite baseline before running the Installation Assistant.
- If it already shows Windows 11: You can use the Installation Assistant to manually install the newest feature release (such as moving from an older build to the latest version) without waiting for automatic deployment.
Install Windows 11
Follow these steps to install Windows 11 using the Installation Assistant:
- On the Download Windows 11 page, click the Download Now button in the Windows 11 Installation Assistant section to download the assistant.
- Run the tool as an administrator.
- Accept the license agreement.
- Once the tool is ready, click the Restart Now button to complete installation on your computer.
- Installation will take some time and your PC will restart a few times during the process.
Installation Options Beyond In-Place Update
As mentioned earlier, the Installation Assistant isn’t the only way to get Windows 11. Microsoft offers two other paths:
- Building bootable installation media
- Downloading a disk image (ISO file) directly
The Installation Assistant is perhaps the simplest route for upgrading a single system. But sometimes, you might be doing a clean install, setting up a new drive, or installing Windows 11 on a machine that won’t boot into Windows. In these cases, the two methods are better suited for the job.
Create Installation Media (Bootable USB/DVD)
The Media Creation Tool builds a bootable USB drive or DVD. You can use it to install Windows 11 on a new or used PC, which makes it the right choice for:
- Windows 11 reinstall
- Clean install, and
- Multi-machine upgrades using a single physical flash drive; something that the in-place Installation Assistant can’t handle
Prerequisites
Before launching the tool, make sure you have:
- A stable internet connection
- Enough storage on the computer, USB, or external drive you are downloading the .iso file to
- A blank USB or DVD with at least 8 GB of space to create a bootable disc
- A DVD burner if you’re going the DVD route
- A valid Windows 11 license or a Windows 10 device that qualifies for a free upgrade
- An x64-based system (the Media Creation Tool cannot create bootable media for ARM-based PCs)
- Hardware that meets baseline requirements for Windows 11
- When installing Windows 11, you have to select a language. This language must be the same that you’re currently using. To check the language, go to “Time & language” in PC settings or “Region” in the Control Panel.
Instructions
- On the Download Windows 11 page, click the Download Now button in the Create Windows 11 Installation Media section to download the installation media tool.
- Run the tool as an administrator.
- Accept the license agreement.
- Next, choose “Create installation media for another PC”.
- Select your language, edition, and 64-bit architecture.
- Pick USB flash drive or ISO file depending on what you’re building.
- Once the media is ready, insert it into the target PC, restart, and boot from it.
If your PC doesn’t boot to the USB or DVD automatically, restart and press your hardware key (usually F12, F2, F11, or Del) to open the Boot Menu or adjust the boot order in your UEFI/BIOS settings. - Select your language, time, and keyboard preferences, and then select Install Windows.
If the Windows install screen keeps showing up after setup has finished, your PC’s boot order still points at the USB drive instead of the internal drive. Revert the boot order back to the internal drive and the loop stops.
Download the Windows 11 ISO Disk Image
An ISO is a file containing an exact copy of the Windows 11 installation disc. Download it if:
- You are setting up a virtual machine
- Performing an offline installation
- You prefer to manage the burning or mounting process yourself instead of letting the Media Creation Tool do it for you
The download is a multi-edition ISO, which means that a single file contains setup files for Home, Pro, and Enterprise editions. Your product key automatically determines which edition installs.
If you’re installing on an ARM-based device, Microsoft publishes a separate Arm64 ISO for that hardware. See Download Windows 11 for Arm-based PCs.
Prerequisites
Before downloading an ISO, make sure you have:
- A stable internet connection
- Enough storage on the computer, USB, or external drive you are downloading the .iso file to
- A blank USB or DVD with at least 8 GB of space to create a bootable disc
- A DVD burner if you’re going the DVD route
- A valid Windows 11 license or a Windows 10 device that qualifies for a free upgrade
- An x64-based system or an Arm64-based device
- Hardware that meets baseline requirements for Windows 11
Download the ISO file
- On the Download Windows 11 page, go to the Download Windows 11 Disk Image (ISO) for x64 devices section.
- Click the Select Download drop-down menu and select Windows 11 (multi-edition ISO for x64 devices).
- When you click Confirm, you are redirected to select a language.
- In the Select the product language section, select a language. This language must be the same that you’re currently using. To check the language, go to “Time & language” in PC settings or “Region” in the Control Panel.
- Click Confirm.
- Microsoft processes the request and updates the section with language-specific download buttons.
- Click the 64-bit Download button to start downloading the .iso file to your PC.
The download link Microsoft generates is valid for 24 hours from the time they’re created. If your download stalls or you close the tab, generate a new link rather than trying to resume the old one.
Verify your download (Hash Check)
After downloading the ISO, make sure it isn’t corrupted or tampered with before you use it to install Windows. Open PowerShell and run the Get-FileHash cmdlet against the downloaded file path:
Get-FileHash C:\Users\YourUsername\Downloads\Win11_English_x64.iso -Algorithm SHA256
PowerShell will calculate and print the file’s hash
Compare the generated Hash string against the official SHA256 values published on Microsoft’s download page under Verify your download. If the two strings match character-for-character, your file downloaded cleanly. If they don’t, delete the file and download it again.
Installation Instructions
Now you can use the Windows 11 ISO to install Windows 11 through any of these methods:
- DVD: Use Windows Disk Image Burner or a third-party DVD burning program to create the installation DVD.
- ISO: Mount the ISO file. This will create a “virtual” bootable disc.
Which Install Method Should You Use?
Use this decision flowchart to determine the correct installation tool for your device.
Troubleshooting: Common Assistant Errors and What They Mean
Sometimes, the Installation Assistant may fail halfway even on a compatible PC. Here are some common error codes, what they mean, and what to try first.
| Error Code | Primary Cause | Recommended Action |
|
0x80070070 (often with -0x50011, -0x50012, or -0x60000) |
Insufficient disk space | Free up space on your primary drive (C:) or connect an external drive with at least 16 GB of free space for temporary setup files. |
|
0x8007007f (usually shown with “Something went wrong”) |
Permissions or driver conflict | Run the Assistant as an administrator, update your graphics drivers, and temporarily disable third-party antivirus software before trying again. |
| 0x8007000d | Corrupted installation file | Delete the partially downloaded setup folder, restart your PC, and launch the Assistant again to fetch a fresh download. |
|
0xC1900200 / 0xC1900202 (often with -0x20008) |
Hardware / OS compatibility check failed | Run Microsoft’s PC Health Check app to identify the non-compliant component. |
| Installation stuck at a fixed percentage for a long time | An unstable internet connection or a corrupted temporary file |
Wait for at least 30 minutes before assuming it’s frozen. Then restart your PC and try again. Setup often pauses while unpacking large system archives or verifying disk integrity in the background. |
Advanced Recovery Command (Last Resort)
If the Assistant repeatedly fails despite clearing disk space and running as administrator, underlying system file corruption may be blocking setup. Do the following:
- Open Command Prompt as Administrator.
- Execute the following repair commands in order:
- Scan and repair corrupted system files:
sfc /scannow
- Repair the underlying Windows component store image:
DISM /Online /Cleanup-Image /RestoreHealth
- Restart your PC.
- Run the Installation Assistant one final time.
Automating Deployment for IT Teams (RMM/Scripted Rollout)
Running the Windows 11 Installation Assistant manually is fine for one or two PCs. But it’s impractical to run it that way on dozens or hundreds of endpoints. That’s why IT teams automate the process through a Remote Monitoring and Management (RMM) platform, which lets them monitor, patch, and manage devices from a central console.
The Windows 11 Installation workflow is largely the same regardless of which RMM tool you use.
First, run a readiness check across your fleet to confirm which devices meet the Windows 11 hardware requirements (TPM 2.0, Secure Boot, an approved CPU). Devices that fail this check should be flagged and excluded, not force-upgraded.
Once you’ve identified the compatible devices, deploy the Windows 11 Installation Assistant with a script. Run it silently using the appropriate command-line switches, accept the license terms automatically, and save the installation logs to a central location. That way, if an upgrade fails, you can troubleshoot it remotely.
Assistant reboots the device automatically when installation finishes, so you don’t need to add a separate reboot command to your deployment script.
In the end, you’re still using the same Windows 11 Installation Assistant described in this guide. Scripting just removes the manual click-through on every device.
Organizations usually deploy Windows feature updates through Windows Update for Business, Microsoft Intune, or Microsoft Configuration Manager rather than the Installation Assistant. The scripted approach described here is primarily used in smaller environments or targeted upgrade scenarios.
When to Use Action1 Instead of Windows 11 Installation Assistant?
The Windows 11 Installation Assistant works well when you need to upgrade a single PC. For IT teams managing dozens, hundreds, or thousands of endpoints, however, downloading and running the Assistant individually quickly becomes impractical.
Action1 provides a centralized way to perform the same type of in-place Windows feature upgrade across managed endpoints without manually launching the Installation Assistant on every computer.
Step 1: Check Which Devices Are Ready for Windows 11
Before starting the upgrade, identify which endpoints meet the Windows 11 hardware requirements. Action1 provides a built-in Windows 11 Hardware Compatibility report that helps IT teams evaluate devices across the organization from one console.
This lets you identify eligible Windows 10 machines and exclude devices that do not meet Windows 11 requirements before deployment.
Step 2: Select the Windows Feature Update
In the Action1 console, go to Software Repository and locate the appropriate built-in package.
For Windows 10 devices being upgraded to Windows 11, select the corresponding Windows 10 Feature Update to Windows 11 package. For machines already running Windows 11, select the required Windows 11 Feature Update package.
Action1 packages the feature-update workflow so administrators do not have to manually download and run the Installation Assistant on each endpoint.
Step 3: Choose the Target Endpoints
Click Deploy to Endpoints and select the computers or endpoint groups that should receive the upgrade.
For larger environments, avoid upgrading the entire fleet simultaneously. Start with a small pilot group, verify that the upgrade completes successfully, and then expand deployment to additional groups or update rings.
Step 4: Schedule the Upgrade
Configure when the feature update should run. This allows IT teams to perform Windows upgrades during maintenance windows or outside normal working hours rather than relying on individual users to start the Installation Assistant.
Action1 can manage remote endpoints over the internet, so devices do not need to be connected to the corporate network or VPN during deployment.
Step 5: Manage the Restart
Windows feature upgrades require a restart to complete. Action1 provides centralized reboot controls, including user notifications and countdown options, helping administrators avoid unexpectedly restarting employees’ computers while they are working.
Step 6: Monitor the Upgrade
After deployment starts, use Action1 to monitor upgrade progress and identify endpoints where the installation succeeded, failed, or still requires attention.
Instead of checking every computer manually, administrators can review Windows versions and upgrade status centrally and focus troubleshooting only on devices where the feature update failed.
When Should You Still Use the Installation Assistant?
For one or two unmanaged PCs, the Windows 11 Installation Assistant remains a simple option. Action1 becomes more useful when Windows upgrades need to be performed consistently across a managed fleet with centralized targeting, scheduling, reboot control, and reporting.
Action1 is designed for in-place upgrades of managed Windows endpoints. It does not replace bootable installation media or Windows ISO files when performing clean installations, installing Windows on a blank drive, creating virtual machines, or repairing a computer that cannot boot into Windows.