
Seeing the message “Your system is up to date” means your computer is running with the current kernel version, updated software packages, and the latest system libraries available for your distribution. In other words, your machine is protected against known vulnerabilities, performs at its peak, and avoids the bugs that older versions often drag along.
Linux works much like a living tree: the kernel forms the roots and trunk, giving structure and stability, while the distributions grow as branches and leaves, each shaped differently but dependent on the same foundation.
The equation is simple: Linux OS = the Linux kernel + system libraries and tools + software packages + a package manager, all bundled into a distribution.
Even though distros differ, they all rely on upgrades to stay secure, stable, and feature-rich with the newest improvements released by developers. And when the time comes for a full system upgrade, it extends those benefits even further with better hardware support, added capabilities, performance improvements, and additional new features.
In this guide, we explain how to upgrade your Linux system using the Terminal command line, GUI-based updaters, or Action1’s autonomous endpoint management platform. You will also find step-by-step instructions for upgrading Ubuntu, Debian, Red Hat Enterprise Linux, and other distros, along with common issues to watch for and best practices that help you upgrade safely and with confidence.
What Are the General Methods to Upgrade Linux Systems?
Linux systems can be upgraded using the Terminal Command Line (CLI), GUI-based tools, and third-party patch management platforms like Action1. Below you will find detailed information for upgrading your Linux system through all of these methods.
Common Linux Upgrade Commands by Tool Type
| Method | Description | Skill Level | Common Tool Examples |
|---|---|---|---|
| Terminal (CLI) | Manual package/system upgrades | Intermediate | apt, dnf, yum |
| GUI-based | User-friendly visual upgrades | Beginner | GNOME Software, KDE |
| Third-party software | Managed, automated upgrade solutions | Beginner–Advanced | Webmin, Landscape |
How to Upgrade Linux Using Terminal (CLI) Command Line?
Below is a step-by-step guide that works across most distributions, with small differences depending on whether your system uses APT (Debian/Ubuntu), DNF/YUM (RHEL-based), or another command-line package manager.
- Open the Terminal — on most Ubuntu and Debian-based systems, press Ctrl + Alt + T. On a Fedora system, RHEL, CentOS, and others: open Activity, then go to Search, and type Terminal, or find it in your applications menu.
- Update the package list — use one of the following update commands according to your current Linux distribution.
- APT (Ubuntu/Debian)—“sudo apt update”
- DNF (Fedora/RHEL 8+/CentOS Stream) – “sudo dnf check-update”
- YUM (older RHEL/CentOS) – “sudo yum check-update”
- Upgrade installed packages — to start the upgrade process, you must use one of the following commands based on your Linux distro:
- APT (Ubuntu/Debian) – “sudo apt upgrade”
- DNF (Fedora/RHEL 8+/CentOS Stream) – “sudo dnf upgrade”
- YUM (older RHEL/CentOS) – “sudo yum update”
Once you hit enter and input that command, the system will show you which packages will be upgraded, how much data will be downloaded, and how much disk space will be used. Then it will ask you, “Do you want to continue? [Y/n].” Type “Y” to start the deployment process and “N” if you want to abort it. You can skip that confirmation by simply adding -y at the end of the above-mentioned commands, like this: “sudo apt upgrade -y.”
NOTE: Alternative commands (still supported on Debian/Ubuntu)
Ubuntu and Debian also support older apt-get commands, which perform the same actions as the modern apt equivalents. For example:
- “sudo apt-get update” works the same as “sudo apt update”
- “sudo apt-get upgrade” works the same as “sudo apt upgrade”
- “sudo apt-get dist-upgrade” is the older form of “sudo apt full-upgrade”
These variations still exist for compatibility and scripting purposes. You may see them referenced in older documentation, sometimes even written incorrectly as “apt get” or “apt get upgrade”. The correct syntax, however, always uses the hyphen: apt-get.
- Perform a full system upgrade (APT systems only) — APT-based distros are known for holding back packages when they require dependency changes. A full system upgrade resolves this by applying all pending updates, installing new kernel versions, and handling packages that need outdated or conflicting components to be reprocessed, removed, or replaced. To start the process, use the following command:
- APT (Ubuntu/Debian): “sudo apt full-upgrade”
- On Fedora and RHEL-based systems, “sudo dnf upgrade” or “sudo yum update” handle routine upgrades within the same release. However, major release upgrades may require specific commands such as “dnf system-upgrade.”
- Remove outdated or unused packages — once the upgrade finishes, it’s a good idea to clear out packages your system no longer needs. This frees up disk space and reduces the chances of running into dependency conflicts during future upgrades. To do that, use the following command:
- APT (Ubuntu/Debian) – “sudo apt autoremove”
- DNF (Fedora/RHEL 8+/CentOS Stream) – “sudo dnf autoremove”
- Reboot the endpoint(s) — some upgrades include kernel updates, and those changes can only take effect after a restart. Keep in mind that Linux will notify you when a reboot is required, but you can also force the restart through the following command:
- “sudo reboot”
How to Upgrade Linux Using GUI-Based Tools?
Upgrading Linux through a GUI tool feels almost effortless, yet it remains one of the most effective ways to keep your system current. Every major Linux distribution comes with a built-in software update tool, and although each one looks a little different, they all work on the same principle.
They refresh your package index, compare it with the latest versions in your enabled repositories, identify which update packages are available, and then guide you through a simple, step-by-step upgrade process. Nothing complex, nothing intimidating.
Now, we’ll focus on Ubuntu’s Software Updater, one of the most user-friendly tools available. The interface may differ slightly from one distro to another, but the upgrade workflow is nearly identical. Below, you will find a detailed step-by-step guide for upgrading your Linux system using it:
- Open the “Software Updater” — click the Activities menu, type “Software Updater” into the search box, and launch the tool. Ubuntu will begin an automated update check and list everything your system is missing.
- Review available updates — you will see a list of upgrades, including security patches, application updates, and sometimes new kernel versions. If there’s anything you prefer not to install, simply deselect that item before continuing.
- Start the upgrade — click “Install Now” or “Upgrade,” depending on which option is available. The update manager will prepare your system and begin applying updates one by one. Before the process starts, Ubuntu will prompt for authentication, so you’ll need to enter your password and confirm.
- Wait for the update process to complete — watch the progress bar and do not interrupt the upgrade to avoid disruptions. You may see messages about resolving dependencies or configuring updated components. Don’t freak out, this is normal and part of Ubuntu’s package-management workflow.
- Restart your system — if a new kernel or other major component was installed, Ubuntu will prompt you to “Restart Now.” Restarting ensures all changes apply correctly and your endpoint runs with the updated components.
How to Upgrade Linux Using Action1?
Visit our website, create your account, and deploy the agent across the endpoints you want to manage through Action1. It takes up to five minutes, and once the agent is installed, you can start patching your endpoints right away.
For your convenience, we have created a clear and easy-to-follow step-by-step guide on how to upgrade Linux using the platform:
- Log in to your Action1 account — Log in to your account.
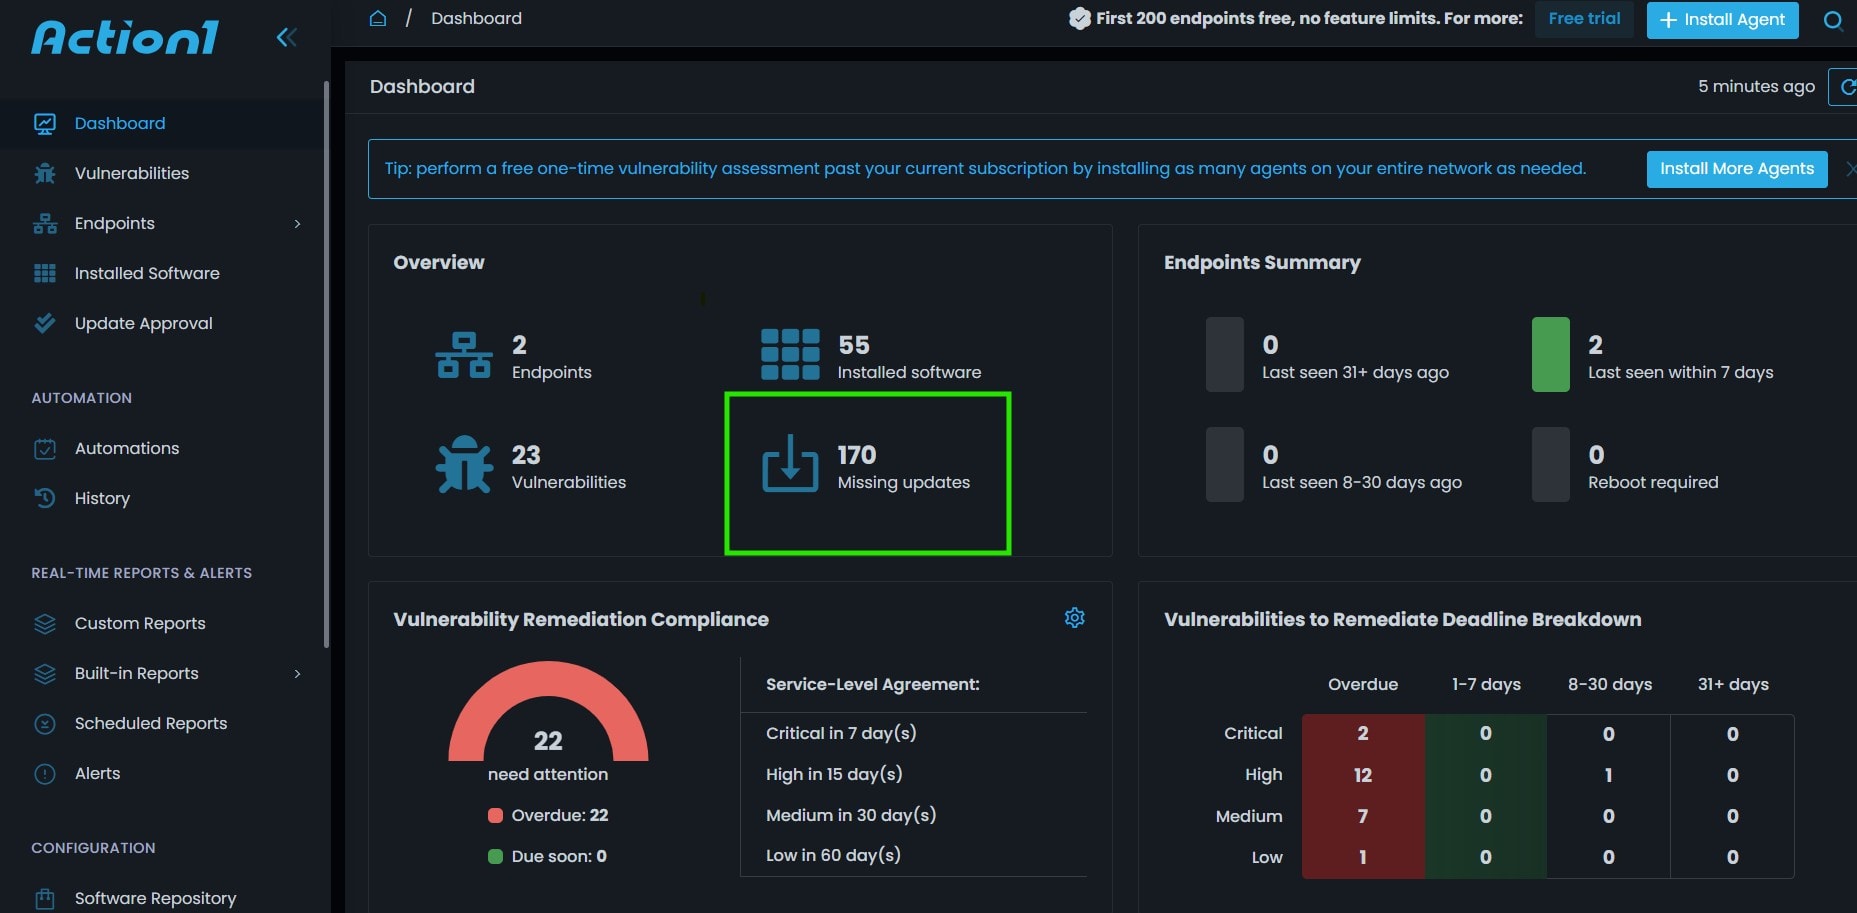
- Navigate to “Missing Updates” — on the dashboard, you will see a section named “Missing Updates”, located in the center of the screen. Left-click it to view detailed information about each available update.
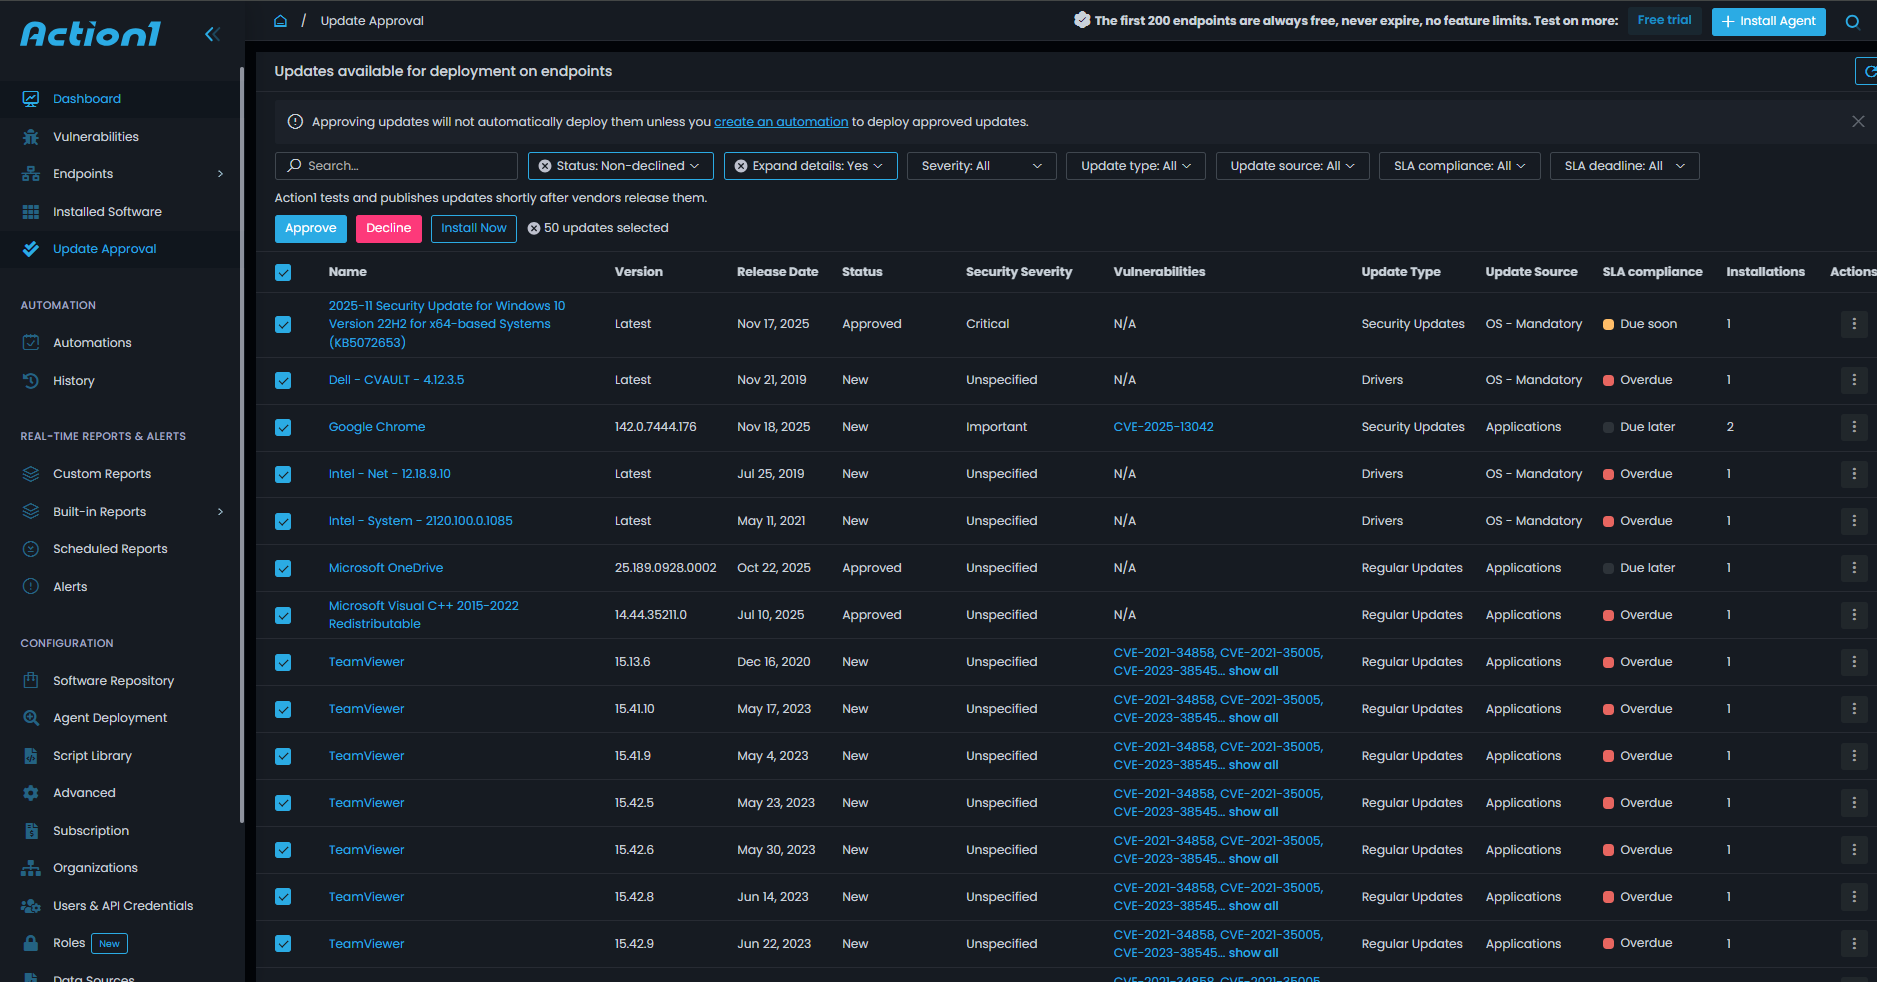
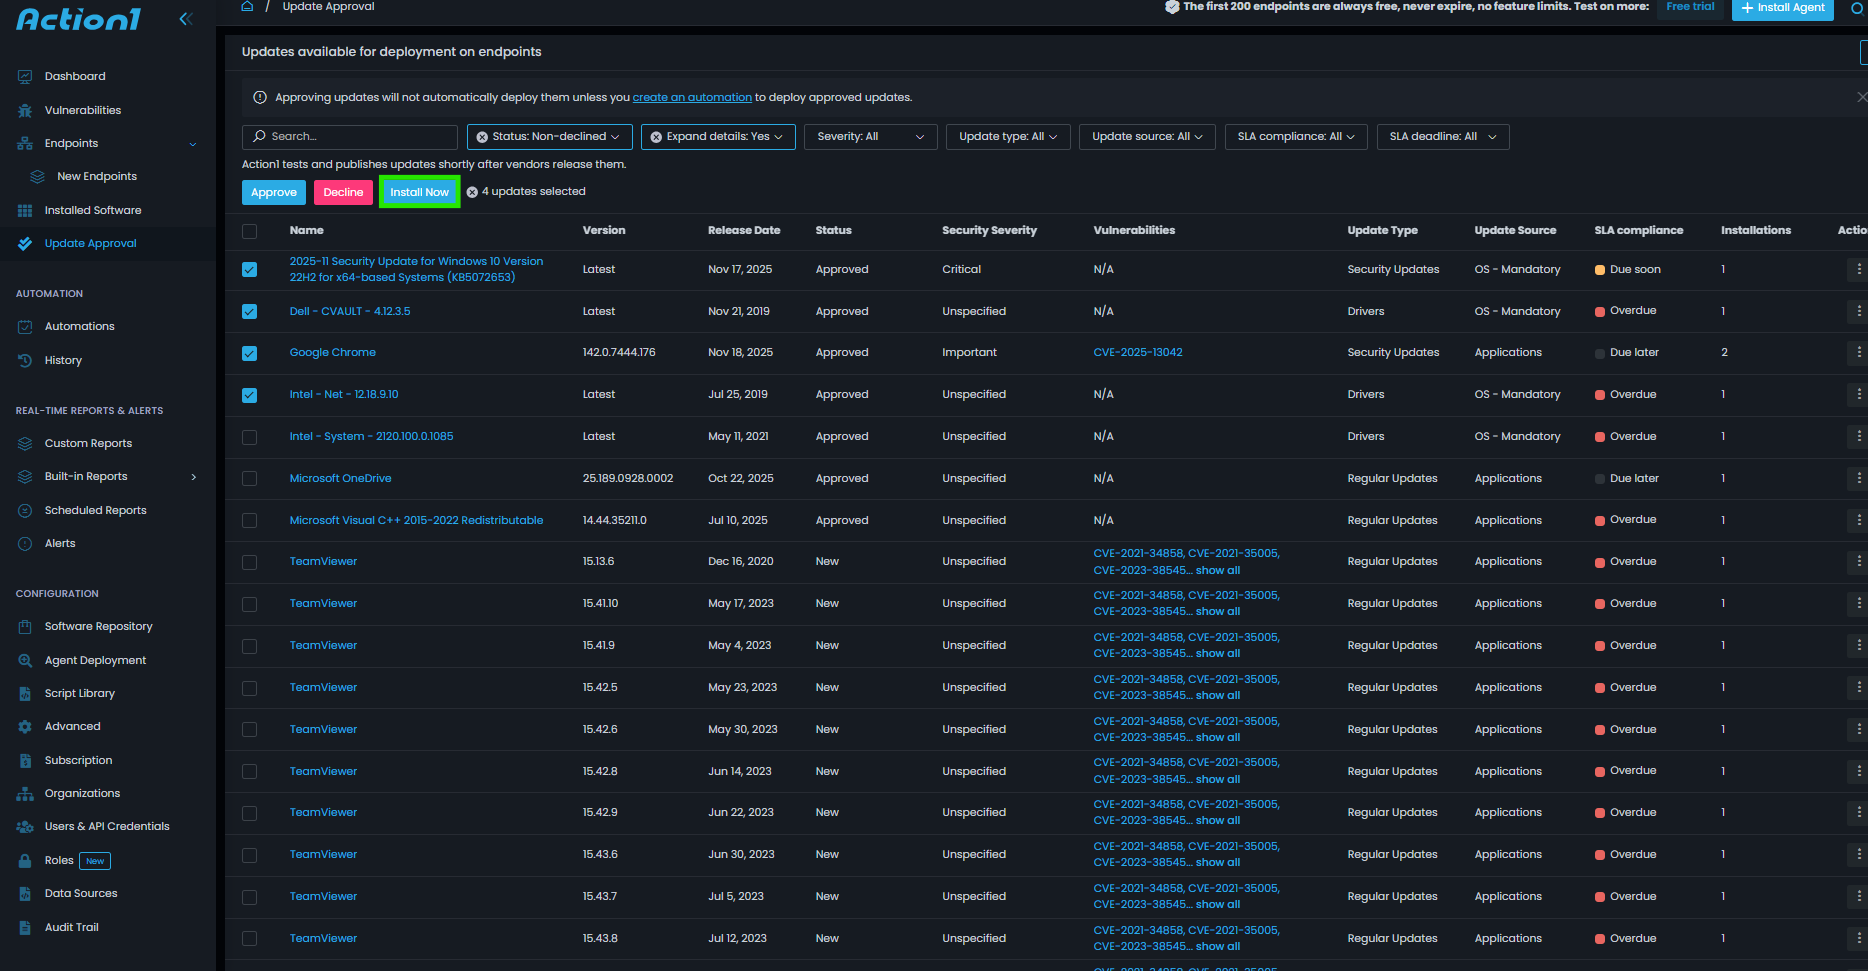
- Deploy updates — Action1 gives you the flexibility to roll out updates immediately by clicking “Install Now”, or schedule automated deployments at a convenient time that fits your organization’s needs. To deploy updates in stages, you can use the “Update Rings” feature, which enables risk-free autonomous rollouts.Select all updates or a specific package you want to deploy, then click “Install Now”.
 Customize the automation by choosing which updates to deploy, setting update approval rules and reboot options, then click “Next Step.”Choose whether you want to update all endpoints or only selected ones, then click “Next Step.”
 Customize the automation by choosing which updates to deploy, setting update approval rules and reboot options, then click “Next Step.”
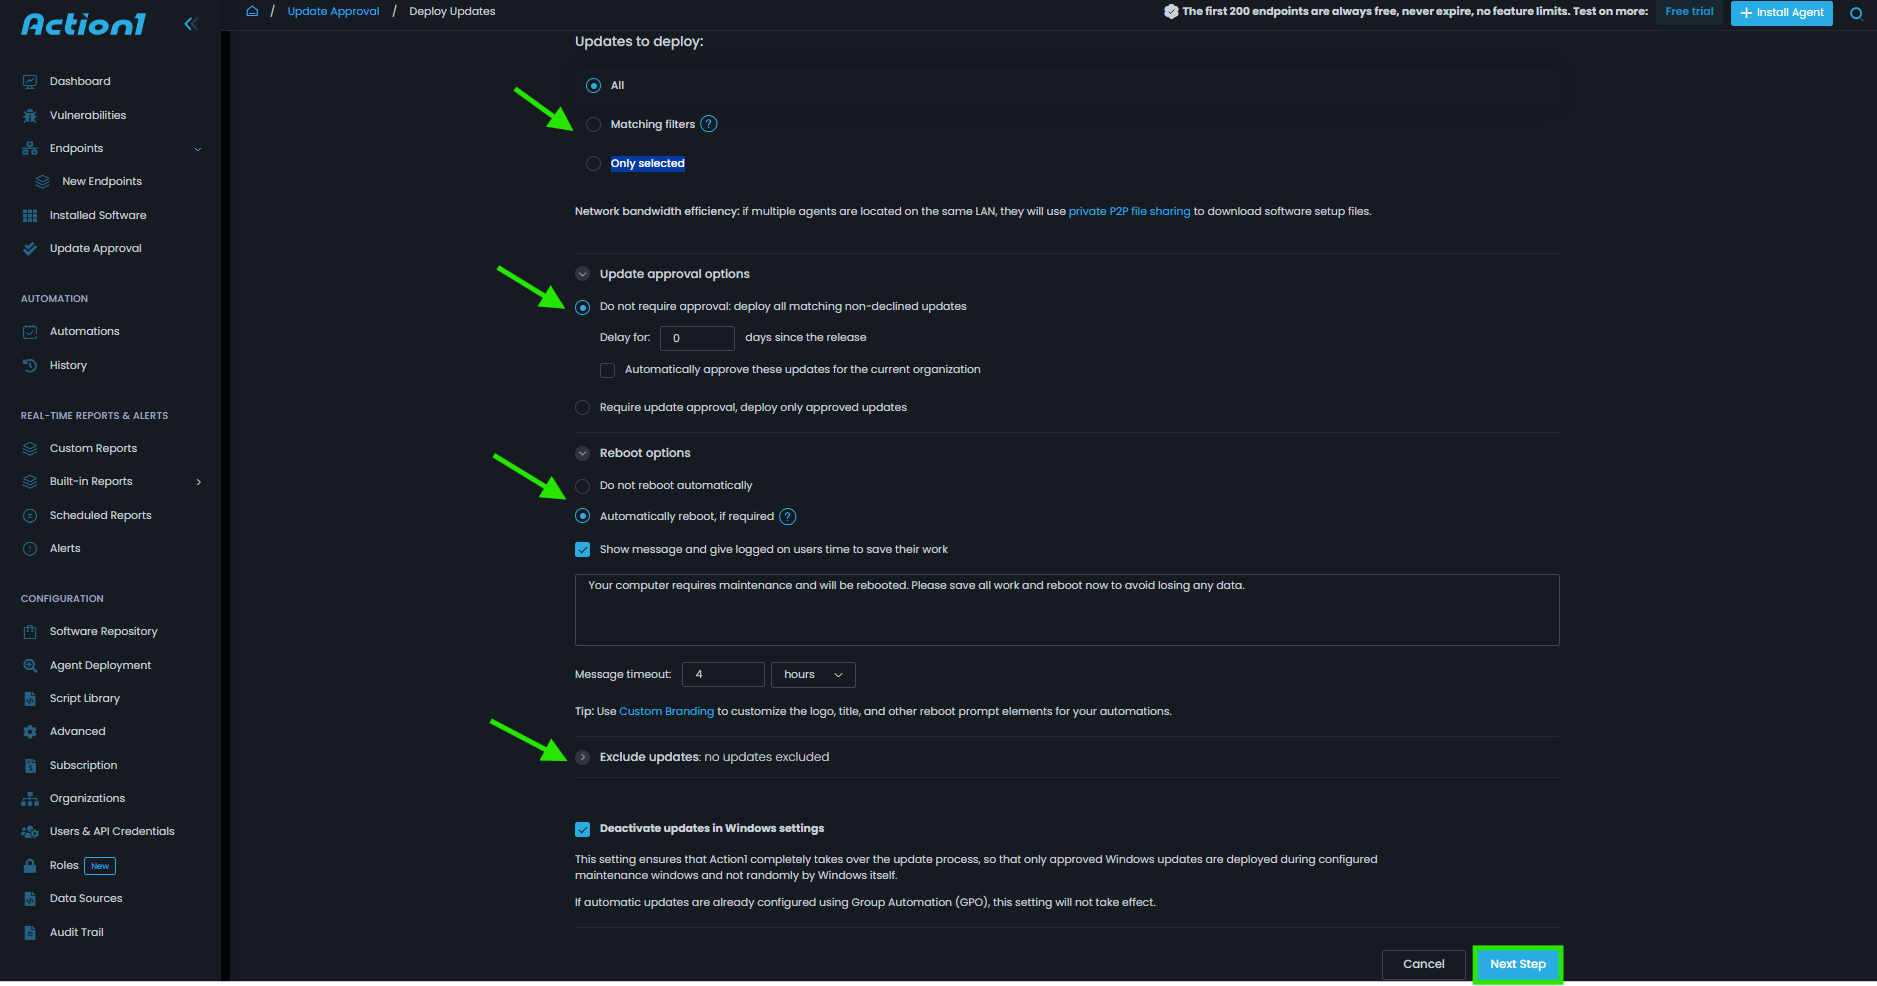 Choose whether you want to update all endpoints or only selected ones, then click “Next Step.”
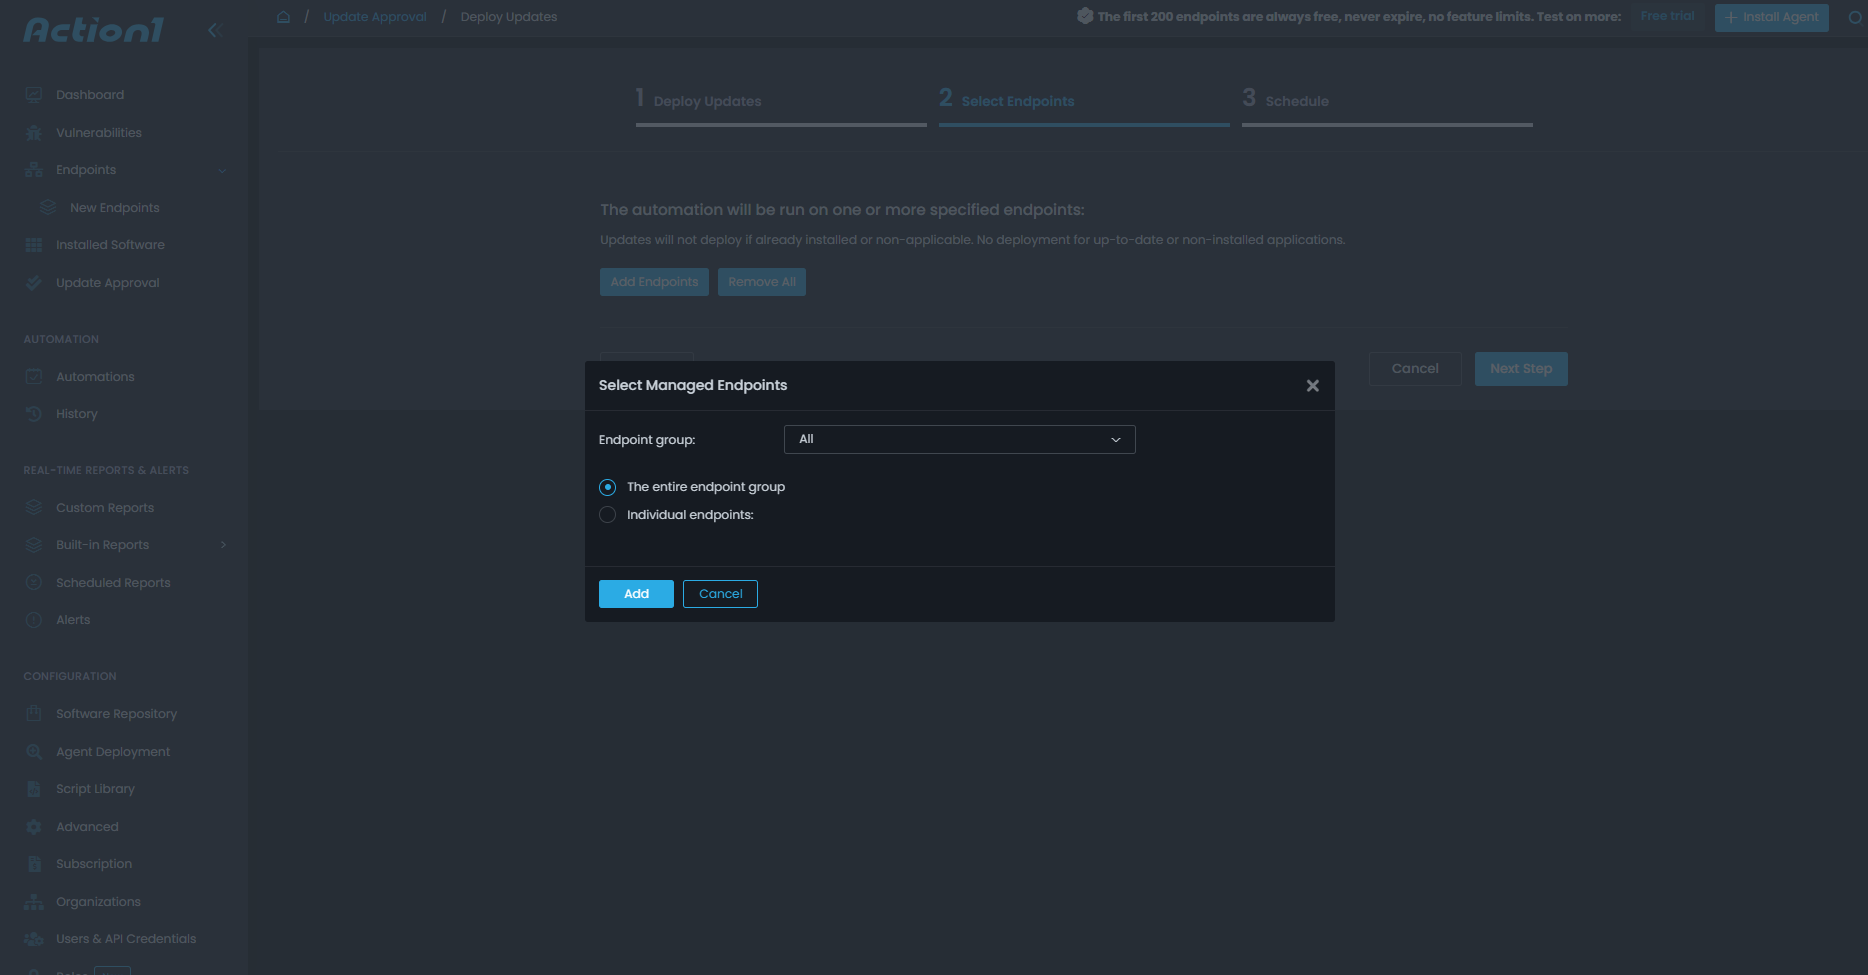
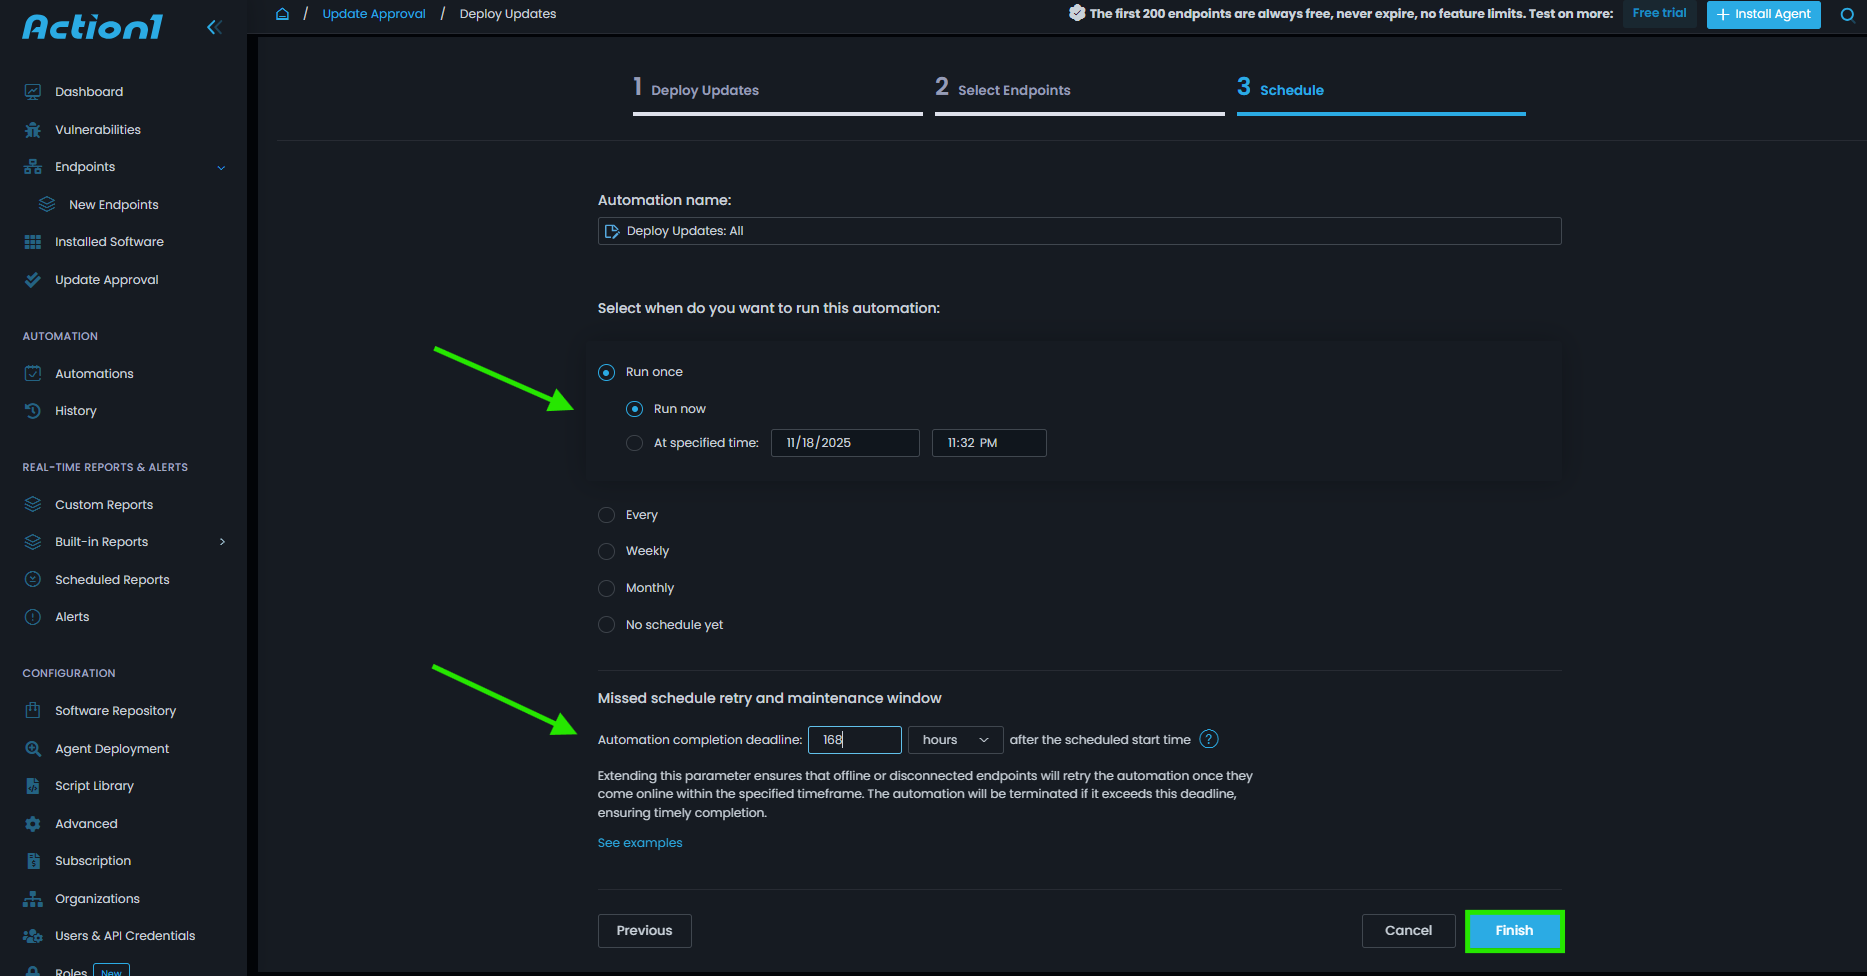
Schedule the deployment based on your preferences. You can run it immediately or set a specific time and date, weekly or monthly. Configure the missed schedule and maintenance window options to ensure disconnected or offline endpoints receive updates as soon as they reconnect. Finally, click “Finish.”
Benefits of Using Third-Party Software to Upgrade Linux
Third-party patch management software automates each step of the upgrade process, which delivers multiple benefits to organizations of all sizes. Let’s take a closer look at the value you gain by equipping your company with a patch manager:
- Automate the identification of missing updates;
- Automate testing and deployment of security patches, upgrades, and all the packages available across your endpoints;
- Significantly ease regulatory compliance, where in just a few clicks you can generate detailed reports by using built-in, fully customizable templates after each update cycle;
- Provide real-time visibility across all your endpoints;
- Minimize downtime risks by offering features like Update Rings, which enable risk-free, staged, autonomous rollouts, ensuring only reliable and tested packages reach your endpoints;
- Harden the overall security posture of every single device by keeping it up to date and running with the latest operating system and third-party software versions;
- Offer flexibility to deploy security updates immediately or in convenient time slots to avoid any operational disruptions;
- Update Windows/macOS/Linux and third-party applications from a single platform;
- Patch management platforms offer a simplified user interface, where even non-tech-savvy users can automate updates and software deployment, with the software guiding them through each step of the process;
- Eliminate manual patching, which is a tedious and time-consuming process;
- Boost your employee productivity by enabling only one person to autonomously upgrade hundreds of thousands of endpoints through unattended upgrades, with minimal downtime risks and the flexibility to schedule deployments outside business hours;
- Equip you with remote control over all your systems, regardless of their location, so you can easily manage and update them from anywhere, directly in your browser;
- No VPN. No on-premises infrastructure. No complex setup. Cloud-native patch management platforms use lightweight agents, which makes them cost-effective solutions.
Native Tools vs Third-Party Software
| Feature | Native Tools (e.g., apt/dnf) | Third-Party Software (e.g., Landscape, Webmin) |
|---|---|---|
| Usability (GUI) | ❌ No | ✅ Yes |
| Automation | ❌ Manual | ✅ Scripting/automation built-in |
| Multi-system support | ❌No | ✅ Yes |
| Cost | ✅ Free | ⚠️ Some paid options |
Best Practices When Upgrading
Upgrading a Linux system looks simple on the surface, but we all know that many things can go wrong, which always brings headaches and unexpected downtime. To make the upgrade process smoother and to help you avoid the usual traps, we’ve listed the best practices every IT professional should stick to.
Pre-Upgrade Essentials
- Create backups and system snapshots
Before starting anything, think about plan B if something does not go as expected. By that we mean creating a snapshot or a full backup of your system(s) because this can save you from hours of stress and potential data loss. If something breaks, and occasionally it does, these backups give you the power to roll back swiftly with minimal damage.
- Check for broken dependencies before upgrading
Broken packages are one of the most common reasons for a system upgrade failure. On Debian-based systems, even a single missing library can block new kernel versions or prevent upgraded packages from installing correctly. To avoid issues like this, run the following command in the Linux command line right before starting the upgrade process:
“sudo apt update”
This will automatically refresh your package index files and expose anything that needs fixing. In case your system reports dependency issues, solve them before you move forward.
- Use test environments before live upgrades
Always test upgrades on a small group of non-critical endpoints, especially when you do release upgrade to a new distribution version. In 9 out of 10 cases, updates will work perfectly, but there is always a chance of facing unexpected downtime due to a problematic one. The safest way to avoid unpleasant surprises is by testing any upgrade before organization-wide rollouts; this gives you certainty, and certainty prevents downtime.
Performing the Upgrade
Once you’ve created a backup and verified dependencies, it’s time to upgrade. But do it in stages, not all at once, to further minimize the downtime risks. Use features like Update Rings offered by Action1 to deploy updates gradually, where you can create rings (groups of endpoints) and set specific success metrics and deployment counts to ensure that only reliable updates that meet those criteria progress autonomously to the next ring.
Post-Upgrade Tasks
Even after the upgrade finishes, your work isn’t done. A few final steps transform a basic upgrade into a clean, safe, and professional one.
- Cleaning up old packages
Old packages pile up over time. After upgrading, run the following command: “apt autoremove” on Ubuntu or “dnf autoremove” on Fedora to remove packages that are no longer needed. They’re just eating disk space at this point.
This removes leftover kernels, outdated libraries, and old installed packages you no longer need. Your system becomes lighter and behaves better.
- Verifying service restarts
The last step in the process is to restart your system(s) once you finish installing updates. This is necessary for the updates to take effect, and this happens only after a reboot. So if you prefer to use the Terminal, you can simply add the following command:
“sudo reboot”
It will safely shut down all running processes and then restart your machine.
However, if you are using third-party patch management software, you can schedule the reboot during the automation setup. Action1, for instance, allows you to immediately restart the endpoint after updating or delay it for later to avoid data loss or work-related interruption.
FAQs
What Is the Safest Way to Upgrade Ubuntu Without Losing Data?
The safest way to upgrade a Ubuntu machine is by using Action1, a GUI tool, or the Terminal command line. However, you must prepare your system(s) before starting the upgrade. Create a full backup of your personal files, application data, and configuration settings. Next, use test environments to confirm the reliability of the updates and then roll them out in stages.
These simple steps minimize not only downtime risks but also those associated with data loss. Last, but not least, when the upgrade finishes, immediately reboot your system(s), or as soon as possible, and then check that everything loads as expected.
How Can I Automate Linux Upgrades Across Multiple Servers?
You can automate Linux upgrades across multiple servers by using a third-party patch management platform like Action1. The software provides real-time visibility across your servers, lists missing updates, and allows you to schedule updates, enforce uniform policies, apply upgrades safely, and generate detailed reports in just a few clicks.
To reduce downtime risks, Action1 supports autonomous, risk-free staged deployments through the Update Rings feature. With solid automation in place, your servers stay consistent, secure, and far easier to manage than when every upgrade has to be performed manually one by one.
Is It Better to Upgrade Using Linux Command Line or GUI Tool?
It really depends. Some users prefer the terminal command line (especially on distributions like Arch Linux), others prefer GUI-based tools, and still others prefer third-party patch management platforms.
The first method is the fastest, where, with just a few commands, your system updates immediately. The second method is reliable and more user-friendly for non-tech-savvy users. While using AEM platforms like Action1, you equip yourself with full control and automation across each step of the process, which comes with minimized downtime risks and manual effort, while maximizing your company’s overall security posture.
How Do Linux Upgrades Affect Installed Applications and Settings?
During an upgrade, your system replaces existing packages with newer versions while trying to preserve your existing settings. Most distributions prompt you whenever a configuration file has changed, so you can keep your version or adopt the new one. Applications typically remain installed and functional because the upgrade adjusts libraries and system components to match the new release. Problems are rare, but they can happen if you rely on outdated software, unverified third-party repositories, or custom system modifications. After upgrading, it’s a good idea to open your most important applications to confirm everything loads correctly.
Can I Downgrade My Linux Version After Upgrading?
Downgrading is technically possible but rarely practical. Most distributions do not support a full system downgrade because upgrades replace core libraries, system files, and critical components that are not cleanly reversible. If you need to go back to a previous version, the most reliable method is to restore from a backup or snapshot you made before upgrading. Reinstalling the previous version and manually restoring your data is the safest course of action if you don’t have one. That’s why creating a snapshot or backup before upgrading is essential if you want the option to go back.
Conclusion
Keeping your system(s) up to date with the latest software is one of the simplest and most powerful ways to strengthen security, maintain performance, and stay compliant. You can upgrade each of your Linux distros through the Terminal command line, GUI-based tools, or a third-party platform. Yet as businesses grow and rely on mixed environments, staying on top of updates becomes far more challenging than it appears.
At this point, Action1 becomes the platform that keeps everything together, delivering automatic updates, cross-OS support, and third-party patching that streamlines upgrades, reduces downtime risks, and keeps productivity moving without interruption. However, you must remember that even with a strong platform behind you, best practices still matter, so before upgrading your Linux systems, always keep a backup or snapshot within reach. If something goes wrong, and it does sometimes for one reason or another, you will be able to restore operations in hours, not days or weeks.
Moreover, test environments and staged rollouts add another layer of protection, giving you confidence that the update behaves exactly as expected before it reaches your entire fleet. Once the upgrades succeed, take a moment to finish the job properly; don’t forget to clean out old packages and reboot the system so every change takes effect. When you pair the right habits with the right tools, upgrading Linux stops being a chore and becomes a smooth, fully automated part of your workflow.
About Action1
Action1 is an autonomous endpoint management platform trusted by many Fortune 500 companies. Cloud-native, infinitely scalable, highly secure, and configurable in 5 minutes—it just works and is always free for the first 200 endpoints, with no functional limits. By pioneering autonomous OS and third-party patching with peer-to-peer patch distribution and real-time vulnerability assessment without needing a VPN, it eliminates routine labor, preempts ransomware and security risks, and protects the digital employee experience.
In 2025, Action1 was recognized by Inc. 5000 as the fastest-growing private software company in America. The company is founder-led by Alex Vovk and Mike Walters, American entrepreneurs who previously founded Netwrix, a multi-billion-dollar cybersecurity company.


