



TL;DR
- Best CMD method: Use
netsh interface set interface "Wi-Fi" admin=disableto turn off Wi-Fi. - Enable Wi-Fi again: Run the same command with
admin=enable. - Find the exact adapter name: Run
netsh interface show interfacebefore changing its state. - Admin rights required: Enabling or disabling a network adapter requires an elevated Command Prompt.
- Common error: “No more data is available” usually means the interface name is misspelled or incorrect.
- GUI option: Open Network Connections and disable or enable the adapter from its context menu.
- Device Manager option: Disable the network device under the Network Adapters category.
- Legacy WMIC method: WMIC can target a network adapter by index, but Microsoft has deprecated the utility.
- Avoid old registry tweaks: Wireless radio registry methods used in Windows 10 are no longer reliable in Windows 11.
- Remote management: Netsh and WMIC can run against remote computers, provided permissions and connectivity are configured.
- Fleet-wide administration: A centralized RMM platform is more practical than logging in to dozens or hundreds of endpoints.
- Visual difference: A netsh-disabled adapter remains visible but grayed out, which helps distinguish it from a missing driver.
- Automation: Commands can be placed in scripts and scheduled to run at startup, logon, or a defined maintenance time.
- Security caution: Avoid exposing reusable administrator credentials through insecure scripts or saved-credential workflows.
Whether you are a single user who wants to disable or enable the WiFi Network Adapter on your PC, or you are a system administrator who needs to manage network adapters on dozens or hundreds of endpoints in your organization, Windows provides several ways to enable or disable a network adapter. The easiest way to toggle WiFi on/off is still using Windows settings and going to the network adapter settings, but it is not feasible for more than dozens of devices; it is essential to use Command Prompt (CMD) to quickly perform this task on multiple machines simultaneously. The netsh interface command is the standard and reliable method to disable/enable a WiFi network interface, though there was another method using a registry tweak that worked on Windows 10 computers; however, Microsoft deprecated this method in Windows 11. There are alternative methods to perform this task, such as PowerShell, Windows Management Instrumentation Command-line (WMIC) utility, and third-party Remote Monitoring and Management (RMM) platforms. We will discuss all those options moving forward in this blog, including the Windows Graphical User Interface (GUI), so you can choose the best option according to your personal or enterprise-wide network interface administration.
Disable/Enable via Netsh Interface Admin Command
The Netsh utility, using Command Prompt, provides you with precise control over your network card that the GUI cannot provide. First, determine the exact network card before executing the command to disable it, because disabling the wrong network interface can result in command failure, or you might accidentally disable the wired network interface. Run the command below to discover all the network interfaces attached to a computer.
netsh interface show interface
The command will show you the output as a structured table detailing the administrative state, operational state, connection type, and interface name.
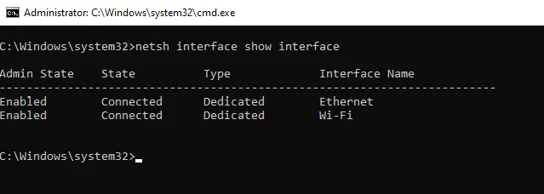
Now, when you have determined which network adapter you will need to run the command on, add the interface name in the double quotation marks along with the disable flag as below. This command will instantly change the administrative state of the network interface, disconnect all TCP/IP connections, and stop network scanning.
netsh interface set interface “Wi-Fi” admin=disable
You can run the interface discovery command to see the change you made.
The same command using the enable flag will enable the network interface again, as follows.
netsh interface set interface “Wi-Fi” admin=enable

As briefly mentioned earlier, administrators used to toggle registry values to achieve the same task; this was achievable because Microsoft handled wireless radio toggling via the radioEnable or SoftwareRadioOff keys in the registry. Microsoft has restructured the wireless network state management entirely in Windows 11 by removing these keys and values, which makes the older script managing these keys totally non-functional, and the netsh interface became the primary method.
When you run the netsh command, it disables the network card and shows it as visible but grayed out in the classic Control Panel Network Connections Applet, whereas toggling the radio values totally hides the network card. This visual distinction is important for admins, as it indicates whether a network card is simply disabled or missing drivers.
Changing the network card status requires elevated permissions and produces a User Account Control confirmation; that is why admins wrap the command with the runas / savecred flag in a batch script using the netsh command. This batch file can be scheduled to run at user logon, enabling standard users’ login to run the command without exposing admin password. Below is a sample command.
runas /user:Administrator /savecred “cmd.exe /c netsh interface set interface \”Wi-Fi\” admin=disable”
Note: If you misspell the interface name, the command will fail with an error message “No more data is available”, which suggests checking the interface name or spelling in the command.
Disable/Enable via GUI — Network Connections
Command-line tools are ideal for admins to perform automation and remote administration on multiple endpoints, but the Windows Graphical User Interface for managing network adapters is an easy way for non-technical users to perform local troubleshooting. It is also a hassle to go through multiple layers of the Windows Settings menu to reach the Network and Sharing Center window, but you can open it by pressing Win+R on your keyboard and pasting the command below in the Run dialog box.
control.exe /name Microsoft.NetworkAndSharingCenter


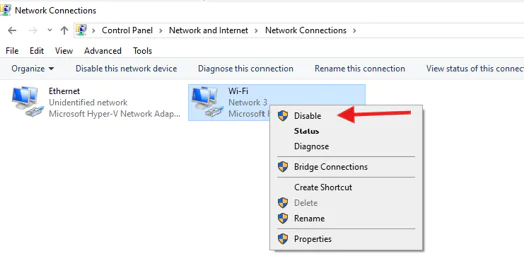
In the Network Connections window, right-click on your WiFi Network card and select “Disable” from the context menu.
Disable/Enable via GUI — Device Manager
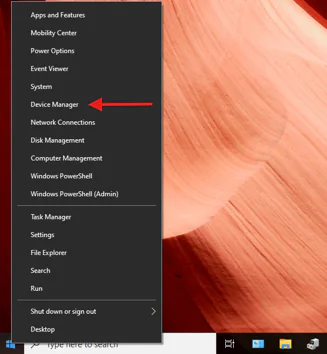
Device Manager is another GUI option to control network card state without using Command Prompt or PowerShell. You can open Device Manager by right-clicking on the Start button and selecting Device Manager.
Alternatively, you can open the Run dialog box by pressing the Win + R -> typing devmgmt.msc in it -> click OK.
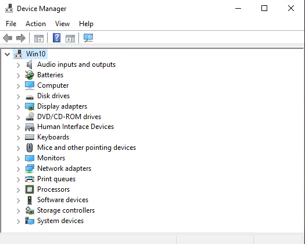
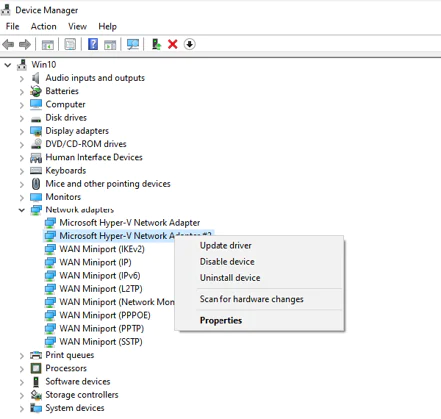
Now expand the “Network Adapters” category•right-click on your Wi-Fi network card device -> and select “Disable Device”.
Disable/Enable via WMIC Command
Windows Management Instrumentation Command-Line (WMIC) offers the capabilities to directly manage the underlying hardware infrastructure. While it offers direct interaction with device drivers without relying on software-level configurations, it requires precise index-number targeting to complete tasks. Same as the netsh command, it is recommended to first determine the exact index number of the network adapter using the WMIC command before disabling it. WMIC lists the network card names with their index number side by side; run the command below to determine the exact index number of the network card.
wmic nic get name, index
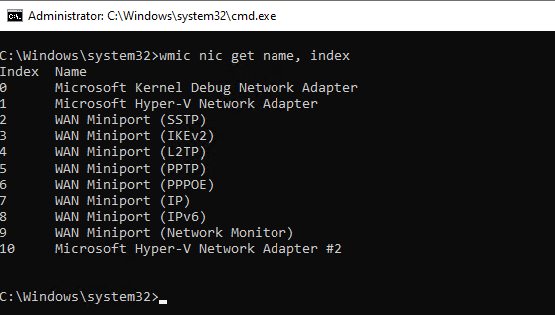
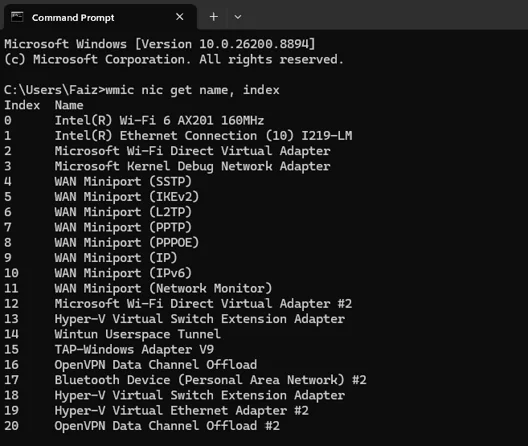
The screenshot above from my Windows 10 virtual machine shows my Wireless Network card on index 10, while below is the output from the latest version of Windows 11, with my Wireless Network card on index 0.
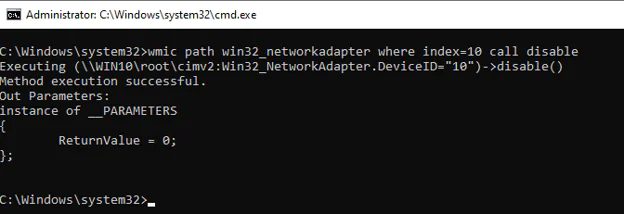
Now run the command below, including the exact index number of your Wi-Fi network interface, to disable it. This command produces the output as method execution successful, but the only way to confirm is by running either the netsh show interface command or by looking at the network interface state in the Network Connections GUI.
wmic path win32_networkadapter where index=10 call disable
Run the following command to enable the WiFi network interface.
wmic path win32_networkadapter where index=10 call enable
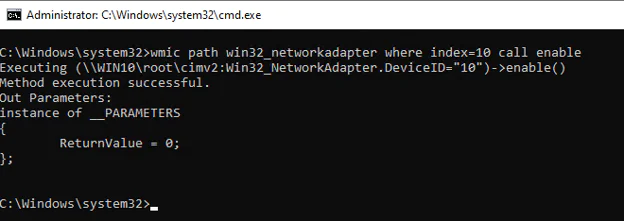
Note: Microsoft has officially deprecated the WMIC utility as of Windows 10, version 21H1, and it is only available as an optional Feature on Demand (FoD) in Windows 11, preinstalled by default in versions 22H2 and 22H2. But as you can see in one of my screenshots above, WMIC is still available in Version 10.0.26200.8894 (25H2), and will most likely be completely removed in version 26H1 (Version 10.0.28000.2525).
Network Adapter Management Methods Comparison
|
Method |
Command |
Requires Admin |
Works Remotely |
|
Netsh Command |
netsh interface set interface “Wi-Fi” admin=disable |
Yes |
Yes (using -r, -u and -p parameters) |
|
Network and Sharing Center GUI |
control.exe /name Microsoft.NetworkAndSharingCenter |
Yes |
No (Local Session Only) |
|
Device Manager GUI |
devmgmt.msc |
Yes |
No (Local Session Only) |
|
WMIC Utility |
wmic path win32_networkadapter where index=1 call disable |
Yes |
Yes (/node:ComputerName) |
Remote/Fleet-Wide Disable via RMM (Action1)
Running commands on individual computers is sufficient for standalone testing, but if administrators need to manage large endpoint networks, manually logging into dozens or hundreds of remote endpoints is not practical or sufficient. Though netsh and WMIC commands can be run remotely and scheduled, it is recommended to centralize these operations, along with many other operations, using a third-party Remote Monitoring and Management (RMM) platform like Action1. Action1 is an autonomous cloud native endpoint management platform that provides capabilities of running custom scripts on hundreds of endpoints in one action, including PowerShell, Command Line, and Bash scripts on Windows, Linux, and MacOS operating systems. Follow the steps below to run the same netsh command to disable a network interface on all your devices at once using Action1.
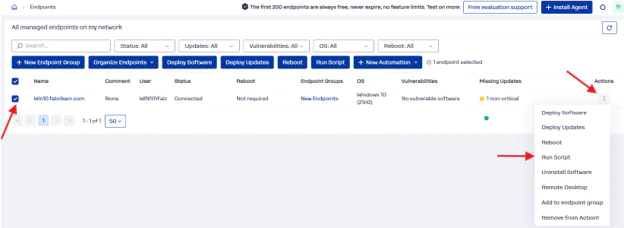
Step 1: Log into your Action1 console, click on Endpoints on the left Navigation pane.

Step 2: Select the endpoint you want to run the script on, click on the More Actions (Three vertical dots) on the right hand side against the selected endpoint, and select Run Script from dropdown.
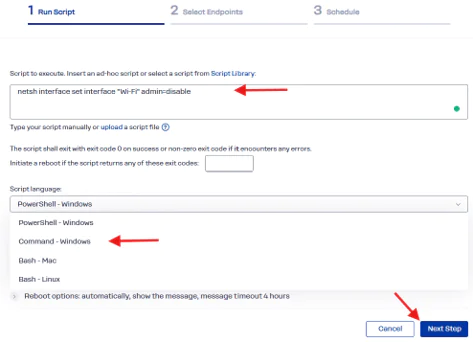
Step 3: The Run Script action will open a small wizard. On the Run Script page, provide the enable/disable netsh command, select the script language as Command-Windows. Then click the Next Step button. You also have the option to save this script in your script library for later use.
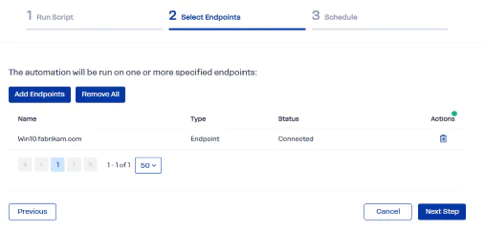
Step 4: On the Select Endpoints page, you can add or remove endpoints, click Next Step after selecting the endpoints.
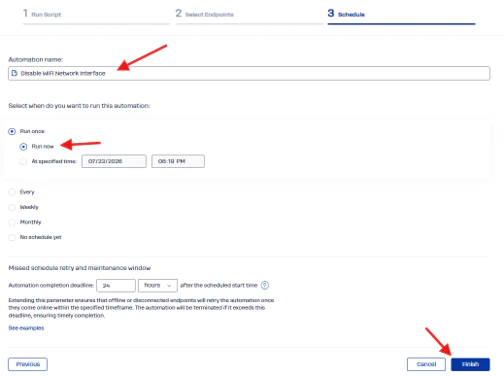
Step 5: On the Schedule page, provide the Automation Name such as “Disable WiFi Network Interface” or “CMD Disable WiFi”, select the option to either Run Now or set a schedule for this command or script to run on a defined time. Click Finish button.
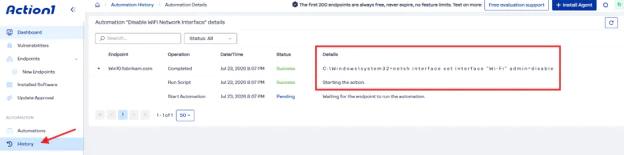
Your script will start running on the selected endpoints via Action1 agents and will show you a summary of task if you have selected the Run Now, you can also check the task history by clicking on History link on left Navigation pane.
Method Selection Matrix
Below is a scenario and method selection matrix for network interface management administrative approach; it depends on the operational scale, desired visibility, and deployment persistence.
|
Scenario |
Method |
Persistence Type |
Visual Presentation |
|
Single Local PC |
netsh interface Command |
Temporary (Resets on manual toggle) |
Visible but Grayed Out |
|
Local Automated Boot |
netsh with runas /savecred flag |
Persistent (Re-applies upon user logon) |
Visible but Grayed Out |
|
Legacy Local PC |
Registry Modification |
Persistent |
Fully Hidden |
|
Enterprise Fleet |
Centralized RMM (Action1) or scripted netsh |
Persistent / Scalable via Policy or script |
Visible but Grayed Out |