

In the Groups folder, located in the Local Users and Groups snap-in in the Microsoft Management Console (MMC), both the default local groups and the user-created local groups are displayed. Local default groups are automatically created when you install the operating system. Belonging to a local group gives the user rights and capabilities to perform various tasks on the local computer.
Local user accounts, domain user accounts, computer accounts, and group accounts can be added to local groups.
Learn how to add user to a group from windows command line. You need to run the below steps.
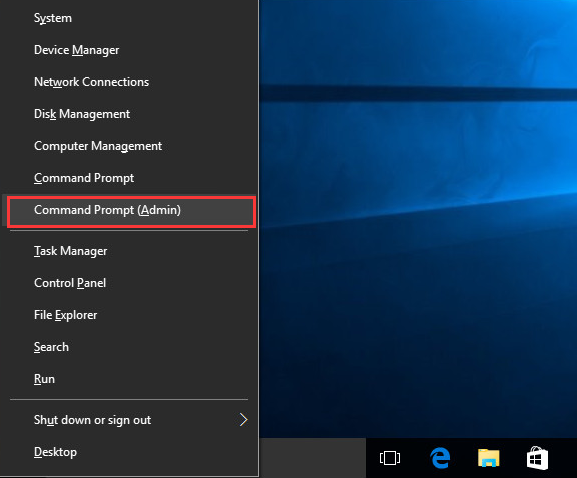
1. Open Command Line as Administrator
Right-click on the Start button (or the key combination WIN + X) and select Command Prompt (Administrator) in the menu that opens.
2. Run This Command to Add User to Local Group
In command line type following code:
net localgroup group_name UserLoginName /add
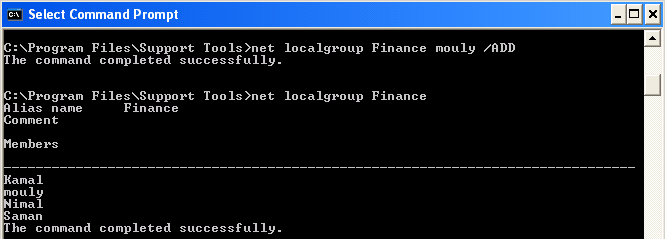
For example to add a user ‘mouly’ to Finance group, we can run the below command:
net localgroup Finance mouly /add
3. Command to Add a Domain User to Local Users Group
In command prompt input this:
net localgroup users domainname\username /add
This command should be run when the computer is connected to the network. Otherwise, you will get the below error.
H:\>net localgroup users domain\user /add
System error 1789 has occurred.
The trust relationship between this workstation and the primary domain failed.
4. Ways to Add User to Different Local Groups
To add a domain user to local administrator group:
net localgroup administrators domainname\username /add
To add a user to remote desktop users group:
net localgroup “Remote Desktop Users” UserLoginName /add
To add a user to debugger users group:
net localgroup “Debugger users” UserLoginName /add
To add a user to Power users group:
net localgroup “Power users” UserLoginName /add
5. To List the Users Belonging to a Particular Group
If you need to get a list of users belonging to a group we can run this command:
net localgroup group_name
6. Manage Local Users and Groups Using Powershell
Recently, Microsoft has added a standard PowerShell module to Windows for managing local users and groups called Microsoft.PowerShell.LocalAccounts. Previously, this cmdlet had to be downloaded and imported separately into PowerShell. In Windows Server 2016 and Windows 10, the LocalAccounts module is now available by default, because It is included with PowerShell 5.1. In earlier versions of Windows, you must install the Windows Management Framework 5.1 to use the local account management module. The module includes 15 cmdlets. The full list of cmdlets in the LocalAccounts module can be displayed as follows:
Get-Command -Module Microsoft.PowerShell.LocalAccounts
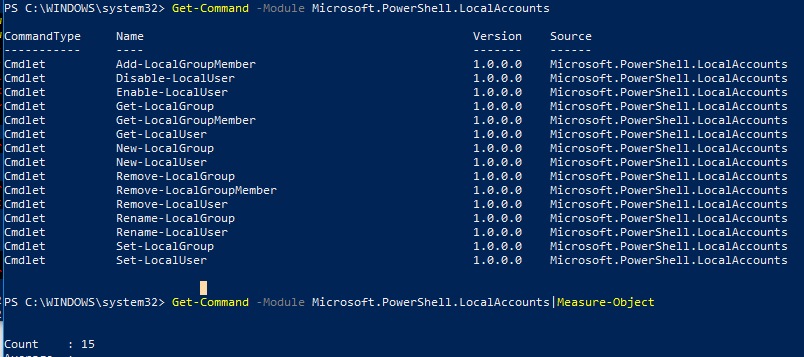
Add-LocalGroupMember— add user to local groupDisable-LocalUser— disable local accountEnable-LocalUser— enable account (unlock)Get-LocalGroup— get information about a local groupGet-LocalGroupMember— get a list of users in a local groupGet-LocalUser— get local user informationNew-LocalGroup— create a new local groupNew-LocalUser— create userRemove-LocalGroup— remove groupRemove-LocalGroupMember— remove member from groupRemove-LocalUser— remove local userRename-LocalGroup— Rename GroupRename-LocalUser— rename userSet-LocalGroup— change groupSet-LocalUser— change user
Next, we consider several typical tasks for managing local users and groups on a computer with Windows 10 using PowerShell cmdlets that are part of the LocalAccounts module.
7. Managing Local Windows Users with Powershell
List the local Windows users on the computer:
Get-LocalUser
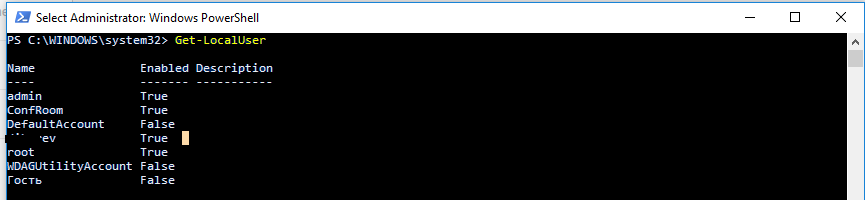
As you can see, there are 7 local accounts on the computer, 3 of which are disabled (Enabled = False).
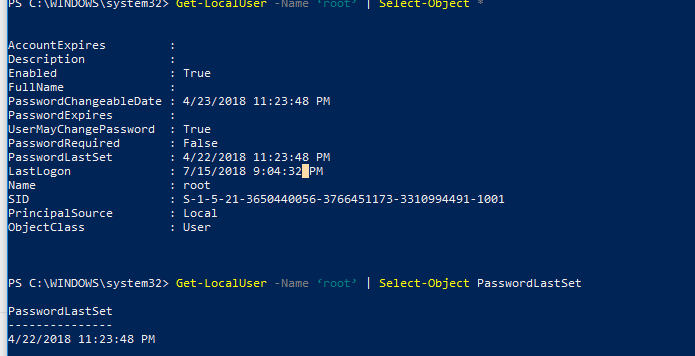
To display all the properties of a specific local account run:
Get-LocalUser -Name ‘root’ | Select-Object *
- AccountExpires :
- Description :
- Enabled : True
- FullName :
- PasswordChangeableDate : 4/23/2018 11:23:48 PM
- PasswordExpires :
- UserMayChangePassword : True
- PasswordRequired : False
- PasswordLastSet : 4/22/2018 11:23:48 PM
- LastLogon : 7/15/2018 9:04:32 PM
- Name : root
- SID : S-1-5-21-3650440056-3766451173-3310994491-1001
- PrincipalSource : Local
- ObjectClass : User
To get a specific user attribute, for example, the last time the password was changed, run:
Get-LocalUser -Name ‘root’ | Select-Object PasswordLastSet
Create a new local user using the New-LocalUser cmdlet. This cmdlet allows you to create the following types of accounts:
- Local Windows Accounts
- Microsoft accounts
- Azure AD accounts
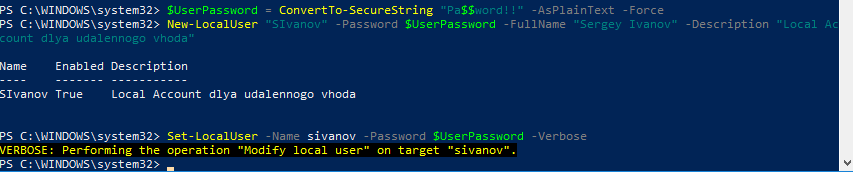
When creating a user account using New-LocalUser, you cannot specify its password as an Open Password argument. Preliminarily, the password must be converted to a safe string by requesting a password online:
$UserPassword = Read-Host –AsSecureString
Or by entering the password directly in the PoSh console:
$UserPassword = ConvertTo-SecureString “Pa$$word!!” -AsPlainText -Force
New-LocalUser “SIvanov” -Password $UserPassword -FullName “Sergey Ivanov” -Description “Local Account remote local account”
To create a user in the AD domain, use the New-ADUser cmdlet.
To change the user’s password, use the Set-LocalUser command (we assume that you have already converted the new password to SecureString):
Set-LocalUser -Name sivanov -Password $UserPassword –Verbose
To set the flag “Password never expires” (“Password never expired”), run:
Set-LocalUser -Name sivanov –PasswordNeverExpires $False
As you can see, you do not need to convert the UserAccountControl value, as when managing account properties in AD.
As you remember, you can log in to Windows 10 as Microsoft accounts. If you need to create a new user associated with a Microsoft account, run the following command (note that you do not need to specify an account password, because it is stored in Microsoft).
New-LocalUser -Name “MicrosoftAccount\[email protected]” -Description “This is Microsoft account”
To create a local account that is associated with your account in Azure AD (for example, you are using Office 365), run the command:
New-LocalUser -Name “AzureAD\[email protected]” -Description “This is AzureAD account”
To remove this local user, run:
Remove-LocalUser -Name sivanov -Verbose
8. Manage Windows Local Groups with Powershell
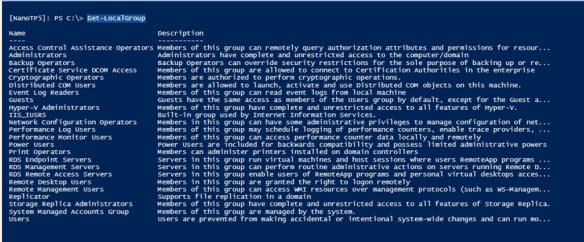
Now we will display a list of local groups on the computer:
Get-LocalGroup
Create a new group:
New-LocalGroup -Name 'RemoteSupport' -Description 'Remote Support Group'
Now we will add several local accounts and a group of local administrators to the new group:
Add-LocalGroupMember -Group 'RemoteSupport' -Member ('SIvanov','root', 'Administrators') –Verbose
If your computer is in a domain, you can add groups and domain accounts or groups to the local group. To do this, they must be specified in the format DomainName \ user2 or DomainName \ ’domain admins’.
You can also add a user to groups using the following pipeline (we will add a user to local administrators):
Get-Localuser -Name 'sivanov' | Add-LocalGroupMember -Group 'Administrators'
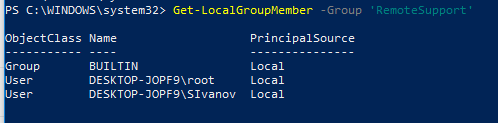
Let’s list the users in the local group:
Get-LocalGroupMember -Group 'RemoteSupport'
As you can see, we use only local accounts (PrincipalSource – Local). However, there may be domain accounts (domain), Microsoft accounts (MicrosoftAccount) and accounts from Azure (AzureAD)
To display the list of groups in which a particular user is a member, you will have to go through all the local groups on the computer:
foreach ($LocalGroup in Get-LocalGroup){if (Get-LocalGroupMember $LocalGroup -Member 'sivanov' –ErrorAction SilentlyContinue){$LocalGroup.Name}}
To remove a user from a group, run:
Remove-LocalGroupMember -Group 'RemoteSupport' –Member 'sivanov'
To manage local users on a remote computer, you must first connect to it via WinRM with Invoke-Command or Enter-PSSession cmdlets.
For example, we need to collect a list of accounts in a local group on remote computers:
$s = new-pssession -computer pc01,pc02,pc03invoke-command -scriptblock {Get-LocalGroupMember -Group 'RemoteSupport'} -session $s -hidecomputername | select * -exclude RunspaceID | out-gridview -title “LocalAdmins”
Consider Using Action1 to Add Local Group Member if:
- You need to perform an action on multiple computers simultaneously.
- You have remote employees with computers not connected to your corporate network.
Action1 is a cloud-based platform for remote IT management and encompasses tools such as patch management, software deployment, remote desktop, software/hardware inventory, endpoint management and endpoint configuration reporting.


