
TL;DR
Fix Windows 10/11 update issues by:
-
Basic Fixes: Restart PC, run Update Troubleshooter, free up disk space.
-
Repair Tools: Use
sfc /scannow,DISM, reset update components. -
Advanced Options: Try System Restore, “Reset this PC,” or in-place upgrade.
-
Manual Updates: Download via Microsoft Update Catalog if auto-update fails.
-
Enterprise Tip: Use Action1 for automated, reliable update management.
Keeping your Windows 10/11 system updated is extremely important for security, performance, and stability reasons. Updates remediate critical software vulnerabilities, fix bugs and problems across your OS, and of course, introduce new features for better user experience. This way your computer stays protected from vulnerability exploitation, minimizing your attack surface, and most importantly, you enjoy the peak performance of your device.
However, for one reason or another, things don’t always go smoothly and as planned. You might face Windows stuck updates due to corrupted files or broken system services leading to failed update installation attempts, where different problems can prevent your computer from staying current and protected.
In this guide, we will discuss various methods to resolve those issues; we will walk you through every step needed to check for missing updates, fix stuck Windows updates, repair system files using built-in Windows tools, and other advanced repair options.
We will also explore in detail how to manually install updates when the Windows Update app is malfunctioning, causing automatic updates to fail; how to use SFC, DISM, and the Windows Update troubleshooter to repair broken Windows system files; and how to perform an in-place upgrade with a mounted ISO file without losing your personal data or apps.
Last, but not least, you will learn how tools like System Restore and the Background Intelligent Transfer Service restart can bring your system back to full health without needing to reinstall your Windows.
So let’s waste no more time and resolve your update issues to keep your computer secured and up-to-date.
How to Check for Windows 10/11 Updates?
When Windows 10/11 is not automatically detecting and installing updates, this becomes a problem, because without them your system remains exposed to vulnerability exploitation and increases the risks of facing different software bugs, which can make your operating system slower than usual or even make it crash entirely.
If you find yourself in a situation of missing critical updates, you are not alone; millions of users share the same problems. The most concerning thing about missing Windows 10/11 updates is that in many cases, you don’t receive any notifications or errors about failed update deployments.
This way you continue using your computer as usual but with outdated software, which can have devastating consequences for your personal, business, or client’s sensitive information. However, don’t panic, since there are many fixes that resolve these issues and help you keep your computer operating with the latest Windows 10/11 updates.
To avoid these risks, it is mandatory to monitor whether your OS has missed any critical updates.
Common Windows Update Problems and Fixes
Your operating system can fail to deliver automatic updates for one reason or another, which increases the chances of experiencing security incidents. Below, you will find the most frequent issues you may face when trying to update and repair Windows 10 or 11:
Stuck Windows Updates
Stuck Windows updates are frustrating without any doubt; when trying to deploy the latest updates or patches, they freeze at 0%, 20%, or 50%, making the update installations impossible. The problem is almost always caused by a malfunctioning update module, broken services, or corrupted files.
You can try the following fixes:
- Restart your PC and try again.
- Check your internet connection.
- Run the Windows Update Troubleshooter.
- Clear the Windows update cache (SoftwareDistribution folder).
- Use Command Prompt to reset Windows Update Components.
- Disable Antivirus or Firewall temporarily.
- Run System File Checker (sfc /scannow).
- Check for Disk Errors (chkdsk).
- Create a New User Account.
Read also: How to Fix Windows 11 Update Stuck at 0%?
Persistent Error Codes
Error codes provide detailed information about the specific issues you are dealing with when trying to update your Windows 10/11. The most frequently encountered error codes include 0x800f0922, 0x80073712, 0x8024402c, 0x80070020, 0x8007000E, 0x80072EFE, 0x800F0922, and 0x80240034. Each one indicates a specific problem related to the update failure.
Here are some fixes you can try:
- Run the Windows Update Troubleshooter.
- Reset Windows Update components completely to their default configuration.
- Clear Windows Update cache folders.
- Restart Windows Update services (BITS, Cryptographic, Windows Update).
- Run DISM and SFC repair commands.
Read also: How to Stop WIndows 11 Updates?
Silent Update Failures
As we already mentioned, sometimes Windows fails to update without showing any error or notification, and this puts your device(s) under security, performance, and stability risks. While you think your system is up-to-date, it is actually missing critical updates that remediate software vulnerabilities, improve the overall performance, and introduce the latest software features.
You can try the following fixes:
- Free up 10-15 GB of storage space.
- Restart Windows Update service.
- Check Windows Update history for failed installations.
- Run Windows Update Troubleshooter to detect hidden issues.
- Reset Windows Update components.
Broken Background Intelligent Transfer Service
When the BITS stops working or becomes unresponsive, your Windows 10/11 system won’t be able to install updates properly. Since it is responsible for downloading update files in the background, any failure related to it can cause updates to get blocked, fail during installation, or remain stuck indefinitely.
You can try the following fixes:
- Restart the BITS service through Services.msc.
- Reset the BITS service using PowerShell commands.
- Reregister the BITS service DLLs.
- Clear the BITS job queue.
- Repair the BITS service dependencies.
Misconfigured Group Policies
In Windows 10/11 editions such as Pro, Enterprise, and Education, certain group policies can disable or defer updates without notifying you about this issue. Keep in mind that these policies are common in company-managed networks or systems upgraded from older Windows versions.
You can try the following fixes:
- Disable the “Configure Automatic Updates” policy.
- Set “Specify intranet Microsoft update service location” to Not Configured.
- Disable the “Remove access to use all Windows Update features” policy.
- Reset the “Defer upgrades and updates” settings.
- Clear problematic WSUS configuration policies.
Corrupted or Missing System Files
When critical system files get damaged or corrupted, logically you won’t be able to update your computer. Failed updates, forced shutdowns, power outages, or interrupted restarts can damage system files, and they won’t get repaired without efforts from your side, so updates will keep failing until the problem is resolved.
Here are some fixes you can try:
- Run the SFC /scannow command.
- Execute the DISM /Online /Cleanup-Image /RestoreHealth command.
- Use Windows Recovery Environmental repair.
- Reset Windows Update components.
Update Conflicts with Security Software
Conflicts with antivirus software, disabled Windows Defender components, or specific firewall rules can cause updates to fail or become stuck because they interfere with the Windows Update app. And the result is always the same: silent failures or repeated reboots during update installations.
You can try the following fixes:
- Temporarily disable third-party antivirus.
- Add Windows Update exceptions to the firewall.
- Disable Windows Defender temporarily.
- Clear antivirus quarantine files.
- Reset Windows Security settings.
Upgrade Failures via ISO or Installation Media
Upgrading your Windows 10 to Windows 11 using a mounted ISO file, USB flash drive, or other installation media might fail in case your PC doesn’t meet the minimum hardware requirements or has compatibility issues.
You can try the following fixes:
- Check hardware compatibility requirements.
- Update the device drivers before upgrading.
- Disable Secure Boot temporarily.
- Clean boot before ISO installation.
- Use Windows 11 Installation Assistant instead.
How to Manually Download and Install Updates?
You can manually download and install Windows 10/11 updates using the Microsoft Update Catalog. First, you need to identify the specific KB number (for example, KB5063060) your OS is missing. Next, enter that update number into the search bar to find it, then click the download button to get the update file and deploy it.
How to Use Windows Troubleshooters?
When your Windows 10/11 does not automatically deploy the latest updates for one reason or another, the built-in troubleshooters are extremely helpful and effective at detecting and resolving the root causes of the issues without requiring advanced repair methods.
They work by automatically scanning your OS system, identifying existing problems, and restoring normal update functionality by fixing corrupted files, stuck services, and broken Windows components.
For instance, the Windows Update Troubleshooter is highly effective in resolving the most common and basic problems that prevent your update installation process. This tool checks for failures related to your Windows Update services, background transfer dependencies, or incorrect configurations that may potentially be causing update failures.
System File Checker (SFC) scans your system files one by one to identify if they are damaged or corrupted, then it automatically repairs them using cached and known-good versions. The tool creates a detailed log file that documents which files were repaired during the process. After running such a scan, and if the identified problems are resolved successfully, you will be able to update your Windows 10/11 as usual, without the annoying errors or failures faced earlier.
Deployment Image Servicing and Management (DISM) is the most advanced troubleshooter compared to the others we discussed. It is capable of restoring the health of the entire Windows image and repairing protected system files that are essential for system stability.
In most cases, this process must be executed when the Windows Update troubleshooter and SFC scan have failed to resolve the issue, causing constant update failures.
Full Microsoft documentation of troubleshooting Windows Updates.
How to Repair Windows Without Losing Data?
To repair Windows 10/11 without losing your important files and applications, you can use the following three methods that work flawlessly: Reset this PC, in-place upgrades using an ISO file or System Restore.
Below you will find a step-by-step guide for each of them that is easy to follow:
Reset this PC
This is the quickest solution, which works by reinstalling Windows 10/11 without losing your documents, photos, apps, and other valuable data. To do it, just follow these simple steps:
For Windows 10:
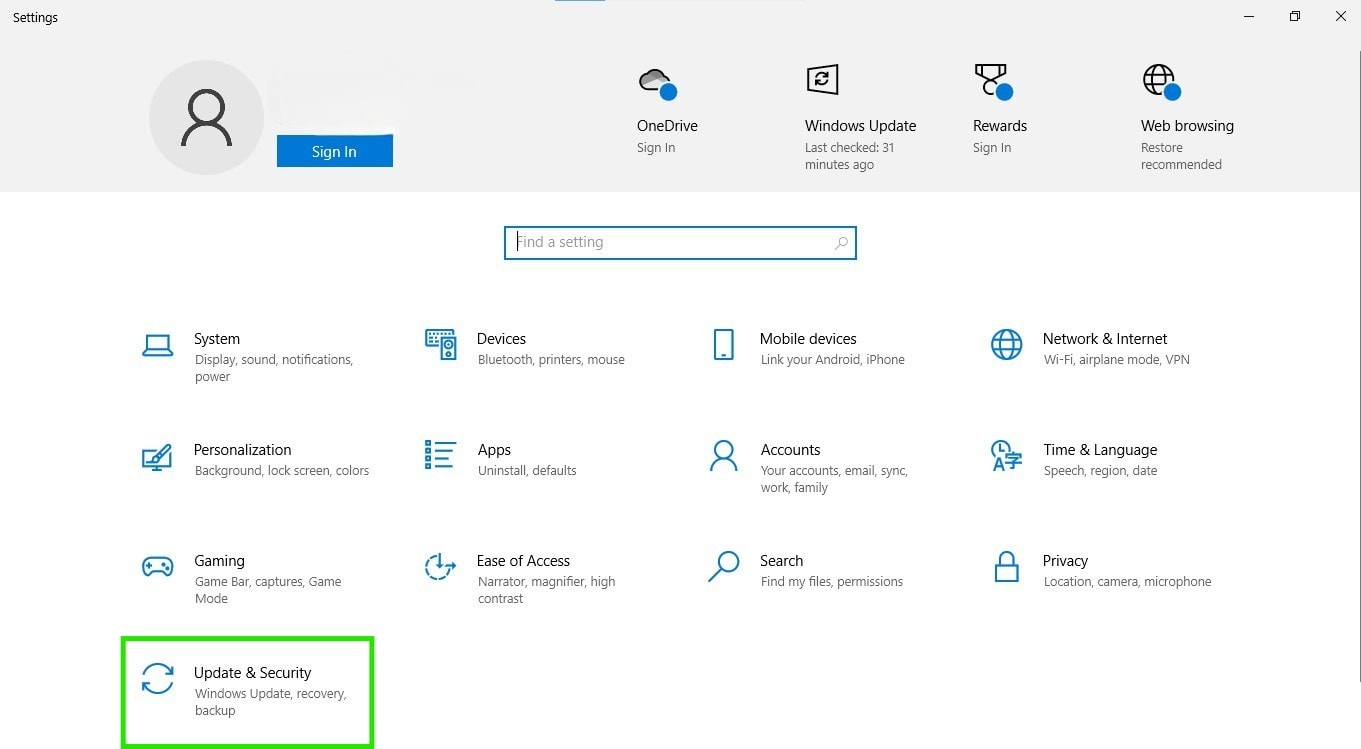
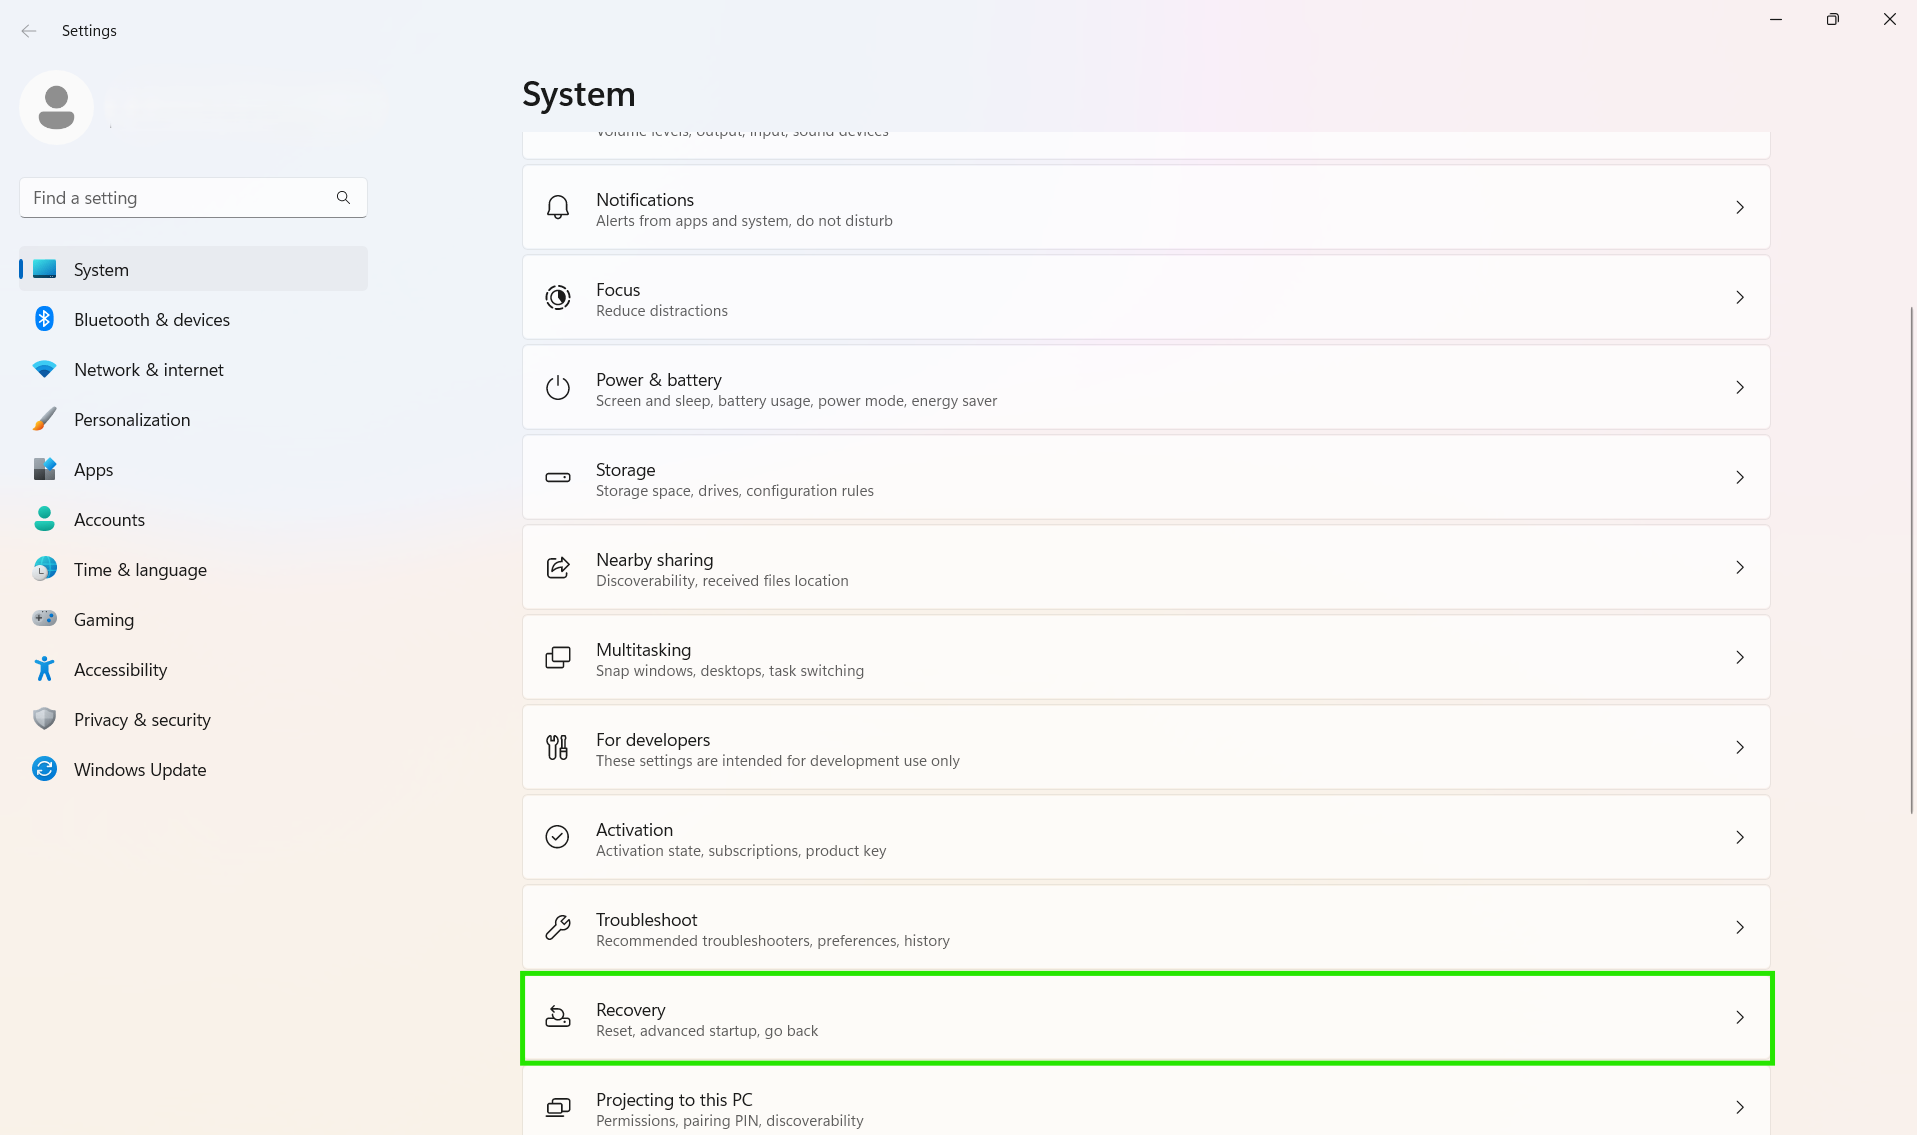
- Step 1. Access the settings menu by pressing the Windows key + I.

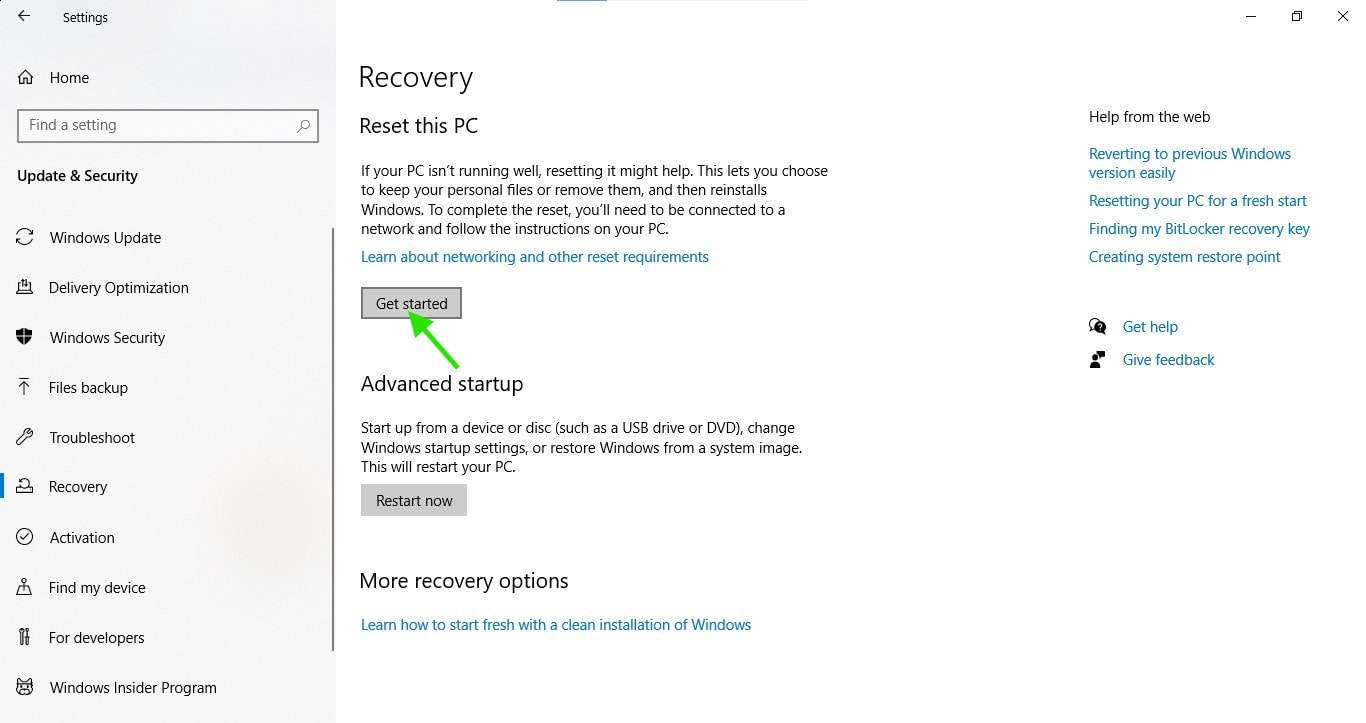
- Step 2. Go to “Update & Security,” and then select “Recovery.”
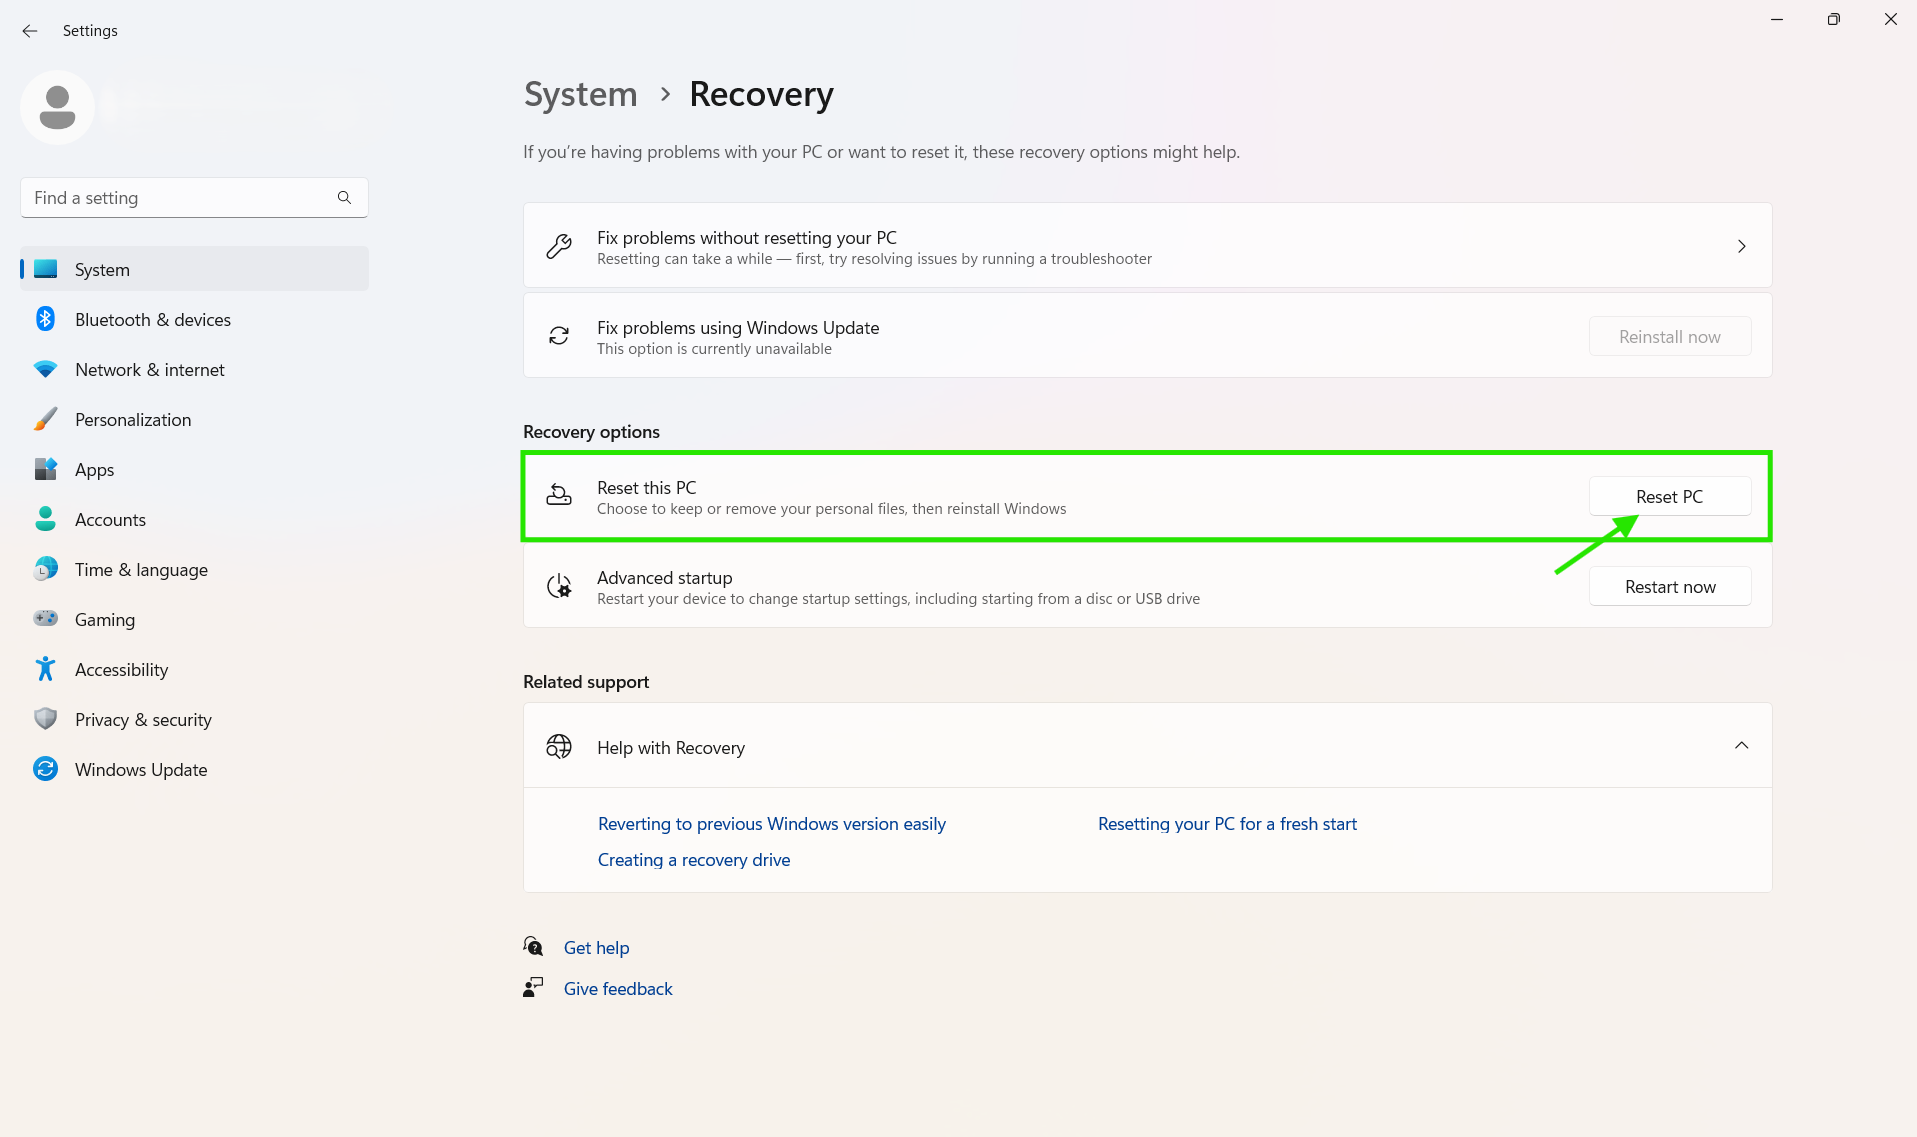
- Step 3. Now you must see the “Reset this PC” option. Click “Get Started.”
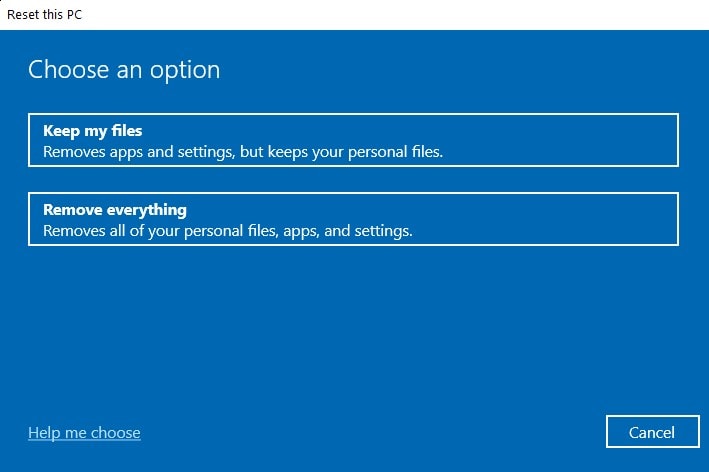
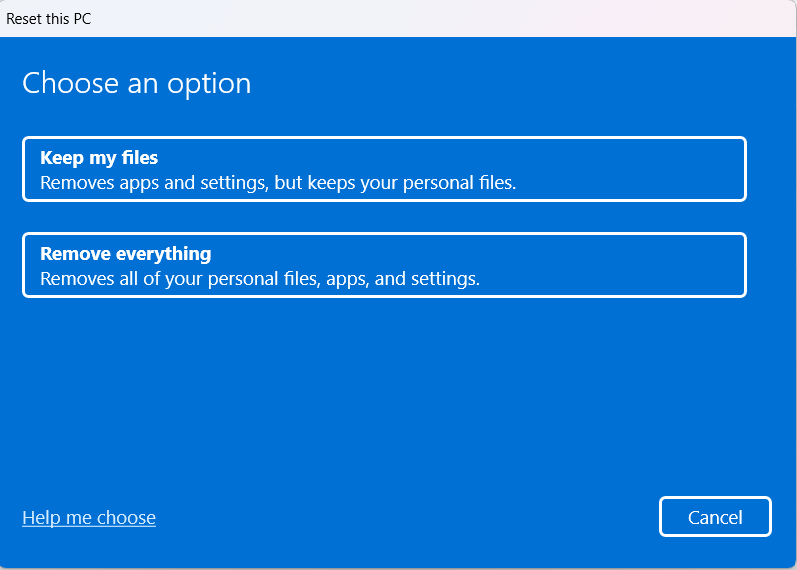
- Step 4. Once the wizard is started, select “Keep my files.”
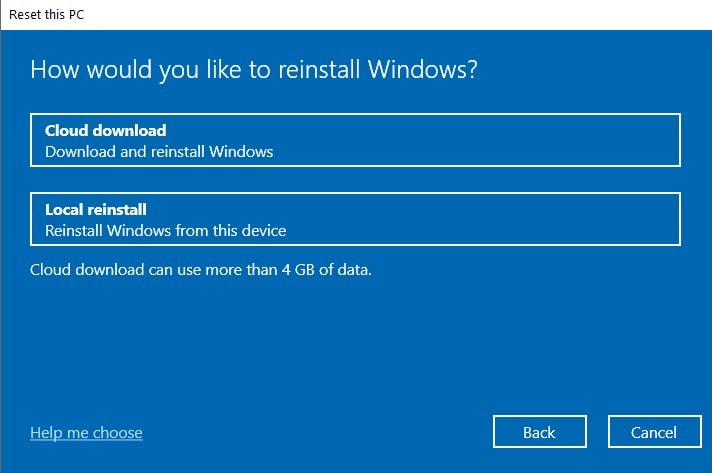
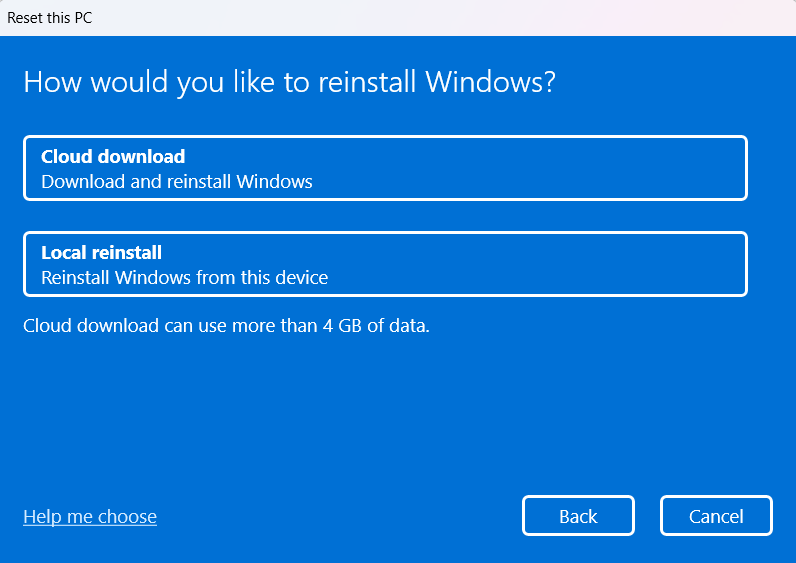
- Step 5. Choose between a “Cloud Download” or “Local Reinstall,” select one of the options that works best for you.
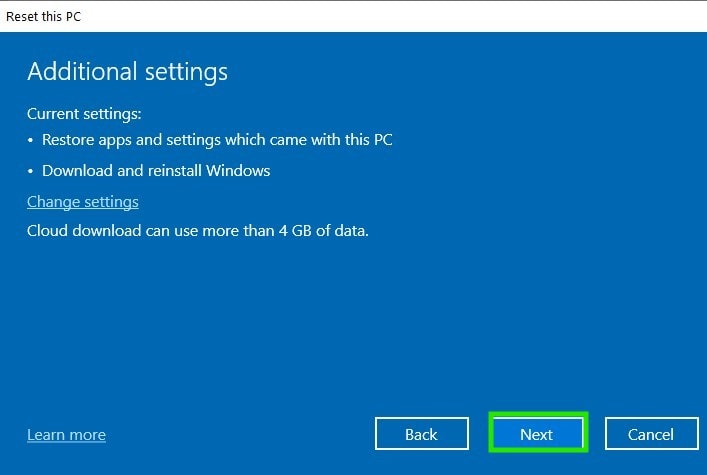
- Step 6. Now you must confirm the settings, or in case you want to modify them, select “Change settings,” then click “Next.”
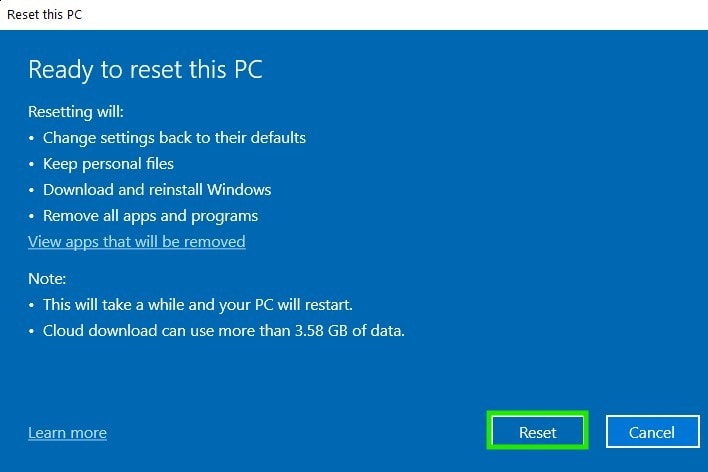
- Step 7. Click “Reset” to begin the process, but keep in mind that it might need 1-2 hours to complete.
For Windows 11:
- Step 1. Press the Windows key + I to open Settings.
- Step 2. Select “Recovery.”
- Step 3. Click “Reset PC.”
- Step 4. Once the wizard is started, select “Keep my files.”
- Step 5. When asked, “How would you like to reinstall Windows?” you can choose between “Cloud Download” or “Local Reinstall,” so select one of the options that works best for you.
- Step 6. Now you must confirm the settings. If you want to modify them, select “Change settings,” then click “Next.”
- Step 7. Click “Reset” to begin the process, but keep in mind that it might take 1–2 hours to complete. Make sure you have enough time to monitor the process until it finishes.
In-place upgrade using ISO file
This is the most effective and reliable repair option, since it is reinstalling your Windows 10/11 over your existing installation while at the same time keeping all of your files, applications, settings, and even desktop shortcuts.
You can start the process by following these steps:
- Step 1. Download the Windows 10 or Windows 11 ISO file from Microsoft’s website or create installation media using the Media Creation Tool.
- Step 2. Mount the ISO file by double-clicking it (or right-clicking and selecting “Mount”), then run setup.exe from the mounted drive to start the Windows upgrade process.
- Step 3. Accept the license terms when prompted by the wizard.
- Step 4. Select “Keep personal files and apps” during the installation setup.
- Step 5. Follow the on-screen prompts to complete the upgrade process, which takes 2–4 hours.
Use System Restore
System restore works by rolling back your system to a specific previous point in time, when your PC worked perfectly without the issues you are facing now. By reverting recent changes that might have been the root cause of the problems, you can restore the normal functionality of your Windows 10/11 while keeping your files, apps, and settings without needing a clean install.
However, keep in mind that you may lose some files that were uploaded to your computer after the restore point was created. It is a good idea to check the date the restore point was processed and back up any file changes after that date to eliminate the possibility of losing them.
To process a system restore on Windows 10/11, follow these steps:
- Step 1. Type “Create a restore point” in the Start Menu search bar.
- Step 2. Click “System Restore” in the System Properties window that opens.
- Step 3. Select “Choose a different restore point” and then click “Next.”
- Step 4. Pick a restore point date before your problems began.
- Step 5. Click “Next” and then “Finish” to confirm your selection.
- Step 6. Allow the restoration process to complete, but keep in mind that it might take 15–45 minutes.
How to Avoid Update Issues in the Future?
To avoid update issues in the future, make sure you have enabled the system restore option to allow your computer to automatically create backups of your valuable files like photos, documents, videos, applications, and even system settings. This will provide you with an option to restore your Windows 10/11 to a healthy state in case you face any issues.
Using third-party backup software is another life-saving option that successfully protects your data from being lost for good. Many vendors offer high-quality backup software that provides you with flexible options and successfully creates an exact replica of your files.
However, if you prefer not to pay for such software, consider investing in an external hard drive or similar media to regularly back up your data on it. But keep in mind that this approach will only protect your personal files, since it can’t back up your apps.
FAQs
Can I repair Windows without reinstalling it?
Yes, you can fully repair Windows 10 or Windows 11 without needing to reinstall it. Using tools like SFC, DISM, and System Restore can help you fix corrupted files, restore your operating system to a healthy condition, and roll back your entire computer to a state before the issues occurred. Fortunately, this happens without affecting your personal files or apps. For the most severe problems that can’t be resolved by the aforementioned methods, an in-place upgrade using a mounted ISO file lets you fix or entirely reinstall malfunctioning system components, of course, while keeping all of your stored data.
What’s the best way to troubleshoot update errors?
The best way to troubleshoot update errors is by giving a shot first to Windows Update Troubleshooter to fix the problem. If it does not succeed, try running SFC and DISM to repair corrupted system files and restore Windows integrity. If update services are stuck, the key to the solution might be in manually resetting the update components, since this commonly resolves the issue. In case these approaches don’t work as expected, an in-place upgrade can refresh and repair your system and the faulty components without deleting your apps or personal data.
Should I upgrade to Windows 11 from 10?
Yes, you should upgrade to Windows 11 from 10, because the newer OS offers a better user experience through introducing an improved UI, performance enhancements, and more advanced integration with Microsoft Defender and the latest virtualization-based security features. However, before starting the upgrade, make sure your computer meets the minimum hardware requirements for that version of Windows to avoid unexpected issues across the process.
How do I know if a Windows update is stuck?
You can tell if a Windows update is stuck when the progress percentage bar doesn’t move for more than 30 minutes, or when the system freezes on the “Installing updates” or “Preparing Windows” screen.
Summary and Key Points
Windows 10 and 11 update failures are way too common for what we would like; the disturbing fact that they can compromise our system’s security and performance or even become a reason for data loss is only making things worse. Thankfully, there are various fixes you can use to restore the proper functionality of your OS without requiring a clean install or losing valuable data.
When automatic updates fail to download and install critical updates or get stuck at 0%, the most common reasons for that are corrupted system files, malfunctioning Background Intelligent Transfer Service, and conflicts with third-party security programs, like your antivirus, that prevent the system from being able to start downloading the necessary updates.
If experiencing such issues, you must start with the basic restore methods, like running Windows Update Troubleshooter, and other more advanced approaches, like using SFC and DISM, which can successfully scan and repair damaged system files. These useful built-in tools fix problems ranging from simple service interruptions to complex system corruption that cause Windows 10/11 update failures.
Common update issues like persistent error codes, silent update failures, and stuck updates at 0% are most likely caused by insufficient storage space, metered network connections, or malfunctioning update components.
The key to solving these specific issues may be restarting Windows Update services, clearing temporary files from the SoftwareDistribution folder, deleting large apps and files to free disk space, and resetting update components through PowerShell commands.
For the most severe issues that cannot be fixed through these methods, there are three other options to repair your system without losing your data: “Reset This PC,” in-place upgrade using ISO installation, and System Restore.
On the other hand, manual update installations through the Microsoft Update Catalog provide an alternative when automatic updates fail for one reason or another, allowing you to directly download and deploy the missing updates to your Windows 10/11.
To avoid future problems, keep in mind to regularly create system restore points, use third-party backup tools, or use an external hard drive to manually back up your data.
Streamline Your Update Management with Action1
Action1 is a cloud-native autonomous endpoint management platform that successfully strengthens the security posture of on-premises and remote devices across your network. Once installed, the software identifies all of the existing vulnerabilities, lists available updates and patches, prioritizes them based on CVSS score, severity, and potential business impact, and enables you to automatically deploy them to remediate these software flaws.
Action1 offers flexible scheduling, intelligent phased rollouts by using update rings, a privately maintained software repository, 100+ built-in customizable report templates, and RBAC to help you keep your devices up-to-date, compliant, and protected from unauthorized access.
With it, you can have peace of mind, knowing that Windows 10/11 and third-party software updates won’t get stuck or fail for one or another reason, since all of them are being delivered from the privately maintained repository. To prevent bandwidth constraints, Action1 uses P2P update distribution, which downloads only once a particular update and then shares it across your entire network.
On top of that, Action1 is free for up to 200 endpoints, meaning that you receive enterprise-grade protection for your business at no cost. You can either use it in your small business or test it as long as you want in your enterprise before making a subscription. Since the platform is cloud-native, you can seamlessly scale from a hundred to hundreds of thousands of endpoints at a gradually lower per-endpoint price.
Make the smart move today, and equip your organization with an update management solution that just works! Improve your security posture, ensure regulatory compliance, and reduce your attack surface by starting to use Action1. One thing is for sure: you and your team will love it, while cybercriminals won’t.
Read also: How to Install Windows Updates Remotely?


